When I shared the runway lesson with you in the June 2016 posts, I talked about constructional training. That’s where you teach the skills you’ll need for a particular task BEFORE you need to use them. Before you build a house – or even a birdhouse – you must first learn how to use a hammer.
That’s what we’re doing with the mounting block lesson. I’m going to use the “Why Would You Leave Me?” game to teach my horse the skills he’ll need to line himself up to the mounting block BEFORE I take him anywhere near the mounting block. (Refer to the previous installment of JOYFull Horses: https://theclickercenterblog.com/2016/07/27/ and Lesson 5 in the Click That Teaches DVD Lesson Series: “The Why Would You Leave Me?” Game)
In training we talk about breaking each lesson down into smaller steps so it becomes easier for your learner to understand what is wanted. Constructional training is another way of looking at this basic teaching strategy. What are the skills you need for the task at hand? Do you have those skills? Yes, then the task will be within your reach. No, then build the skills first.
When you build skills first, you find that each new thing you ask for is really just an easy step beyond what you already have. So before I play what I refer to as the “capture the saddle” game, I first build the skills I’ll need for this lesson via the “why would you leave me?” lesson.
Capture the Saddle – A Targeting Game
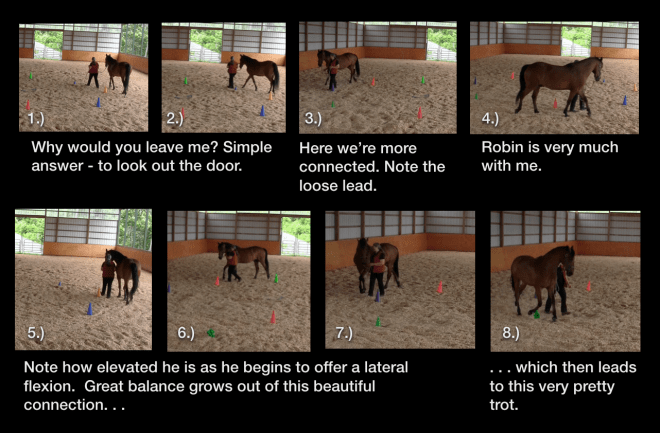
Photo 1.) Why would you leave me? At this point in the lesson, Robin’s answer would be: I can’t think of a single reason. I’m happy to stay right here by your side.
Why would you leave me? Answer: I can’t think of a single reason. I’m happy to stay right here by your side.
When that’s the answer, you have a horse who is ready to walk with you to the mounting block.
I’ve pulled some photos from a video of the “capture the saddle” lesson. The resolution isn’t the greatest since they come from a video, but they illustrate well how the lesson works. The horse I am working with is a young haflinger who didn’t know how to stand well for mounting.
Photo 2.) Getting a Baseline.
His owner didn’t use mounting blocks so this was a new concept for him. When she asked him to stop with her beside the mounting block, he kept going. He ended up facing in the opposite direction. Previous experience had taught him that it was a good idea to keep the saddle well away from her. This is a very common scenario, one many riders have to deal with.
Photo 3.) This is a horse who doesn’t understand mounting blocks.
We can’t expect this horse to understand instantly what is wanted. Instead we went through the steps that would teach him how to line up next to a mounting block so his rider could easily get on.
Photo 4.) We want to go from this . . .
Photo 5.) . . . to this.
We weren’t just teaching him to line up next to a mounting block. That could easily have been done with targeting. He was also learning how to soften and respond to rein cues. That’s an important extra that this lesson gives us. His owner reported that he was an incredibly wiggly horse who was very difficult to ride. BEFORE she gets back on, the mounting block lesson will help him to be better balanced and more connected to her.
6.)
7.)
8.)
Photos 6-8
Photos 6-8.) The three photos above show how I begin with the “Why would you leave me?” lesson. He’s learning to walk with me. Note, as I approach the mounting block, I am not holding onto the reins. I want him to stop with me as I step up onto the mounting block.
Photo 9
Photo 9.) He doesn’t know this part of the lesson. He’s not expecting to stop at the mounting block, so he over shoots the mark. That’s okay.
I could teach this part of the lesson in many different ways. I could use targets and mats to help him out, but remember, I want to prepare this horse for riding. Riding includes not just all those times when things are going great. It also includes the sudden scares that can send even the most solid of riding horses jumping to the side.
The mounting block lesson confirms that your horse understands how to respond to your rein cues. It provides an essential safety net for those times when things are going wrong, and it is also a core building block for creating the great performance we all dream of having when things are very right.
10.)
11.)
12.)
Photos 10-12
So in photos 10-12, I have taken the left rein, and I am asking this horse to soften and bend his nose towards me. That causes his hips to swing out away from me. Essentially his front end is stopping before his hind end. The extra momentum from his hind end causes him to swing around to the front side of the mounting block. In horse training language he is yielding his hips.
He has ended up facing in the opposite direction from the one in which we started. (Photo 13) That’s more than okay. I’ll first ask him to take a step or two back so I can easily reach the right rein.
13.)
14.)
21.)
22.)
Photos 13-16
Next I’ll have him soften and come around me on his right rein. (Photo 14) As he swings back to the opposite side of the mounting block, I’ll again ask him to take a step back. (Photo 15) This does two things. It helps him to rebalance, and it gives me access to the left rein. (Photo 16)
By the time I get on, I will know that he will soften and yield his hips to both reins. Many people get in a hurry with this lesson. They become too goal oriented. They are thinking only about getting on. I am thinking about the ride ahead. I want it to be safe. That’s first and foremost. And then I want it to be fun – for both the horse and the rider. That’s not going to happen if the horse is out of balance and disconnected from his rider. So the “capture the saddle” lesson is really one that should be process not goal driven. Yes, I want my horse to line up next to the mounting block, but it’s not a race to see who can teach this the fastest. Each time this horse swings wide, he’s giving me another opportunity to explain rein cues to him.
As he comes past me again on his left side, I let go of the rein and reach out towards the saddle. (Photo 17) He’s not ready to let me get to the saddle. In the photos below you see that he swings wide again. (Photos 18-19) That just gives me another opportunity to ask him to soften to the right rein. (Photo 20)
At no point in this do I want the horse to feel as though I am punishing any of his responses. This is about teaching him WHAT TO DO. It is not about blocking or stopping unwanted reactions.
17.)
18.)
19.)
20.)
Photos 17-20.)
As he swings past the mounting block, I can again ask him to take a step or two back. (Photo 21) This helps him to rebalance, and it also gives me access to the left rein. I’ll ask him to step forward to line up along side the mounting block. (Photo 22)
21.)
22.)
Photos 21-22
As he comes past me again on his left side, I LET GO OF THE REIN. (Photo 23)
Photo 23.)
This is very important. I don’t want to block him to make him stand still. Remember always – you want energy. You want your horse to move his feet. This lesson redirects his energy. It doesn’t block it. You are releasing him into a halt, not stopping him from moving. There is a huge difference. (I’ll refer you again to my books and DVDs for a more in depth discussion of this very important concept. Visit theclickercenter.com)
As I release the rein, I am reaching up to touch the saddle. (Photo 23) Click and treat. (Photo 24.) The clickable moment for this phase of the lesson occurs as my hand makes contact with the saddle. So this lesson begins with rope handling and ends with targeting.
Photo 24.)
I’d like him to come forward half a step so he is in a better position for me to get on. I use the left rein to ask for this step. (Photo 25.) As he begins to respond, I again release the rein and touch the saddle. (Photo 26.) Click and treat. (Photo 27.) We’re making progress. This time he doesn’t swing away.
25.)
26.)
27.)
Photo 25-27.)
Photos 28-30.) I ask him for another small step forward. (28.) This time when I reach out for the saddle, he’s in perfect position. (29.) Click and treat. (30.)
28.)
29.)
30.)
Photos 28-30.)
Remember though, it isn’t so much about the goal of lining up next to the mounting block as it is about his response to the reins.
So far I have clicked and reinforced him just for letting me make contact with the saddle. Now I am making it harder. I have stepped all the way up onto the mounting block so I can lean down onto the saddle and add some weight. I’m really seeing if I can “capture it”. (Photo 31.)
(Photo 31.)
(Photo 32.) The answer is – not yet.
(Photo 32.)
He swings wide out from under my hands. Again, this is okay. It gives me another opportunity to ask him to soften and yield his hips. All of this bending and connecting to the rein helps him to become more supple and better balanced. That’s going to help him be more connected to his rider.
So as he swings around past me on the left rein, I’ll again ask him to rebalance by taking a step or two back, and then I’ll bring him back in front of me first on the right rein, and then on the left. (Photos 33-36.)
33.)
34.)
35.)
36.)
Photos 33-36)
As he passes the mounting block, I again let go of the rein and reach for the saddle. (Photo 36.) He’s better balanced than he was in the first couple of passes, and he’s in a much better position. It’s easy for me to touch the saddle. This time I can really grab the saddle. (Photo 37.) Click and treat. (Photo 38.)
37.)
38.)
Photos 37-38.)
I use the word grab because I don’t want to be delicate in this. I want this horse to really feel me taking the saddle in my hands. This is the target position. As soon as I have both hands on the saddle – Click!
39.)
40.)
Photos 39-40
I’ve asked him to go forward another step (Photo 39.) and this time he swings a little too wide so I can’t reach the saddle. (Photo 40.) The pattern should be familiar by now. I ask him to swing back around via the right rein, (Photo 41.) then I bring him forward past me on the left rein. (Photo 42.)
41.)
42.)
43.)
44.)
Photos 41-44
He comes in really close to the mounting block. It’s easy to capture the saddle. (Photo 43.) Click and treat. (Photo 44.) This isn’t an ideal orientation for getting on, but we’re making good progress.
I ask him to come forward one small step. This adjustment puts him into a great position for me to get on. Click and treat. (Photos 45-47.)
45.)
49.)
47.)
Photos 45-47
He’s made great progress. We’ve gone from the photo on the left (48) to the one on the right (49) in just a couple of passes.
48.) We want to go from this . . .
49.)
Photo 48-49
It’s time for a break.
Photo 50
I’ve gotten down from the mounting block. (Photo 50.) We’re going to walk a large “why would you leave me?” circle back to the mounting block. Remember that means I’ll be asking him to walk beside me without my needing to take the reins to keep him with me. (Photo 51.)
51.)
52.)
53.)
54.)
Photos 51-54
I approach the mounting block hands free. (Photo 51.) As I step up onto the mounting block, he stops on his own. (Photo 52.) He’s brought the saddle into perfect position. I can really grab hold of the it and truly capture it. (Photo 53.) Click and treat. (Photo 54.) This is a horse who is telling me he’s ready for me to get on.
As the horses figure out that they get clicked for bringing the saddle to our waiting hands, they become increasingly clever about lining themselves up to whatever we are using for a mounting block.
It’s great fun having your horse bring the saddle to your waiting hands. (Photo 55.)
55.) This horse is bringing the saddle to his rider’s waiting hands.
Photo 55
Sometimes a horse will misjudge the approach and ended up slightly angled out to the side. You know he has truly understood the lesson when, without any prompting from you, he steps sideways so he can bring the saddle to your waiting hands. That’s a horse who really understands the game. Click and treat.
As this video shows, sometimes a mounting block is a tree stump, or in this case a metal gate. When a horse understands the capture the saddle lesson, he will line himself up to anything you treat as a mounting block.
If you have a horse who dances around a mounting block, this lesson will definitely help you. But please note: this article began with a discussion of constructional training. The more preparation you bring to it, the easier the lesson will be.
The preparation goes beyond the “Why Would You Leave Me?” Game. It’s a matter of looking at what comes before what comes before the lesson you want to work on.
What comes before the “Why would you leave me?” Game? Lots of preparation. That’s prep for your horse AND prep for you. Anytime you use a lead or reins, you want to practice first without your horse so your handling skills are horse-friendly and clicker compatible. The how-to instructions for using reins and leads is beyond the scope of this single article. For that please visit: theclickercenter.com and theclickercentercourse.com
Coming Next: Cue Communication Part 5: Grand Prix Behaviors
Remember, if you are new to the JOY Full Horse blog, click on the JOY Full Horses tab at the top of this page to find the full table of contents and links to each of the articles I have published so far.
I hope you will want to share these articles by sending links to this blog to your friends. But please remember this is copyrighted material. All rights are reserved. Please do not copy any of the “JOY Full Horses” articles without first getting written permission from Alexandra Kurland, via theclickercenter.com
Also note: these articles are not intended as an instruction guide for introducing your horse to clicker training. If you are new to clicker training and you are looking for how-to instructions, you will find what you need at my web sites:
Author’s note: I’ve been publishing my new book, JOYFull Horses in this blog. This post is different. July was packed with great training adventures. I wanted to share, so this is a slight divergence from the JOYFull Horses posts. Enjoy! Alexandra Kurland
Bridges
When I was in eighth grade, my science teacher set up a competition in the class. Given the same components (balsa wood and toothpicks) each student was to build a bridge which would then be tested with progressively heavier and heavier weights to see which bridge was the strongest. It was a great assignment. Or it would have been except the competition was open only to the boys in the class. What did the girls do instead? Our assignment was to create a stain booklet showing how best to remove different types of stains from soiled clothing.
This sounds like the dark ages, but it was really not that long ago. I’ve been thinking about that science teacher this week because of the Democratic National Convention. I was traveling last week so I missed most of the Republican convention, or I would have been writing about that, as well. I’m one of those people who actually enjoys listening to political speeches (at least the well-crafted ones). I like talking about politics, even – and especially – with people who have views that differ from my own. I try not to mix too much politics into what I write about horse training, but every now and then it is important to pause for a moment and step outside the barn door.
One of the clips the news feeds played from Tuesday night’s roll call vote was that of a delegate who was 102 years old. She was born before women had the right to vote. That stopped me in my tracks. I know the 19th Amendment granting women the right to vote was ratified in 1920, but that’s just an abstract date. Hearing her speak made me realize that there are many women alive today who were born into a world in which their mothers were not allowed to vote. It brought home to me how recent these changes really are, and how important it is that finally, finally we have a woman nominated to run for president of the United States.
Whatever you may think of Hilary Clinton, however you are planning on voting in the fall, this is a milestone that is worth celebrating.
In eighth grade the boys in my class took shop. They learned how to work with power tools. The girls took home economics. We learned how to cook what was at the time considered a healthy meal: chicken ala king – essentially a can of cream of chicken soup poured over chow mein noodles. Curious the things we remember. We were to fix it for lunch and serve it to the boys in the class. As a vegetarian, I refused to participate. I was allowed to skip the preparation of the main dish and was relegated instead to making a salad – iceberg lettuce and tomatoes. We then had to serve what we had made to the boys in the class.
The message was clear. The world may have been changing. Many of our mothers had advanced degrees from universities. They were working outside the home in professional jobs that only a few years before would have been closed to women, but we were still expected to be homemakers not world changers.
The school gave one message. My family gave me a stronger one. We can create our own realities. I wasn’t allowed to build a bridge in that class, but that didn’t keep me from building them later. You can walk over my bridges without any fear of falling because they are bridges that link what we knew then about how to handle horses with what we know now.
Bridge Builders
This month I had the very great privilege to meet some other bridge builders. One of the most surprising was a lion trainer I met in Germany. I’ll bet you weren’t expecting that one!
I’m just back from attending Anja Beran’s annual workshop on classical dressage. Anja has a long standing relationship with the Krone Circus. She trains their dressage horses. The horses stay with her for roughly eight years, and then they are sent to the circus where they continue to perform well into their twenties. When we walked through the barns at the circus, we saw horses who were 25, 28, even 30 years olds. They all looked great. They were a good weight, with healthy backs, clean legs, shiny coats, and brights eyes – and they were all still performing.
That was one of the main messages from both the circus and Anja Beran’s workshop. When you build a strong foundation for a horse, you will have a horse who can stay sound and in work for many years to come. This has always been at the core of my work. My horses are family. It matters to me that the work I do with them isn’t just for my entertainment. It has to benefit them, as well. One thing Anja Beran and I share is a deep understanding that good training helps horses stay sound. Horses thrive when training is done well.
We hear so many sad stories of competition horses breaking down because they are rushed through their training. At the circus we met horse trainers who value a good foundation because they love their horses. Yes, they value performance – but not at the expense of the horses.
We also met Martin Lacey, a trainer who loves lions. In the morning before the circus opened to the public Anja had arranged for us to watch him work with his lions. I don’t think many of us were truly looking forward to this part of the program. Yes, it was lions, but we all had images of the old-style circus training with its cracking whips and sad-eyed lions.
Martin Lacey built a bridge for us into another world. He loves his lions. That was clear. He grew up in a family that owned several zoos in the UK. For him lions were part of his family. That’s how he talked about them. He had 26 lions and tigers with the circus, and all of them were animals he had known since they were cubs.
He showed us how he began their training, teaching them a very natural behavior for cats of any size. He had the lions follow a moving target stick. Correct responses were reinforced with meat held out to them on the end of the stick.
Everything Martin Lacey showed us was so very familiar. He used mats in very much the same way I use them for the horses. He arranged the environment so his lions were successful. He wanted to show people the power and graceful movement of the lions so he taught them to jump from one platform up onto the metal panels of their enclosure and then down to another platform. In the show it was very dramatic watching lion after lion leaping up onto the side of the enclosure. They would hang for a moment high over the heads of the audience before jumping down onto the next platform.
Lacey showed us how he taught this behavior. He begins by having his lions follow a target stick from platform to platform. When they are confident, eager jumpers, he has them leap from one platform onto a higher one that is hung from the enclosure wall. As the lions become confident with this jump, he slants the platform down slightly so now they are landing on a sloping surface. He lets them build their coordination and confidence at this level of difficulty, then he slants the platform down a bit more. Gradually over time the platform hangs straight down, but now the lions have the strength and the skill to leap directly up onto the vertical wall of the enclosure. It is just shaping through small approximations, something every good trainer understands.
Some of the behaviors Lacey teaches are based on very traditional circus tricks. He has his lions sit up on their haunches and swat at the air to show off their enormous claws. The behavior may be old-style, but how it is taught is not. When Lacey first teaches his lions to sit up, he provides them with an elevated T bar for them to rest their paws on. The T bar gives his younger lions the support they need to keep their backs straight while they are developing the strength and coordination to perform this behavior correctly.
The lion to the right of Martin Lacey is using her T bar for support as she sits up on her haunches. All the lions are orienting to his target stick.
He uses targeting to get them to reach up to the T bar in the first place. Once they can balance resting their forepaws on the bar, he teaches them to swat one paw at a time at a moving target. His skill at delivering timely food reinforcers was impressive, but shrink down the size of the feline, and you would see that any of us could teach our family cats this same behavior – in the same way.
In the show some of his lions still had the T bar set up in front of their station for support. With the youngest lions the T was very long giving them plenty of room on which to rest their paws. The ones who were further along had shorter horizontal bars. The T bar was gradually being faded out. In the show many of his lions could balance without needing any support.
To teach his lions to advance towards him as though they were charging, he used multiple mats. The lions moved from mat to mat to mat. I had to smile. I use multiple mats all the time with horses. When I teach horses to run towards me, to keep things safe as they add speed, multiple mats are a great tool. Predators, prey, it makes no difference. Good training is good training regardless of the species you are working with. One of the hallmarks of good trainers is they are masters at setting up the environment for success.
That was the bridge Martin Lacey was helping us to see. The planks of his bridge were made from the elements good trainers share. I know there are many who oppose the idea of keeping any animals in captivity, especially animals like lions. That’s a different conversation, one I’ll leave for another time.
For now, given that animals are already under our care, the question becomes: how do we manage them?
If Martin Lacey had come out cracking whips and using intimidation to control his lions, I would be the first to say, absolutely not. This shouldn’t be. But that’s not the relationship Lacey has with his lions, and because of that he is an important bridge builder. He is saying to all of us – look at the connection you can have with these animals, a top predator. It isn’t built out of fear.
If Lacey can create this with these lions, what excuse do we have for using violence to control our horses, our dogs, our children?
I think the jury is still out around the question of should wild animals be kept in zoos and circuses. Is it fair to them? What is the benefit to them, to us, to the planet? Where does the greater good fall? There are so many ethical questions involved, but one thing that was clear is Martin Lacey’s message is one we all need to hear. Whatever the species of animal you are working with, the core principles of good training apply. If he can stand in the center of an enclosure surrounded by lions, with a pouch filled with raw meat at his belt, and control them not through fear, but through understanding, that’s a bridge that is worth standing on. If he can do it with lions, we surely can do it with each other.
Classical Bridges
Anja Beran is another bridge builder. Her bridge stretches back centuries to bring classical riding into the modern world. Her bridge reaches forward into the future as she shows us how the gymnastic exercises developed by the great riding masters can be used for the benefit of horses. So many of the horses in her barn came to her severely lamed by training. Draw reins, heavy hands, rushed training – had compromised the soundness of so many of the horses that she presented during the workshop. With each horse, she showed us how slow lateral work can be used to restore soundness and create performance excellence.
I know there are many people who would say that we should not ride horses at all. But Anja was showing us something that I also know – good riding heals horses. Physically, emotionally, good riding is good for horses. I may add the clicker and all that it represents into my training, but at it’s core what we each teach is not that far apart.
The Science Bridge Earlier in July I also had the honor of spending time with yet another bridge builder, Dr. Susan Friedman. Dr. Friedman is a professor of Applied Behavior Analysis at Utah State University. Many of us know her through her presentations at the Clicker Expo, her web site – behaviorworks.org, and her on-line course, Living and Learning with Animals, a course for professional animal trainers and veterinarians. Earlier in the month Susan joined me at the Cavalia Retirement farm where we co-taught a workshop.
If Anja’s bridge links us to classical dressage, Susan’s links us to science. When I watch a trainer like Martin Lacey working with his lions, I am smiling not because he is using feel-good words. Lots of clinician-showmen know how to hide their actions behind soft words. I am smiling because I see good training being applied.
What is the measure of good training? Susan helps us answer that question through her understanding of scientific inquiry. She reminds us that science is always self-correcting. What we understood about animal behavior fifty years ago, ten years ago is changing because of the research that is being done. Science connects what I do with my horses to what Martin Lacey does with his lions. When one of my horses makes a mistake, I don’t punish him with a whip. I change the environment to make the lesson easier for him to understand. Martin Lacey does the same thing with his lions. Why have we both chosen to avoid punishment and maximize positive reinforcement in our training? Susan’s bridge takes us to that answer.
It’s easy to nod your head and say, yes, yes, of course we should use positive reinforcement, but so often what we have had modeled for us is punishment. You might be reading this thinking that it’s horrific to have animals in captivity. What do you do? What actions do you take? Do you respond to this post by attacking me? If so, you are acting like an old-time lion tamer cracking his whip and using punishment to suppress behavior.
Susan built for us a very different bridge. Throughout the weekend, in so many different ways, through her stories, her teaching, her thoughtful modeling, she showed us how to be completely congruent with the ethics of positive living. It is all too easy to let a thoughtless word here, a careless action there erode a relationship. Susan modeled for us so brilliantly how to live a life that leaves people shining. She takes care to give every individual the positively-oriented support, attention, and modeling they need. That’s not just a bridge, it’s a gift.
My eighth grade science teacher didn’t build bridges. Instead he broke them down – literally. When the boys brought their balsa wood bridges into class, he kept adding weight to them until, one by one, they all broke.
He broke other kinds of bridges. For many in that class he broke the bridge into the sciences. And most importantly he broke the bridge into kindness. The behavior he modeled was that of a bully. He used ridicule and punishment to control his class, and he ended up being universally disliked by his students. He was a dictator not a bridge builder.
In this world we need people who build bridges, not the ones who tear them down. When you find someone who is a good bridge builder, that is someone you want to get to know better.
Thank you Susan, Anja, and Martin. I hope life brings me many opportunities to get to know each of you better.
In the previous section I described how I taught Peregrine to line himself up to a mounting block. He was already an experienced riding horse who was familiar with mounting blocks so this was an easy lesson. I used two targets to bring him into position. The first brought him to the mounting block and the second took him forward a couple of steps so he ended up positioned exactly where I needed him to be in order to get on.
Capture the Saddle
I teach the mounting block lesson very differently these days. The lesson is called: “Capture the Saddle”. (Refer to Lesson 11 in The Click That Teaches DVD Series: “Capture the Saddle”.) It begins with rope handling and directed learning and ends with targeting. I teach it in this way because I regard the mounting block lesson as a final safety check before a rider gets on. The lesson shows how well connected you and your horse are to one another. BEFORE you get on and need to rely on them for your safety, it confirms that you BOTH know how to communication via the reins and are comfortable with their use.
A horse that has been well prepared with good ground work will breeze through this lesson. The prerequisite is a lesson that I have named: The “Why Would You Leave Me?” game. I will refer you to the DVD of that name for the details on how to teach this lesson. (This is Lesson 5 in The Click That Teaches DVD Lesson Series)
The “Why Would You Leave Me?” Game
The overall description is this: the handler sets out a circle of cones and then leads her horse around the circle. The basic question is: can the handler let go of the lead/rein and have her horse stay with her like a dog heeling at her side? Or when she let’s go, does her horse wander off the circle, lag behind, rush ahead, or push into her to cut across her path? Where is his attention – with her or elsewhere outside of the circle?
Robin has his attention on me as we walk around the “Why Would You Leave Me?” circle.
It doesn’t matter if the horse can do this perfectly at liberty, wearing nothing on his head. Lots of things change when a horse is “dressed” for riding. The horse that walks beautifully by your side when he’s wearing nothing, may become an anxious freight train when he’s wearing a bridle.
Some people may jump to the conclusion that a horse who becomes anxious when he’s wearing a bridle dislikes having a bit in his mouth, but that may be a red herring. If we went back to that horse’s first encounter with a bit, we might discover that he was one of those youngsters who always seemed to have something in his mouth. His handlers were forever taking lead ropes, brushes, halters out of his reach. If you left anything close enough to grab, he would have it in his mouth. So when he was offered a bit, there was nothing unpleasant about it. It was something he could put in his mouth, and finally his people didn’t snatch it away from him!
But then the reality of riding set in. Riders bounced uncomfortably on his back. His saddle pinched his shoulders, and worst of all, when he guessed wrong or headed off in his own direction, his riders jerked on the rein so the bit hurt his mouth. It wasn’t long before someone approaching him with a bridle became a predictor of unpleasant things to come.
Of course, this isn’t the only outcome for riding. The sight of the bridle can mean a fun clicker game is about to begin. But for a horse who has been ridden with corrections, the bridle often triggers unpleasant associations.
You could decide to work exclusively at liberty, or you could help this horse out by explaining away his anxiety about halters, leads, bridles, and saddles. Every time you explain away a fear, you remove a potential source of stress for your horse. That’s a process that’s worth doing.
Expectations
When I first get on a horse, I like to walk off from the mounting block on a loose rein. (And yes I do use mounting blocks. I feel very strongly that they are a courtesy to the horse. They save strain to his back. You save strain to yours, and you protect your saddle from becoming twisted.)
I want the horse to stand patiently at the mounting block until I signal to him that I am ready for him to walk off. I’ve watched too many horses who barely let the rider settle into the saddle before they take off. The rider is snatching up the reins and blocking the horse before they’ve even gone two steps. The horse protects himself by throwing his head up and tightening his jaw which then hollows his back. The ride has barely begun, and already they are in a training hole. It’s a long way from play for either horse or rider.
When I get on, I expect my horse to wait patiently while I get myself organized and settled into the saddle. I appreciate these good manners, so I always click and treat the horse for standing well. I’m sure there will be some who feel that the horse should not need to be be reinforced for behavior that he knows well, but I like to say “thank you” by marking good responses with a click and a treat. It costs so little to maintain this ritual. I ride with clicker treats at the ready. Offering one as a thank you takes no real effort, and it means that my horses can be trusted to stand quietly at the mounting block.
When we are ready, I cue the horse to walk off. I want him to walk off on a loose rein. On a green horse, this may not be possible. Two steps on from the mounting block I may be picking up the rein and sliding down asking for the hip, but the goal is to have a horse who leaves the mounting block in an energetic, but relaxed walk. The reins are long. I don’t want to be shortening them up and restricting the walk in any way.
This is important. It gives me time to evaluate how my horse is feeling on that day. Where is his back? Does everything feel as it should, or is there a stiffness or an uneven feeling that I need to be aware of? What is his energy level? How does everything compare to previous rides? Can I feel the effect of the previous lesson in the start-up? What is available to me? What do I need to work on? As Mia Segal (June 9, 2016 post) would say, if you know the questions, you have the lesson.
Walking Off Casually and the “Why Would You Leave Me?” Game
Walking off casually gives us time to come together as a riding pair. It gives me time to evaluate where my horse is on that particular day, both physically and emotionally. But walking off casually is not a given. It is something I have actively taught to my horses. It begins on the ground with the very first leading lesson and is further expanded upon in the “Why Would You Leave Me?” game.
This lesson is best taught on a circle. Every time the horse takes his focus away from the handler and begins to leave the circle, the handler slides down the lead and brings the horse back onto the circle. The handler is essentially asking the question: why would you leave me?
This is such an important question to ask. Are you leaving because the environment is too distracting? In that case perhaps the best option is to move to a less distracting location. And note the distractions could be from things the horse is afraid of and wants to get away from, such as a tarp that’s come loose over the shavings pile. Or it could be things the horse wants to go towards, such as grass or his pasture buddies.
Are you leaving because you are so full of energy that you can’t walk at my pace? Are you leaving because you aren’t balanced enough to stay on a circle? Are you leaving because you’re afraid of me?
Robin begins by being momentarily distracted by something out the back door, and ends with some lateral work and a beautifully balanced, connected trot.
These are all questions I want to ask and have answered before I put my bones up on the horse. That’s the purpose of the “Why Would You Leave Me” game. The end result will be a horse who walks with you without needing to be held there with a lead.
We begin on a circle so the loop keeps repeating itself. If your horse tends to crowd into you as you pass by the gate, and you missed noticing until he was already pushing you off the circle, don’t worry. You’ll come around to that point again, and you will be better prepared to ask for what you WANT him to do. Eventually, you’ll be able to leave the set pattern of the circle and walk complex patterns.
In this video Panda shows off her “heeling” skills. She’s working with Sue Bennett, one of the coaches for my on-line course. Sue and Panda have just met, but that doesn’t matter to Panda. She’s happy to stay connected. Why would you leave me? For no reason at all.
My thanks to my coaches: Michaela Hempen and Asfaloth for the bridling pictures; Monty Gwynne and Icaro for the mounting block; Sue Bennett and Panda for the heeling video (and Ann Edie for letting Sue play with her guide horse); and Robin for the “Why Would You Leave Me?” photos.
Also please note: I am not attempting to provide complete instructions for any of the lessons I have described in this post. Nor have I detailed how to ride in a way that is clicker compatible. That’s not the function of these posts. You will find very thorough instructions in my books, DVDS, and on-line course. Visit: theclickercenter.comtheclickercentercourse.com
Coming Next: Cue Communication Part 4: Capture the Saddle – A Targeting Game
Remember, if you are new to the JOY Full Horse blog, click on the JOY Full Horses tab at the top of this page to find the full table of contents and links to each of the articles I have published so far.
I hope you will want to share these articles by sending links to this blog to your friends. But please remember this is copyrighted material. All rights are reserved. Please do not copy any of the “JOY Full Horses” articles without first getting written permission from Alexandra Kurland, via theclickercenter.com
Also note: these articles are not intended as an instruction guide for introducing your horse to clicker training. If you are new to clicker training and you are looking for how-to instructions, you will find what you need at my web sites:
Behaviors Become Cues
In the previous section I wrote about Panda and the guide work she performs. Just as guide work made the perfect example for understanding environmental cues, it also shows so clearly how this back and forth cue communication works.
This is a particularly challenging form of curb for a guide because there is no clear difference between the end of the sidewalk and the start of the driveway, but Panda was always consistent at stopping where she should. Even when the surface was repaved, changing many of the familiar environmental cues, she was rock solid in her guide work. The driveway is the entrance to the parking lot for the district school buses so there was always a lot of traffic in and out. Stopping accurately at this crossing was essential.
When Panda gets to a curb, she stops. If it’s the up curb on the far side of a street crossing, she’ll put one foot up on the curb. This tells Ann not only that there is some sort of obstacle in front of them, but where to look for it.
Ann finds the obstacle by searching for it with her foot. She then cues Panda to go forward. Panda walks on. Ann may then tell her to trot on with a “hup, hup” verbal cue. Panda will increase her speed by breaking into a brisk trot. But she may then stop and pull to the side. Perhaps a pedestrian is coming in the opposite direction pushing a baby carriage and walking a dog. There isn’t room to pass, so Panda alerts Ann that there is “a situation” ahead by stopping and moving them over to the edge.
Traffic checks are another great example of cue communication. It’s up to Panda to alert Ann and either to refuse to go forward, or to back them up out of harm’s way.
In all of these examples Panda is using the behaviors we have taught her in their appropriate context to provide Ann with the information she needs.
Mounting Blocks as Cue Communication
Cue communication can take other more subtle forms. One of the early behaviors I taught to Peregrine via the clicker was to line himself up to the mounting block. He was already very good about walking with me to the mounting block and standing quietly while I got on, but I wanted to add a bit of clicker flourish to the behavior. So I used two targets. The first brought him to the mounting block and the second took him forward a couple of steps so he ended up positioned exactly where I needed him to be in order to get on.
The targets quickly faded to hand signals. I was able to leave him in the center of the arena, walk the ten to twenty feet over to the mounting block, and call him to me. He would come and line himself up without my having to make any adjustments via the reins.
It became a favorite behavior. In fact, if I forgot and started to lead him to the mounting block, he would hang back. How silly of me! I’d let go of the reins and head by myself to the mounting block. He’d wait until I signaled to him, and then he’d come directly over and line himself up.
This behavior could always be counted on night after night even in a busy arena. Peregrine would wait in the middle of the arena while all the other horses went past. When the coast was clear, I’d cue him to come. He never wandered off to visit with the other horses or to look for the scraps of hay which could always be found in the arena. Coming when cued was a consistent, sure-fire behavior – except . . . every now and then he would stall out in the center of the arena. I’d cue him to come, and he’d just hang back.
I never forced him over to the mounting block. Instead I checked his feet, I listened for gut sounds, I took his temperature. Hanging back from the mounting block was his way of telling me that something was wrong. It was my early warning sign that he wasn’t feeling well.
Trust Your Horse, Trust the Process
I can just hear the harrumphers now. What nonsense! All you’re doing is teaching your horse that he doesn’t have to listen to you. You’re letting him get away with not coming. You’re rewarding him for hanging back. You’re just going to get a horse who never goes to the mounting block.
Except that’s not what happened. I trusted Peregrine, and I trusted the work we were doing together. I truly believed that riding was fun for him. He wanted to be ridden.
He showed me this in so many ways. We’d be working on shoulder-in, adding our clicker bells and whistles to the basic movement. He’d give me an extra lift through his shoulders, and I’d click and pull a peppermint – his favorite treat – out of my pocket.
He could hear the crinkle of the wrapper as I was undoing it. Through the saddle I could feel his excitement. If the paper was very stuck to the peppermint so he had to wait a bit longer than usual, he’d give a soft nicker of anticipation. Finally! I’d reach down, and he’d take the treat gently from my fingers. I’d hear the quick crunch of the candy, and then he’d be ready to move on. I’d touch the reins and without missing a beat he would pick up into another stride of even more glorious shoulder-in. How could I not click that!
Of course he loved to ride! Riding was the ticket to laughter, to lots of praise, to scritches on the neck, and best of all to peppermints!
So on the nights when he hung back, I knew he wasn’t feeling well, and I always listened. He’d had a long series of serious health issues following a bout of Potomac Horse fever. I needed this early warning system to be up and functioning so I could monitor his health.
Capture the Saddle
I teach the mounting block lesson very differently these days. The lesson is called “Capture the Saddle”. It begins with rope handling and directed learning and ends with targeting. I teach it in this way because I regard the mounting block lesson as a final safety check before I give the okay for a rider to get on.
A horse that has been well prepared with good ground work, will breeze through this lesson. The prerequisite is a lesson that I refer to as the “Why Would You Leave Me?” game. In the next section I’ll describe both these lessons and the reasons for them.
Coming Next: Unit 4: Cue Communication continued: The Mounting Block Lesson
Remember, if you are new to the JOY Full Horse blog, click on the JOY Full Horses tab at the top of this page to find the full table of contents and links to each of the articles I have published so far.
I hope you will want to share these articles by sending links to this blog to your friends. But please remember this is copyrighted material. All rights are reserved. Please do not copy any of the “JOY Full Horses” articles without first getting written permission from Alexandra Kurland, via theclickercenter.com
Also note: these articles are not intended as an instruction guide for introducing your horse to clicker training. If you are new to clicker training and you are looking for how-to instructions, you will find what you need at my web sites:
Everything You Need to Know About Cues
At the end of Part 1 I asked: What are ten things you would want a beginner to know about cues? That seemed like a simple enough question, but look where it has taken us – to neuroscience and the affective emotional systems, to habits and what maintains them, to TAGteaching and the focus funnel, to guide training for horses, to Feldenkrais work and asking questions, to the Premack principle and the creative use of imagery in training.
All that and we still have only three things on our list:
1.) Cues and commands are not synonyms. 2.) Cues are not just verbal signals. They can include weight shifts, hand gestures and other body language signals. 3.) Cues can come from the environment.
And now here’s number 4.) Cue Communication
Cue Communication
We tend to think of cues as coming from us, but cues can also be given by our animals. The behaviors we teach them can be turned around and used by them to communicate back to us.
When we recognize that cues are a two way street, we become much more aware of what are animals are trying to communicate to us.
Panda was the poster child for environmental cues. She can serve the same function for cue communication. Guide work is dependent upon the back and forth exchange of cues. I described earlier Panda’s traffic checks. That’s a great example both of environmental cues and cue communication. The moving car is the signal for Panda to stop and back up. Her actions cue Ann. Ann must interpret Panda’s sudden change of behavior correctly and allow her to move her out of harm’s way.
Everyday Conversations
Good training is about cue communication. It’s a two way street.
When novice trainers first encounter cues, they often think that they are something only they give. Most of us have spent time around dogs, either our own or a friend’s. We’re used to telling dogs to sit, to lie down, to come, to leave it! These are all cues (or possibly commands – depending upon how they were taught) that we’re giving to the dog.
But what about that sad-eyed look the dog is giving you that gets you to stop working on the computer, get up, walk to the coat closet, put on your jacket and your outside shoes, take the leash off the hook where it’s hanging, attach it to your dog’s collar, open the back door and take him out for a walk. That was quite the complex chain the dog set in motion just by raising his eyebrows and giving you “that look”.
He probably further cued the internal components of the chain by jumping up, wagging his tail, running to the back door, sitting quietly while you put on shoes and jacket and attached the lead.
Back and forth throughout this sequence there was a dance of cues. Some were given by you, some by the dog. It is so like talking on the phone. You have a long story to tell. What maintains the conversation? The little interjections your listener gives you that tell you she’s still on the line, still listening to you. The call hasn’t been dropped by your cell phone network, nor has she gone off to feed her horses. Without those little sounds cueing you that the connection is still active, and she’s still on the other end of the line, your story would stutter to a stop.
“Are you still there?” You may find yourself asking this as you talk on the cell phone.
“Are you still walking to the door?” Your dog wags his tail, or goes into a play bow. Yes! That just redirected the human from the kitchen back on track to the door.
We tend to think of cues as coming from us, but cues can also be given by our animals. When you live with animals, you become as much cued by their behavior as they are cued by you. We know the look our cats give us when they want to be picked up for a cuddle, when they want to be set down again, or let out, or fed. We become well-trained humans.
Animal Trainers – The Ones to Really Learn From!
I have always known how much my behavior is being cued by my animals. I know those “looks”. I have learned to interpret them and respond appropriately to them. It’s no good picking your cat up for a cuddle when what she wants is to go out. She’ll simply squirm out of your arms to repeat – louder – her cue. She knows what many people who travel in foreign countries also believe. If the foreigner doesn’t understand your language, repeat what you just said, only louder. In the cat’s case, this often works!
Cats are superb trainers. They are experts at arranging their households to their liking. If you want to learn about training – watch your cats. You don’t need to go any further to find a master trainer!
A Well-Trained Human
Cats are very good at taking the behaviors we have taught them, and turning them around to cue us. I became very aware of this when one of my cats was a small kitten. She wanted to see what I was having for breakfast and perhaps share it with me. I didn’t want to encourage this behavior, so I took advantage of her interest to teach her to sit. I followed the same procedure I had seen dog trainers use. I held a small tidbit over her head. As she looked up to see what was in my fingers, her hindquarters sank towards the floor. Click! I gave her a tiny bit of the buttered toast she was so interested in.
Two or three reps were usually enough to satisfy her curiosity. She would go off and leave me alone to enjoy my breakfast without the constant interruption of a too inquisitive paw pushing its way onto my plate.
Over the course of several days the sit began to evolve. Now we had a proper down on your rump sit. Click and treat.
One morning she added a slight paw lift. I grew that from a slight lift of her front foot into a “high five” wave. It was very cute.
And that’s when she turned the tables on me. I was in the kitchen not far from the refrigerator. She very deliberately sat down, lifted her paw and gave me my cue. It was so like the dog handlers who cue “sit” and “down” with a hand signal, only in my case the cue set in motion a much more complex chain. I walked to the refrigerator, opened the door, reached in, lifted out the tub of margarine, took off the lid, put a small dollop on the tip of my finger, reached down and let her lick it off my finger.
I had to laugh. I knew exactly what had just happened. She had turned everything around, and she was cueing me!
I also understood more clearly than I ever had before that the behaviors we teach our animals can be used by them to cue us.
In the previous sections I used the image of a runway to teach a horse to step on a mat. The point of using this image is to get you thinking creatively, with imagination. That’s what takes you far, far away from the mind set of do-it-or-else training.
Transforming Horse Training Into Play
We’ve all watched skilled trainers, whether in person or on video. I’m sure you’ve taken in a variety of images of how things are done. Now suppose you’re handed a horse who is pushy, or won’t stand still for saddling. You’ve seen how professional horse trainers deal with this in what often seems like no time at all.
It’s so easy to put on their “hat” and fall into the same-old, same-old of traditional horse training solutions. But remember – when you are watching one of those skilled trainers, you aren’t just watching fifteen minutes of training. You are watching fifteen minutes plus fifteen years. That’s a lot of experience – and a lot of mistakes made and lessons learned – to get to the point where things look easy.
Easy isn’t the only criterion we’re looking for. I remember watching a video of a trainer who was working with what was described as a “lazy” horse. The owner wanted to be able to lunge the horse, but her horse stayed in close to her and wouldn’t move out. There are all kinds of reasons why a horse would lock in close to a handler. One might be that the horse has learned that staying in close is the safest place to be. If that was the case for this horse, the trainer took his safety away. He charged into the horse with his lunge whip, sending the horse leaping away to the side.
The trainer was using negative reinforcement. His timing was excellent. As soon as the horse was in motion, he stopped cracking the whip. But the instant the horse slowed down, he was on the attack again. It took just a couple of turns around the circle to convince that horse that he needed to keep moving. Easy. The battle was over in just a few minutes.
The trainer stood in the middle of the lunge circle touting the virtues of his technique. The horse continued to trot around him the whole time he was talking to the audience. He no longer even needed to lift his whip. It was an impressive result.
But I was thinking about the lesson from the horse’s perspective. If one of us were trapped in a round pen with someone peppering bullets at our feet, wouldn’t we run? And we’d keep on running until we dropped from exhaustion. If we slowed down, the person in the middle would just need to gesture with the gun to get us running again.
It is the same thing. So easy isn’t enough. I can look at the behavior that emerges – a horse moving at a steady pace around me at liberty and think that’s a fun result. The question becomes: how can I get to that behavior but in a more learner-friendly way? How can I take this, or any other lesson, and turn it into true play for both myself and my horse?
One of the principles that is common to ALL good training methods is this:
There is ALWAYS more than one way to teach every behavior.
If you really believe that and know how to put this principle into practice then this leads you to the answer.
You’re going to break the task down into smaller components so your horse understands what is wanted in each step. You want him to be more than just comfortable with what is being asked. You want him to be eager to play.
Using Props
To teach horses to step on mats, I set out the V runway pattern. The cones help handlers line their horses up with the mat so they have room to come to it on a straight line. When I first taught mats, I didn’t put the cones out. But then I saw that handlers would leave the mat and cut back around on such a tight turn that the horse had no chance to line himself up again straight to it.
They did the same thing at mounting blocks. If the horse shifted away from the mounting block, they would walk off on a tight circle that gave the horse little opportunity to come in straight. The missing step was the handler’s ability to visualize the path she needed to take to give her horse the most success.
So I set out the V shaped line of cones. The length of the “runway” obliged the handler to go out far enough so that she had room to line her horse up to the mat.
I could have set the mats out in a parallel lines. Then I would have had a different kind of runway, and I would have used different images to describe it. It might have become the catwalk for a fashion show. The horse would be a model sashaying her way down the runway – stopping periodically to show off her costume.
Instead I set them out in a V so the handler would have a wide funnel entrance and a better chance of getting the horse into the top of the runway. It’s only experienced pilots and co-pilots who can successfully enter into the top of a narrow runway. Novice teams need the wider opening.
Playing with Images
Playing with images takes you away from relying solely on the standard-issue horse training approaches you may already know. It puts you into a creative place where you can come up with your own patterns, images, and techniques that work for your horse.
People often feel that they have to follow exactly the instructions given by a clinician or riding instructor. I offer the runway as a starting point. I suggest that you begin with my image. Understand how this process works; learn the basics of good rope handling; see what it gives you when you have a horse who welcomes the information the lead provides; and then become creative. Invent your own images to help teach the skills your horse needs to meet your personal training goals.
Creativity
For me, there’s no better indicator of success than hearing from someone that they have found a new way of teaching a familiar lesson. They don’t go about it exactly the same way I do. Their horse has shown them a different way, just as my horses often show me new ways to teach old things.
Creativity is at the core of our being. When a handler clutters up her work space with cones, empty supplement containers, bags of shavings, and who knows what else, and sees in that clutter a better way to teach a lesson, I know she has understood the greater game. She is becoming creative and inventive. She is creating new games. For both horse and handler it has become true play.
You might not want to put quite so many shavings bags into your “play ground”, but clutter can definitely contribute to creative ideas.
Coming Next: Unit 4: Cue Communication
Remember, if you are new to the JOY Full Horse blog, click on the JOY Full Horses tab at the top of this page to find the full table of contents and links to each of the articles I have published so far.
I hope you will want to share these articles by sending links to this blog to your friends. But please remember this is copyrighted material. All rights are reserved. Please do not copy any of the “Joyful Horses” articles without first getting written permission from Alexandra Kurland, via theclickercenter.com
Also note: these articles are not intended as an instruction guide for introducing your horse to clicker training. If you are new to clicker training and you are looking for how-to instructions, you will find what you need at my web sites:
In the previous installment I introduced you to constructional training. I used the runway lesson to teach your horse to step on a mat. Instead of going directly to the mat, you first taught your horse the skills he’d need to make this an easy lesson.
So now you have a horse who is eager to get to his mat. He isn’t just gingerly stepping a toe onto the edge of the mat, he’s rushing ahead to get to it. Hurray! You’re part way through this lesson.
For every exercise you teach there is an opposite exercise you must teach to keep things in balance.
The mat lesson helps you understand the importance of this statement. You’ve got a horse who is eager to get to the mat. Now you need to explain that you’d like him to walk with you to the mat.
Robin shows his great mat manners, walking with me to the mat.
He lands on the mat in beautiful balance. He’s going to continue to be our equine teacher for this lesson. In the following photos you’ll see how to build great mat manners.
Mat Manners
You’re now ready for the next level in this “runway” game.
You want a horse who is eager to get to the mat, who regards it as a fun place to be, a place where lots of good things happen, but you also want a horse who walks with you to the mat. You don’t want your co-pilot taking over complete control. You still want to make some of the decisions. So now if he starts to grab the throttle stick from you, you can use your “needle point” skills to ask him to stop and back up.
I know that’s mixing a lot of metaphors. Let’s see how this works.
Rushing doesn’t lead to the mat. It leads to needle point. But needle point is not a bad thing. Your co-pilot understands what is wanted. I tend not to click for course corrections. So that first backing step won’t be rewarded with a click and a treat. But when we’re back on pattern, and I ask for the next step, perhaps asking now for one green stitch forward – that I’ll click and treat.
In the “needlepoint” part of the runway lesson I’m asking Robin for one step forward.
After a click and a treat, I release him to the mat.
We’re back in sync with one another, still a few steps away from our landing pad. I’ll release the controls to my co-pilot, and we’ll walk together with slack in the lead. I won’t need to help him get to the mat. He knows how to land our little craft. He stops, perhaps not perfectly square yet, but with both feet on the mat. Click and treat!
Again, he lands beautifully on the mat.
And now the game changes yet again. I want the mat to be a versatile tool. I want my horse to remain on the mat while I move around him, or even away from him. The mat provides the foundation for what is referred to in the horse world as ground tying – the horse stays on the spot where you left him as though he was tied.
The mat is a great tool for teaching ground tying.
101 Things
So the new game becomes “101 things a handler can do while a horse stays on a mat.”
This is a variation on the theme of a game which many canine clicker trainers play with their dogs. It’s called “101 Things a Dog Can Do With A Box”. The handler presents a dog with a box. Each novel behavior the dog offers gets clicked. So if the dog sniffs the box, he gets clicked. If he sniffs it again, he doesn’t get reinforced. But if he paws the box with his right front foot, he does. Now if he sniffs the box or paws it with his right front – nothing. But if he changes and paws with his left front, click and treat.
This was a popular game early on amongst canine clicker trainers, but for a lot of reasons I never played an equine version of it. One of the more fuddy-duddy reasons was I really didn’t want my horses learning all the creative things they can do either with their bodies or with things. I didn’t want them thinking they can do fancy leaps into the air with me on their backs or open their stall door latches whenever it pleased them. If they discovered these talents on their own, so be it, but I didn’t need to be an accomplice in this kind of cleverness. (That’s especially true when it comes to stall latches!)
So 101 things was out for my horses, but it is very much in for the handlers. I need them to be creative. So the game becomes – every time your horse lands back on the mat, you have to come up with a new behavior a handler can do while a horse stands on a mat.
At first this is easy. Your horse lands on the mat, and you might ask him questions about handling his mane. Will he continue to stand on the mat while you run your fingers through his mane? Yes. Click and treat. Repeat this several times and then walk off casually back around to the top of the runway.
I begin by “parking” Robin by tossing the lead over his neck. Draping the lead over his neck quickly becomes a cue to stand.
With Robin “parked” on the mat, I can begin the “101 things a handler can do while a horse stands on a mat” lesson. In this round of the game I am stroking his mane. The lead rests over his neck in the “parked” position. I’m not holding on to it, but I can easily pick it up should he walk off.
Next time you get back to the mat, you have to think of something else to do. It could be you simply expand running your fingers through his mane to stroking down his neck and along his shoulder. Or you could decide to play the game more like “101 things you can do with a box”. You stroked his mane in the last round, so now you’re going to think up a completely different sort of behavior. “Will you stand on the mat while I bend down to tie my shoe? Oh, I don’t have shoe laces! Never mind my shoe still needs to be checked.”
“Will you stand still while I tie my shoe?” Yes, click then feed.
Most people can easily play a couple rounds of this game but then they begin to get stuck for ideas. They are too much in their “horse-training” head. They’ve already stroked their horse from head to tail and picked up all four feet. What else can they do? They are running out of ideas.
The Opposite of Flooding
Time to channel their inner child or their inner kindergarten teacher. You can ask your horse for horsey things like dropping his head, or putting his ears forward, or letting you walk behind him and groom his tail.
While Robin stands on a mat, I can ask for horsey things. In this case I am touching him at his elbow as a cue for him to lift his foot.
As Robin lifts his foot, I have him target his knee to my hand.
From here it is easy to ask him to target his foot to my hand. (This is an easy way to teach a horse to pick up his feet.)
You can play silly games with your horse. Can he stand still while you run around pretending to be an airplane? Bzzzz, Bzzz – coming in for a crash landing into the mountain (horse). Click and treat.
When you run out of “horse training” games, you can play silly ones. In this case I’m pretending to be an airplane. I even include the sound effects of a buzzing engine.
My favorite kind of “crash landing”.
I love watching the horses watch the people. This is the best entertainment they’ve had in years! What will their human do next!?
Robin isn’t sure what to make of my behavior. What a very strange human!
This type of training is done routinely when you are prepping a youngster for riding. The handler waves things around and jumps up and down. The goal is to desensitize the horse so he doesn’t spook at unexpected movement. But instead of creating an entertaining game for the horse, it is often done with flooding.
Here’s an example of how flooding works. Suppose a horse is afraid of flapping saddle blankets. He scoots away. The blanket pursues him, matching him move for move until finally he gives up and stands still. Next comes another scare, this time it might be an umbrella opening and closing in his face. The horse learns he can’t escape. The best he can do is stop. That makes the umbrella go away – for the moment, but it is back again in the next instant. He learns finally that no matter what happens, no matter how afraid he is, he can’t get away. He gives up and stands still while the handler flaps tarps around his body, and up over his head, covering his eyes so he cannot see to run even if he wanted to. He’s given up flight because he has given up.
The handler isn’t playing, except maybe at being a “horse trainer”. And this most certainly is not a game for the horse.
I want to create something very different for the horses I interact with. It needs to be play for both of us. I want my horse to know that he does have a choice. His voice most certainly counts.
Teaching the skills you need before you use them; building success and confidence through patterned exercises; and – most important – really listening to your horse helps transform these lessons into true play for both of you.
Playing with Language
I’ve written about mats many times. I’ve described in detail the rope handling techniques that are used. I’ve referred to the runway image. (I definitely spend too much time in airports. I can rarely teach a weekend clinic without making some reference to airplane travel.) I’ve also referenced the needle point image because to me this section of the lesson always makes me think of the fine, detailed work that needle point represents.
What I haven’t done before is used quite so much of this type of imagery in describing the lesson. My point is not to force you into a mold where you have to be thinking – okay what colour thread am I supposed to be picking up and why? If you’ve never done needle point or other fine detailed handiwork, this image will feel foreign and forced. If you haven’t traveled on as many airplanes as I have over the last few years, the runway image may not jump out at you as you set your cones out in a V.
My point is not to get you using these images. My point is to get you thinking creatively, with imagination. That’s what takes you far, far away from the mind set of do-it-or-else training.
Coming Next: Transforming Horse Training Into Play
Remember, if you are new to the JOY Full Horse blog, click on the JOY Full Horses tab at the top of this page to find the full table of contents and links to each of the articles I have published so far.
I hope you will want to share these articles by sending links to this blog to your friends. But please remember this is copyrighted material. All rights are reserved. Please do not copy any of the “Joyful Horses” articles without first getting written permission from Alexandra Kurland, via theclickercenter.com
Also note: these articles are not intended as an instruction guide for introducing your horse to clicker training. If you are new to clicker training and you are looking for how-to instructions, you will find what you need at my web sites:
I ended the previous section by saying the lead tells a story. I want my lead rope to be a welcome tool, one my clicker-trained horse is completely comfortable with. That’s the goal, but it’s often not where we begin. Often when I first attach a lead to a horse, what I encounter is resistance and concern. Lead ropes have been used for correction and punishment – so the horse is defensive. He’s telling me about is history, and I need to listen. I also need to respond in a way that doesn’t prove to him that he was right to be guarded.
I want to show him that the defenses he’s thrown up aren’t necessary. The castle walls, the moat with the sharks, the draw bridge, the boiling oil, the iron portcullis, and all the armored men lined up behind can all vanish, whisked away not through force, but through play. Mats are going to be the training tool I use.
To introduce a horse and handler to clicker training I focus on six foundation lessons. Teaching a horse to stand on a mat is one of those lessons. The mat is what the word implies. Think door mat, and you’ll have the right sort of size. You can use plywood, carpet squares, rubber mats. They all work as long as they contrast well with the surface they are on.
They are lots of different ways that you can teach a horse to step on a mat. Over the years I have used a variety of approaches, tailoring the choice to the needs of the team. But my favorite way, and the way I generally choose first is to imagine that the mat sits at the end of a runway of cones. I am trying to line up straight to my runway so I can bring my horse to a safe landing on the mat in the same way a plane would line up to a real runway. Here’s the lesson:
The Runway
Instead of castle walls with the mat as a drawbridge, I imagine an airplane runway. The sides of the runway are lined with cones that form an open V, funneling us down towards the mat at the end.
My horse, Robin is going to be our equine teacher for this lesson. He’s going to show you what the lesson looks like with an experienced “copilot”. I’ll also be describing what the lesson is like when you’re working with an inexperienced horse. I’ll be taking you from the first wobbly “flights” down the runway to the finessed balance that evolves over time. For now Robin is waiting expectantly for the game to begin.
If Robin is one of our equine teachers, let’s suppose the other is a pushy, somewhat nervous horse who has gotten into the habit over several years of dragging his person pretty much wherever he wants to go. In this lesson the pilot (me) is approaching in her single engine little plane (the horse). I’m being buffeted by strong winds. The plane (my horse) is rocking from side to side, trying to drag me off course. Can I even make the top of the runway? No! I abort to try again. I circle around, and this time I manage to get the nose of the plane, i.e. this horse, pointing into the open V of the runway. Click and treat. The wide end of the funnel helps me to be successful. I want to find ways to say ‘yes” to this horse, so I make the lesson as easy as possible by making the opening of the funnel extra wide. I’m setting up the environment to help ensure success. A narrow funnel would be much harder to get to with my determinedly pushy horse.
I had originally wanted to show a video of an inexperienced horse using the runway lesson, but computers being computers my editing program isn’t cooperating with that intent. So instead I enlisted Robin’s help. He’s my “dance partner”, or to stick with my metaphor of the runway, my copilot. I filmed him going through the pattern, and I’ve pulled still photos from the video to describe some of the key elements of this lesson.
It’s been a very long time since I have worked Robin through this foundation lesson. As always, I found it was worth revisiting the basics with him. No matter how skilled a horse becomes, the basics always reveal details that need polishing. So whether you and your horse are a novice team or one that is very experienced, the runway is a great lesson to explore.
Please note: This is not a stand alone lesson, nor is this JOYFULL Horses book intended as a clicker training how-to instruction manual. The prerequisites and a description of the handling skills needed for this lesson are presented in my DVD lesson series and in the on-line course. I am describing this lesson in detail here not not so much to teach you how to use it, but to illustrate some important concepts that are relevant to all good clicker lessons.
I’ll start with a short video which will give you a quick overview of the lesson.
There are a lot of important details in this 3 minute clip. I’m going to take the lesson apart literally frame by frame. I’ll be using stills pulled from the video to point out the key elements of this lesson. Enjoy!
The runway is part of a larger loop. There’s no beginning, middle, and end. A horse that is familiar with mats might begin, as Robin did, on the mat. The pushy horse I am starting with has never stepped on a mat and is worried by them. I would begin with that horse where we are picking up the pattern here, with Robin turning with me into the top of the runway. Note the slack in the lead. I probably would not be giving this much freedom to my pushy horse. he wouldn’t yet know how to read and respond to the subtle signals from my lead and body language. I would need to slide up the lead to signal my intent to turn. I would click and reinforce the horse as he responded to my request. This would bring him to a halt, ready for the next phase of the lesson.
Note how I have brought Robin into the runway. I’ve been mindful of the placement of the V. I’ve given us enough room to turn so Robin ends up in line with the mat. This exercise is about straightness. It is a wonderful lesson for helping crooked, pushy, unbalanced, nervous, or just plain wiggly horses.
Here Robin is beautifully lined up to the mat as he completes his turn into the runway.
In contrast here I’ve made my turn too early so there isn’t time to line Robin up straight to the runway. I originally taught the mat lesson without any cones for markers. People would walk their horses off from the mat and then come back around in too tight of a turn. There was no way their horses could line up to the mat and approach it on a straight path. These handlers were setting their horses up for a wiggly, crooked approach. The mat is about lining up straight to a mounting block, approaching the center of a jump on a straight path, crossing streams and other obstacles, stopping square at X in a dressage test, and performing any other task where precision and accuracy in the approach are needed. A novice horse needs the extra help that a long runway approach gives him. I set the cones out as guides for the handlers. They have to take their horses back to the mat by walking all the way out and around the line of cones. Targets aren’t just for our horses. Sometimes they are for us, as well.
You’re in the runway. Now what? This lesson is like a dream where you drift from one scene to another – never questioning the odd juxtaposition of images. In this part of the lesson I am doing “needlepoint” with this horse. That’s the image.
Needlepoint may not seem relevant to horse training, but the individual balance shifts we teach in the runway always make me think of the intricate stitches in a needlepoint tapestry.
Each stitch is an individual action. Each stitch must be carefully thought through before beginning the next. I may have to change colour often. I may only want one or two stitches of green before I switch to red. That’s how this part of the lesson feels to me. I will be asking for tiny shifts of weight. Each balance shift forms one stitch in this larger tapestry.
When I ask my horse for one tiny step forward, that’s one green stitch. If I’m working with a poorly balanced or pushy horse, I don’t want to take a step and then follow it with many more. Instead, just as this horse begins to lift his leg, I’m going to click. The click interrupts one thought – move forward – and replaces it with another – get your reinforcer. Before he has even really begun to move, he’s at a standstill again waiting for his treat He was thinking of barging past me, but that would have crashed our little “plane”. Instead disaster has been averted. He has taken a half step forward, and now he’s shifted his weight back slightly to get his treat.
He’s beautifully set up for the next stitch in our tapestry. I ask for another forward step. Click! Again, the power of the click interrupts him before he can charge forward. He is learning patience. He is learning self-control. He is learning to control his movements. He began with a throttle that was either at full power or completely turned off. Now we are gaining some adjustability. I can ask for a tiny amount of energy, and he can give me a soft, half step forward. Click and treat.
He is doing so well, it is time to land “the plane”. I put aside one image – the needle point – and we walk casually forward down the rest of the runway. As we approach the mat, I realize my co-pilot isn’t ready to stop. I walk over the mat myself and keep going, letting my co-pilot walk beside me.
We circle around back to the top of the runway. My co-pilot learns fast. The little plane is steadier now as we bank around the turn and face into the top of the V. Click and treat. This time I put red thread into my needle. I ask for backing. Again, I click on that single stitch. The plane wobbles a bit and goes off course. We are no longer pointing straight down the runway. It doesn’t matter. The pattern allows for many stitches of red.
Click by click we lay down a line of red stitches. The backing is smoother now, less hesitant, less wobbly. We have backed ourselves in a squarish turn that takes us out of the top part of the runway. I am using skills learned in previous lessons. My “copilot” may not be able to back straight yet, but I can still keep us in the vicinity of the runway by having him back in a square pattern. Straight will emerge as he learns how to handle these larger course corrections.
When you put enough of these fine needlepoint stitches together, you get a picture that looks like the one Robin is illustrating for us in this series of photos:
Robin’s adjustability and good balance has allowed him to come in straight to the mat. I’ve turned toward him to ask for one step back with his right front foot.
Robin has initiated a step back. As he does, I click and prepare to release the lead.
Robin has completed the single step back. You can’t see it, but my hand is opening on the lead even before his foot lands. What goes up must come down. It’s important to let go as I click and not to wait for the foot to land. If I stay on the line, I would be holding on way too long, giving my horse something annoying that he would need to push against. The timing needed to release a horse into the action you want takes deep practice focus. If you aren’t sure what I mean by deep practice, read my blog on this subject. (https://theclickercenterblog.com/2014/11/16/)
I’ve already clicked. Now it’s time to reinforce Robin with some hay stretcher pellets.
My “needlepoint tapestry” is made up of many stitches. I’ll ask Robin for another, single step back.
It may not look as though anything has changed, but Robin has unweighted his right front in preparation for backing. That’s my cue to be ready to click.
Robin has begun to take a step back – Click! Remember it’s important to click as he initiates movement. I’m not waiting to see the outcome of the weight shift (meaning the completed step back.) If I click as he initiates a movement, I am saying “yes” to that movement. This lesson is not about blocking or shutting down energy. I want energy. I want behavior. I want to say “yes” to moving even if the moving is being done by a pushy, inexperienced horse. When I click as he begins to take a step, I am saying “yes” to movement that in the past someone else may have punished. An inexperienced horse is expecting a “no”. Part of his pushiness comes from trying to rush past the obstacles he’s expecting me to throw in his path. Instead he hears a click! Surprise, surprise! He brings himself to a stop to get his treat. Self control and good balance will emerge out of saying “yes” when what his history tells him to expect is a “no”.
I’ve clicked Robin as he began to take a step back. The click is a cue to me to begin my reinforcement cycle. I’m reaching into my pocket to get a treat. But note also what my right hand is doing. I have moved it forward so the snap hangs straight down. I am giving Robin the full freedom of the lead. This is an important part of this lesson and one many people struggle with so I’ll be pointing it out again in other photos. The snap on my lead is going to become a tactile target for my horse to orient to. Moving my right hand towards Robin as I get the treat with my left is part of the teaching process that helps Robin tune in to the significance of the snap and it’s orientation.
Here’s the contrast. As I ask Robin to take a step, I’m using my right hand more actively on the lead. If he were a more inexperienced horse, I might need my hand here to help him maintain his balance as he takes a step forward. Otherwise, he might be falling into me with his left shoulder. (Note: if I were on Robin’s right side, things would be reversed. I would be feeding with my right hand and releasing the lead fully with my left.)
Here’s a common mistake. I’ve released with my left hand, but I’ve kept my right hand in place on his neck.
Even while I am reaching for the food, I am keeping my right hand in place. I refer to this as driving down a motorway with your emergency brake on. When a horse is unbalanced and pushing through you, it can feel as though you can’t let go completely. It takes focus to remember to release the lead completely with your right as well as your left hand. This is where you learn to truly let go. This is the beginning of floating on a point of contact – a heavenly feel for both horse and handler.
After all, you’ve got treats in your hand. Where is your horse going to go? This is the perfect time to experience letting go of him.
The runway lesson teaches the handler to be an agile thinker. Depending upon what happens with my horse’s balance, I may need to change in an instant the direction I want him to go. So while I am giving him his treat, I am already thinking about what I am going to do next. I don’t wait for him to fill in the “dance card” through my indecision. My body language is signaling the next clear intent. Can you tell what I’m going to ask him to do next? Answer: walk forward with me to the mat.
Robin has done a nice unit of “needlepoint stitches”. Now it’s time to let him move. I am releasing him to the mat.
In the photos it was time to release Robin to the mat. It is time to do the same for my less experienced horse. Once again, I’ll set the needle work image aside. I have asked this horse to stay focused with me through several steps. We have put down enough concentrated stitches. Now it’s time to move. We’ll walk casually towards the tip of the V and the mat. This time instead of walking over the mat, I may choose to stop on it. My co-pilot misses the stop and over swings past me. No problem. It’s a sloppy landing, but it won’t bring out the fire brigade, at least not this time. I am standing on the mat, clicking and treating my horse for standing quietly beside me. He can see that the mat did not swallow me up. Instead standing next to it produces lots of clicks and treats.
In contrast to a green horse Robin shows us a beautifully on-the-spot landing on the mat.
Robin is showing perfect mat manners. Even though he is eager to get to the mat because it represents an opportunity for reinforcement, he is walking with me on a slack lead. Mats are a great tool for teaching horses the emotional control they need to walk politely out to turnout and other exciting places. If your horse pulls or dances around you when you lead him, working with mats is a great lesson to teach.
Robin knows how to land on a mat. First, one foot . . .
Then a second foot . . .
Both front feet on the mat. Click! and . . .
. . . and initiate the reinforcement process. Note how I release the lead fully to Robin WHILE I reach into my pocket with my left hand to get the treat. Coordinating these two actions takes deep practice concentration. (https://theclickercenterblog.com/2014/11/16)
. . . Feed. Note how balanced we both are. I am encouraging good balance in Robin, AND I am also building a feel for good riding balance for myself. The mantra is: feed where the perfect horse would be. In this case that means Robin’s head is in line with his shoulders – not pulled off to the side towards me. I feed at a height that encourages him to lift up from the base of his neck. I want to feel him lifting up, supporting his own weight as I feed him. As he takes his treat, if I feel him leaning down onto my hand, that should signal to me that I need to change what I’m doing to encourage better balance in both of us.
I want to turn the mat into a conditioned reinforcer. If it becomes a predictor of good things, my horse will want to go to the mat. He’ll enjoy being on the mat. That means I’ll be able to reinforce other activities with an opportunity to return to the mat. So before we head back to the top of the runway, I cue Robin to give me a very familiar behavior, one I call: “the grown-ups are talking, please don’t interrupt”. Than means Robin is standing in his own space. My pockets are full of treats, but I am not being mugged. Robin adds the extra flourish of his beautifully calm focus and good balance to this important base behavior.
It’s click then feed for beautiful grown-ups, and then . . .
I invite Robin to leave the mat and walk off casually with me back to the top of the runway.
My green horse has also been standing beside me practicing good grown-ups. It’s time to walk off again and head back to the top of the runway. This time our entry into the V comes out perfectly. Click! That brings him to a halt so he can get his treat. I don’t have to actively stop him, cues he may not yet understand. That’s what the runway is going to teach him – whoa and go. As I give him his treat, I am deciding which colour thread to pick up, meaning should I ask him to go forward or back? I may decide to ask for a couple of green stitches, and then I’ll switch to red. It all depends upon the response I get from my “co-pilot” and where we are in the runway.
As my co-pilot becomes steadier and better balanced, we can work on an intricate pattern – one stitch forward, one stitch back, each one separated by a click and a treat. We are building control – not the force-based control of do-it-or-else, but the self-control of good balance. He is gaining the ability to change his balance – forward or back within a single stride. He doesn’t have to barge past me any more because he can regulate both his emotions and his balance.
So far I’ve asked Robin for a lot of backing. I need to balance that with requests to go forward – but remember, in the “needlepoint” phase of this pattern I am asking for only one step at a time.
As soon as he begins to initiate a step, it’s click . . .
. . . release the lead and begin the reinforcement process.
Again note how my right hand moves towards Robin releasing the lead fully to him. I have pointed this out before because it is a detail many find very difficult to coordinate. Their focus is on getting the food. It takes focused practice to coordinate the separate tasks both hands are doing. (https://theclickercenterblog.com/2014/11/16)
Many people push against the use of food during training, but clicker trainers have such an advantage because we feed treats. In this photo series you’ve seen how I can use the food delivery to help my horse become better balanced. Here I’ve drawn Robin slightly forward with my food delivery. This sets me up well to be able to turn into him to ask for my next request – backing.
As he begins to lift his left front foot, I am ready to click and release the lead.
Again, my right hand moves towards Robin to release the lead AS my left hand gets the food.
Even as he is taking the food from my hand, I am setting up my next request. Can you tell which direction we’ll be heading? Forward or back?
As soon as I’ve given him his treat, I release him to the mat. Note: this release to the mat is an important element. I don’t ask him to keep doing “needlepoint” all the way to the mat. I want to reinforce the concentrated work with an opportunity to move forward freely. The mat gives us a destination that offers even more reinforcement opportunities.
Give Them What They Want
For the horse who prefers nothing better than to nap under a tree, all this slow, step by step work is easy-peasy. It’s all that walking forward stuff to get to the top of the runway that this horse finds wearisome. So what this game sets up is a bargain. I’ll let him get all these easy clicks and treats for walking one step at a time provided he will walk with me when I ask him to head back to the top of the runway.
Remember the Premack principle from the previous article? (https://theclickercenterblog/2016/06/09) I’m reinforcing a lower valued behavior – marching on around the outside of my pattern – with a higher valued behavior – getting loads of clicks and treats for taking one small, low energy step after another followed by a chance to stand still at the mat. What could be better!
For the high-energy, foot moving, impatient horse Premack also works. I’m saying to this horse: if you will indulge me by giving me a couple of needlepoint stitches, I will not only make it worth your while by clicking and treating each one (thereby upping their value), I will also let you march forward down the rest of the runway. And if you will further indulge me by standing still on the mat where again I pay really well, I will let you march on, uninterrupted back to the top of the mat.
In both cases the Premack principle is at work. And in both cases I am turning all the segments of the loop into activities that gain value. Pretty soon, my slow-moving horse will be looking forward to the march back to the top of the runway, and my impatient horse will be showing me how softly and with such delicate control he can creep down the runway.
Stopping on Mats
For my inexperienced horse it’s time for the game to change again. I’m going to start using the skills he’s been learning in the runway.
When we get to the mat, instead of stopping so my feet are on the mat, now I’ll change course slightly in the runway so the mat is in line with my horse. If he steps over it the first time or two so his feet never touch it, that’s all right. We aren’t yet ready to land. But eventually, on one of the passes, I’ll do a test run. As we approach the mat, I’ll rotate slightly towards him as I slide up the lead. I’m indicating that we will be stopping. Our needle point has taught him how to listen to these signals. He’ll stop with his front feet just shy of the mat. Click and treat.
Here is Robin again showing us how much control and refinement the runway can help us build into leading:
I’ve released Robin to the mat. Note the slack in the lead. There’s no pulling to the mat, no forging ahead of me. We are walking together towards the mat. Exactly right.
I’ve brought Robin up to the mat, but I am deliberately asking him to stop just shy of it.
Frame 1: His front end stops beautifully, but . . .
Frame 2: Robin wasn’t expecting to stop before the mat. His front end stopped in response to my request, but his hind end took an extra moment to catch up to the change in the pattern. It’s a bit like a rear end collision at a traffic light. The first car stopped, but the second one didn’t. The result: Robin has stepped out to the side with his right hind. He could have plowed past me to continue on to the mat, but instead he has managed to stop his front end in response to my request. It’s only his back end that couldn’t quite stop in time.
He may have landed slightly out of balance, but he still responded perfectly to my request to stop his right front and then his left front foot, so he gets clicked. That’s my cue to begin the reinforcement process. I surprised him with a sudden change in pattern. That resulted in less than perfect balance in the stop, but he still gets reinforced for a correct response to my cues.
Feed so his head stays lined up with the rest of his body.
Now I’ll use his “needlepoint” skills to bring him the rest of the way onto the mat. That was the point of my abrupt halt. I wanted to create an opportunity to show you how these skills work.
Robin responds to very light cues on the lead. A very small change in my hand position is all that is needed to request a single, forward step with the right front.
Job done with the right front.
Now I ask for one step forward with the left front.
Job done again. With a very inexperienced horse I would have clicked and reinforced each footfall. With Robin I can connect these requests together via cues. Cues act as both prompts and reinforcers. I am only clicking after he has both feet on the mat, but I am still giving him plenty of “yes” information via the cues from the lead. Those cues contain an additional “yes” every time I release the lead.
I’ve clicked so now it’s time to feed.
I’ll further reinforce his good efforts to get on the mat by asking for “grown-ups”, a well known and highly reinforced behavior. Note how beautifully he maintains his balance, and his very calm, focused demeanor even though he is just inches away from the treats in my pockets.
I continue to use his “needlepoint skills” to ask him to take one step back off the mat.
Once he’s stepped back off the mat, I can ask him to come forward again. An inexperienced horse might become frustrated by all this toing and froing. He might be wanting me to make up my mind and decide which way I want him to go. But the “needlepoint” lesson in the runway has familiarized Robin with this type of request. They are just a series of changing dance steps. They were never taught as corrections. I want him to see them as a path towards reinforcement – never as a way to avoid punishment.
His front feet are back on the mat. Now I’m asking him to step up with his left hind. Click as the leg begins to lift.
Again the reminder to release with right hand as well as the left.
Feed for a job well done.
Ask for grown-ups to create added value for landing on the mat. Why go through all of this? Compare this photo with the one taken just moments before I asked Robin to step off the mat.
In both photos Robin is in grown-ups. He’s showing the calm focus and good balance that has been consistent throughout this session. But in the photo on the right Robin shows slightly more lift from the base of his neck. The difference is subtle, but it is there. It was created out of the rebalancing steps he took to back off and then, weight shift by weight shift, return to the mat. The control he has over his footfalls leads to the consistency we see throughout this lesson in his balance.
These photos were all pulled from a video. Now that we’ve gone through the details of this lesson, let’s have you watch the video again. How many of the photos you’ve been studying can you spot? They are just still frames taken from the video. How much more detail are you seeing now than you did when you watched this video the first time through at the beginning of the article? How many of the points that I covered are you spotting? I’ll bet you’re seeing the very deliberate release of my right hand and the use of the food delivery to help build good balance. What else pops out at you now that I’ve been pointing out the details of this lesson?
Constructional Training
For the inexperienced horse, as well as for Robin, the work in the runway builds the skills that are needed for the mat. That’s the strength of this approach. I haven’t started with the mat where a horse’s concern over stepping on an unknown surface might create problems. The focus of this lesson is to teach the horse to step on the mat, but that isn’t my end goal. The mat is a tool. Stepping on the mat is a way to get that energetic walk and those “needle point” skills that I’ll be using elsewhere in his training. And once my horse is comfortable with the mat, I can use it throughout his training as a reinforcer.
When I first introduced my horse to the overall game which we call clicker training, I had to deal with the food. It started out as a distraction. I held a target up for my horse to touch – which he did, eagerly enough. His curiosity served me well. Click and treat. Treat! You have food in your pockets. Never mind the target, I’ll have more of those!
The initial stages of clicker training are really a teaching process that transforms the food from a distraction into a useful tool. Once my horse understands that he gets the treats by taking his focus off my pockets and offering instead other behaviors that I like, then the game can really expand. It truly does become a game, a treasure hunt where solving the puzzle becomes even more reinforcing than the treat itself.
The mat works in a similar way. At first it is something to be avoided – stepped over or around, but never actually on. Then it becomes something to put a tentative, testing toe on. Clicks and treats! This isn’t so bad. What was all the fuss about!
Pretty soon you’ll have a horse who isn’t just stepping gingerly onto the mat, he’s rushing down the runway to get to it. Hurray!
Coming Next: Mat Manners. For every exercise you teach there is an opposite exercise you must teach to keep things in balance. The mat lesson helps you understand the importance of this statement. The runway lesson has helped create a horse who is eager to get to the mat. Now you need to explain that you’d like him to walk with you to the mat.
Remember, if you are new to the JOY Full Horse blog, click on the JOY Full Horses tab at the top of this page to find the full table of contents and links to each of the articles I have published so far.
I hope you will want to share these articles by sending links to this blog to your friends. But please remember this is copyrighted material. All rights are reserved. Please do not copy any of the “Joyful Horses” articles without first getting written permission from Alexandra Kurland, via theclickercenter.com
Also note: these articles are not intended as an instruction guide for introducing your horse to clicker training. If you are new to clicker training and you are looking for how-to instructions, you will find what you need at my web sites:
The Time Has Come the Walrus Said To Talk of Many Things
“The time has come,” the walrus said,
“To talk of many things:
Of shoes and ships and sealing-wax
Of cabbages and kings
And why the sea is boiling hot
And whether pigs have wings.”
Lewis Carroll – Through the Looking Glass
In Chapter One of this section I shared some examples of how the environment can cue behavior. Panda, the mini I trained to be a guide, provided us with many examples of environmental cues. In the previous Chapter I showed how a combination of mats and strategic food delivery can be used to teach basic leading.
We’ll be building on that lesson is this next unit. Which means the time has come to talk about Premack, Feldenkrais work, asking questions, mats, airplane runways, needlepoint, and creativity. If you’re not sure what some of these mean or what the link is between them, read on. And yes, we will be getting back to play and our list of ten things a beginner needs to know about cues, but first let’s set the stage with a discussion of the Premack Principle.
Behaviors as Reinforcers
One of the things that quickly becomes apparent when you start turning training into play is how quickly the behaviors you teach your horse can be turned around and used as reinforcers for other things.
This is not a new understanding. In the late 1950s primatologist, David Premack developed his relativity theory of reinforcement which is better know as the Premack Principle. Simply put this means that a higher valued, more probable behavior can be used to reinforce a lesser valued, less probable behavior.
If you hate to sweep your barn aisle, but love to ride, don’t put sweeping after riding. Let riding serve as a reinforcer for sweeping up. When you finish grooming and reach for the broom before you reach for your hard hat, that puts you on a habit path that’s going to culminate not just in a great ride, but also in a love for barn chores. Clicks for you!
That’s something I discovered when I changed the sequence in which I did my barn chores. I’ve always disliked sweeping. When I was boarding my horses, it never made any sense to me that we were sweeping the barn aisle last thing at night. The only person who was going to see our beautifully swept aisle was the morning stall cleaner, and she was going to begin the day by making a mess.
It would have been much better to sweep up when we first arrived so we could enjoy the clean aisle all evening, but that wasn’t how things were done. In my own barn I sweep the aisle first and then follow that with cleaning the stalls and paddocks – something I enjoy. After the barn chores are done, I get to play with the horses. The result? I now look forward to sweeping the aisle. It’s a great way to begin my day.
Panda is “helping” me sweep my barn aisle during a visit to the barn.
The same kind of sequencing becomes important when you train your horse. Think about the order in which you ask for things. If you’ve taught a behavior well, it can serve as a reinforcer for a newer behavior you’re working on. Ideally every behavior you add into your training loops should function as a reinforcer for all the other behaviors. The result: every behavior you ask for will become something your horse enjoys doing.
That’s ideally. How can you make that a reality for the behaviors you teach your horses?
Turning Mats Into Tractor Beams
For a horse who likes to be actively doing something, what could be more tedious than standing on a mat? And yet, that’s definitely not how our eager clicker horses view mats.
Mats become like tractor beams drawing the horse in. They are where good things happen. You get treats on a mat. You get lots of attention. And when you leave one mat, you get to head off to another. More treats! Yeah!!
Mats are where good things happen.
If I teach mats well, they are a source of play not tedium. When I am first teaching mats, I keep the Premack principle very much in mind. Most horses initially view a mat as something to avoid. They will step over it, around it, slam on the brakes in front of it, anything but actually step on it.
I’ve taught mats in lots of different ways. You can freeshape stepping on a mat, but I prefer to put the horse on a lead and turn this into a more directed-learning process. The reason I do this is because it’s a great opportunity for the horse and handler to become more familiar with good rope handling techniques.
In the horse world the lead is often used as an enforcement tool. “Do what I say – or else!” If a horse pushes past the handler, the lead is there to give him a quick reprimand. The handler jerks the lead so the horse feels a sharp bump from the halter.
If a horse doesn’t back fast enough, he knows the lead will be there again swinging threateningly in his face.
That kind of expectation is not clicker compatible. We need to take the “do it or else” threat out of the lead. The lead is there to ask questions – not to tell or demand.
What does this mean – the lead is there to ask questions? One of the best ways to describe this came from a youtube video clip of Mia Segal. Segal is a Feldenkrais practitioner. Developed by Moshe Feldenkrais in the mid-1900s Feldenkrais work eases pain or restrictions to movement by increasing an individual’s awareness of small movements.
Feldenkrais Work
Unlike a massage and other manipulative therapies, Feldenkrais work is experienced through self-observation. You learn how to move with attention. You become aware of how you move; what parts of your body you mobilize to create an intended movement; how far the movement flows through your body; where it stops; where it is blocked; and what can be released to extend the movement. It is an exploration of movement in which an individual is guided via questions towards greater self-awareness and well being.
The expression “Where there is no fear or pain, learning can take place in a single lesson.” lies at the core of this training. Like many in the horse world I was first introduced to Feldenkrais work via Linda Tellington-Jones. Her TTEAM training evolved out of this work. Later I was fortunate to have a client who was an Alexander Practitioner and who had also studied the Feldenkrais work. We did trades, sharing back and forth the new things we were exploring. Through her I learned even more about the art of asking questions.
Asking Questions
Recently a friend sent me a link to a youtube clip of Mia Segal teaching a workshop (https://www.youtube.com/watch?v=prGxrhXDEgQ). My friend said it reminded her a lot of my work. As I watched it, I thought, she’s right. Mia Segal might have been talking about working with people, but she was describing perfectly my approach to horse training. Segal was sitting on the floor with one of the workshop participants. She was clearly in the middle of a session. Her student was lying on her back, knees up in the air, with Segal comfortably supporting her head in her hands.
Segal was talking about the first time she saw Moshe Feldenkrais working. It was 1957. After the session he asked her if she had any questions. She had so many, but she knew there were other people waiting. How could he have time for all of her questions?
Feldenkrais answered her – “If you know the question – it will take but a minute.”
The art of training is knowing the questions to ask. That is as true for our horses as it is for people.
Segal went on to say:
“Someone recently asked the question: ‘What is the difference between this work and pilates, yoga, and other physical therapies. Isn’t it all the same? So you have another method.’ And I thought the biggest difference is this is a method of questions. I don’t have answers, and I don’t want answers.
You ask a person to move in a certain way. Bend your knees to the right and you ask – ‘How is she doing it? Is it anything to do with what I feel under my hands?’
How do I feel it in my hands? How is she coming back? Does this change anything under my hands? And do it to the other side – How is she doing it, and does this feel different?
So rather than thinking – Here it stops. Here it goes. Instead I just keep putting a little question mark at the end. HOW does it go? HOW does it stop? WHERE does it stop? WHEN does it stop? Is it the same on both sides? And then I have the whole lesson.”
The Translation to Horses
When I slide down a lead to a point of contact, I am listening through my hands. And I am asking questions.
This horse and I are deep in conversation. I am asking many questions through my hands.
When I meet horses for the first time, most aren’t used to being asked anything. They expect to be ordered about. Some horses are very compliant. They have learned that the best way to stay out of trouble is to do what they’re told. They will follow the feel of a rope. They will be responsive, and light in your hands. They may even seem happy or at least content.
Light we can measure in terms of how much pressure we need to apply to get a response; how quickly the horse responds; how much weight we feel in the rope as he moves. Does he move with us, or does he hang back leaving pressure on the lead? These are all measurable.
But happy. Who knows. How do I know if you or anyone else is happy?
The “Black Box” of Emotions
How do I know if another person is happy? I may see behaviors that I associate with times when I have felt happy, but I don’t really know how anyone else feels. When you say you love your horse, I believe you. But what does that really mean? If you tell me you love your horse, but then you sell him so you can buy another horse who jumps higher, I have to believe that that word means something very different to you than it does to me.
So I can say that a horse is responsive – that’s measurable. I can describe other behaviors that I like to see – his ears are relaxed so they flop back and forth in time with his walk. Or I might see the opposite. He has his ears pinned flat, he’s grinding his teeth, and the muscles around his eyes are tight. These behaviors tell a different story. I wouldn’t say that’s a horse who is happy.
The Lead Tells A Story
Often when I first attach a lead to a horse, what I encounter is resistance and concern. Leads have been used for corrections – so the horse is defensive. He may throw his head up as I slide down the lead, or punch my hand with his mouth. He might even bite at the lead or at me. He’s telling me about his history, and I need to listen. I also need to respond in a way that doesn’t prove to him that he was right to be guarded.
The mats are going to help me. I was about to add the phrase: get past his defenses, but that’s not exactly right. That would imply that the castle walls are still there, and all I’ve done is found a way to scale them.
Instead, I want to show him that the castle walls, the moat with the sharks, the draw bridge, the boiling oil, the iron portcullis, and all the armored men lined up behind it aren’t necessary. They can all vanish, whisked away not through force, but through play. In the next installment I’ll describe a lesson that replaces castle walls with airplane runways, and you’ll see how the Premack Principle can be applied to training loops.
Coming next: The Runway
Remember, if you are new to the JOY Full Horse blog, click on the JOY Full Horses tab at the top of this page to find the full table of contents and links to each of the articles I have published so far.
I hope you will want to share these articles by sending links to this blog to your friends. But please remember this is copyrighted material. All rights are reserved. Please do not copy any of the “Joyful Horses” articles without first getting written permission from Alexandra Kurland, via theclickercenter.com
Also note: these articles are not intended as an instruction guide for introducing your horse to clicker training. If you are new to clicker training and you are looking for how-to instructions, you will find what you need at my web sites:
In the previous post I shared many examples of using environmental cues. For one example I wrote:
“When you have a training challenge, instead of tackling it head on with your normal “horse training” solutions, think instead about how you might use props. If your horse has trouble turning to move out of your space, how could you use mats to help with this?”
One of the reasons I wanted to share the JOYFull Horses book on line was I knew I wanted to include video along with the text. That’s what I’ll be doing in today’s post. To illustrate just how useful environmental cues can be in training, I’m going to explain more fully how you can use mats to teach basic balance and leading skills. I’ll be combining the draw of the mats with the set up for a turn that can be created out of food delivery.
These videos were taken during the spring 2015 Arkansas clinic at Cindy Martin’s farm. Cindy is one of the coaches for my on-line course. The video features her beautiful draft cross mare, Scout. Scout is a fairly new arrival in Cindy’s family. When she first started riding her, Cindy discovered two things. First, Scout’s idea of steering meant going where she wanted to go regardless of the rider’s wishes. And second, if you asked for forward, you were just as likely to trigger rearing as any forward impulsion. These riding issues meant it was time to go back to ground work and teach Scout the basics of leading.
By the time these videos were taken, Scout was well versed in the foundation skills of clicker training. She had become a mannerly, very pleasant horse to be around, but her tank-like qualities were still in evidence. This was in part due to a lack of balance. During the spring 2015 clinic, I introduced Cindy to a simple lesson in which food delivery was combined with the use of multiple mats to teach better leading skills.
These videos take you step by step through the process.
Part 1 establishes a baseline. Cindy is asking for Scout to turn away out of her space. In this short video you’ll see Scout push forward through Cindy’s request. In many traditional forms of horse training we would have dealt with this push-through by getting after Scout. We would have punished the forward push, but punishment brings with it many unwanted consequences. Obviously, we used a very different approach, one that used positive reinforcement to teach Scout what was wanted.
In Part 2 you’ll see how Cindy begins to use food delivery to set up the balance shifts she wants. If you aren’t familiar with clicker training, this can look as though Cindy is simply feeding Scout out to the side. That’s only part of what is happening.
In the video you’ll hear me refer many times to “grown-ups”. This is a short hand expression for a lesson which I call: “The grown-ups are talking, please don’t interrupt”. This is one of the foundation lessons of clicker training, one of the very first things we teach the horses when we introduce them to clicker training. It’s a long name for a simple lesson. What it means is the handler is able to stand next to her horse with her pockets full of treats, and her horse will stand quietly beside her. I gave it this very long name because I wanted to emphasize that at the core of clicker training sits good manners.
Having a horse who is mugging you for treats takes the fun out clicker training. I don’t want the mugging behavior. And I also don’t want the horses to be anxious about the treats, so early on we teach them this foundation behavior. Moving away from the treat pouch is what earns clicks and treats.
So many people avoid using food in training because they see it as a distraction. They want the horse working for them, not any goodies in their pockets. I ask a lot of my horses, and I want to reinforce their good behavior generously with something they really enjoy. Being able to offer something they will actively work for adds enormously to my training. Plus, I find it reinforcing for myself to be able to say thank you for a job well done.
How do you know what your horse will actively work for? Ask yourself what will he mug you to get. At the top of the list for most horses is food. I’m going to take that information and transform food from a distraction into a powerful teaching aid. I do this by teaching the “grown-ups are talking” lesson. Once a horse understands that treats come when he shows me good emotional self-control, I can use food as a reinforcer to help teach other things. That’s what you’re seeing in this series of videos.
In Part 2 Cindy is using grown-ups. First, she asks Scout to look straight ahead so her head is out of Cindy’s space. Click. Normally, Cindy would feed Scout so her head continues to be centered between her shoulders. But to teach her how to turn so she doesn’t crowd forward into Cindy’s space, Cindy is instead stepping into her and extending her arm out so Scout has to look to the right to get her treat.
Once she does, Cindy again asks for grown-ups. Scout’s head is still bent to the side. To earn a click and a treat, she needs to keep her head away from Cindy. When she does – click! – she earns another treat. Again, Cindy extends her arm out to the side so Scout has to bend her head even more. As she does, she discovers that she can move her feet. That simple realization lets her straighten out into a more comfortable position.
So, while it might look as though Cindy is simply feeding Scout treats, and that’s how she is getting her to turn, the treats are in fact reinforcers that come after Scout has been clicked for keeping her head away from Cindy in the “grown-ups are talking” lesson.
When she does, she not only gets clicked and given a treat, she also gets to walk forward to a mat. In previous lessons Scout has been introduced to mats. She’s not only comfortable standing on them, the mats have become conditioned reinforcers.
This means that there is such a deep history of reinforcement that’s been built up around the mats, Scout regards them as a great place to be. They are a predictor of good things – easy requests and lost of treats. So Scout likes going to mats. We can use them to reinforce previous behavior. We’re going combine the strategic use of the food delivery with her eagerness to go to mats to help her find her own balance through these leading turns.
Part 3 continues to develop Scout’s balance. Not only will this teach great leading manners, but it also opens the door to lateral work. So many good things come out of lessons that are taught with positive reinforcement.
Part 4 begins to introduce the lead back into the equation. We don’t want to have to rely forevermore on food delivery to get turns. Now that Scout understands the pattern we want, Cindy can begin to ask for the turns from the lead. She may encounter some old history when she slides down the lead. Scout’s old pattern was to push through pressure, so Cindy goes back and forth between the food delivery and the lead to set up the turns and and change Scout’s expectations.
You’ll see some beautiful rope handling in these videos. Cindy is very light and tactful on the lead. She is familiar with the rope handling techniques which I teach in my books, DVDs and on-line course. If you aren’t familiar with this type of rope handling, refer to my web sites: theclickercenter.com and theclickercentercourse.com.
The lessons I am presenting here are built around this style of rope handling. The lead is taught as a clicker-compatible tool. The horses trust the information it gives them. It is not used as a correction tool. I don’t want my horses to be afraid of the lead or to be worrying about what might happen if they make a mistake. That would poison the cues the lead is giving. If you are using a style of rope handling in which escalating pressure is at times used to enforce behavior, you will undermine the intent and the power of this lesson.
Part 5 takes us into the second day of the clinic and shows us steady progress in this lesson. You might want to refer back to Part 1 as a reminder of the starting point.
Up to this point Cindy has just asked Scout to turn away from her. In this lesson I have her ask her to turn in her direction, as well. We’re following a basic principle of training: For every exercise you teach, there is an opposite exercise you must teach to keep things in balance. These two turns are part of creating beautiful leading balance.
Part 6 continues the process of adding in the lead. Again, I’ll refer you to my books, DVDs, clinics and on-line course for details on this rope handling technique.
Cindy and Scout are learning how to dance together. Each small step is part of a larger flow that will let them move in balance one with the other. This is the final video of this particular lesson. Scout had been doing wonderfully well, but she was beginning to get a little slower in her responses. That’s a good indicator that she might be getting tired. So rather than push beyond what she could do, we noted this early sign of fatigue and brought the day’s lesson to a close. Both Scout and Cindy had learned a lot.
This is a glimpse into the future. This clip was taken during the fall 2015 clinic. Scout and Cindy have made great progress in their dance together. Lateral work is one of the many good results that comes out of teaching good balance.
The fun of teaching in this way is you always get so many good things popping out of simple lessons!
Have Fun!
Coming Next: Chapter 3: The Time Has Come the Walrus Said To Talk of Many Things: Premack, Asking Questions, Mats, Airplane Runways and Creativity
Remember, if you are new to the JOY Full Horse blog, click on the JOY Full Horses tab at the top of this page to find the full table of contents and links to each of the articles I have published so far.
I hope you will want to share these articles by sending links to this blog to your friends. But please remember this is copyrighted material. All rights are reserved. Please do not copy any of the “Joyful Horses” articles without first getting written permission from Alexandra Kurland, via kurlanda@crisny.org
Also note: these articles are not intended as an instruction guide for introducing your horse to clicker training. If you are new to clicker training and you are looking for how-to instructions, you will find what you need at my web sites:


 I’m just back from attending Anja Beran’s annual workshop on classical dressage. Anja has a long standing relationship with the Krone Circus. She trains their dressage horses. The horses stay with her for roughly eight years, and then they are sent to the circus where they continue to perform well into their twenties. When we walked through the barns at the circus, we saw horses who were 25, 28, even 30 years olds. They all looked great. They were a good weight, with healthy backs, clean legs, shiny coats, and brights eyes – and they were all still performing.


 Anja Beran is another bridge builder. Her bridge stretches back centuries to bring classical riding into the modern world. Her bridge reaches forward into the future as she shows us how the gymnastic exercises developed by the great riding masters can be used for the benefit of horses. So many of the horses in her barn came to her severely lamed by training. Draw reins, heavy hands, rushed training – had compromised the soundness of so many of the horses that she presented during the workshop. With each horse, she showed us how slow lateral work can be used to restore soundness and create performance excellence.
 Earlier in July I also had the honor of spending time with yet another bridge builder, Dr. Susan Friedman. Dr. Friedman is a professor of Applied Behavior Analysis at Utah State University. Many of us know her through her presentations at the Clicker Expo, her web site – behaviorworks.org, and her on-line course, Living and Learning with Animals, a course for professional animal trainers and veterinarians. Earlier in the month Susan joined me at the Cavalia Retirement farm where we co-taught a workshop.