I’ve told you many times throughout these diaries that I clicked and reinforced a particular action. Those are good words, but we have to question – is that what really happened?
Absolutely, I did click. But what, if any, effect did it have on the goats’ behavior? Did they even notice it?
In July I could make a good case for the click being just meaningless noise for the goats. At this stage in their training were they stopping and orienting back to me because they heard the click? Or were they stopping because I stopped?
There was one very consistent cue that they were responding to. When I reached into my pocket, they surged forward for the treat. It’s this behavior that I wanted to change. There are many strategies for doing this. The one I chose for these sessions was to turn the movement of my hand into a cue for backing.
Once they had this part of the sequence down, I expected that they would notice more what came before the movement of my hand – the click. Hear that sound, and you know treats are coming – get ready. I know some people drop the click out and let the movement of their hand become the marker signal. I prefer to keep the click in the sequence.
We all have biases in what we use for our marker signals. My strong preference is for tongue clicks so I don’t have to carry a clicker around with me. That leaves my hands free for other things.
We also have biases in how we use marker signals. Do we keep them in? Do we change them over time to verbal signals? Do we sometimes feed without using a marker signal? Do we click but not feed? (When you want your click to function as a cue, that’s a peculiar one. What are you cueing? It becomes like an unfinished sentence. Think how annoying and not very useful that is when people make a habit of never finishing their . . . .
There are lots of variations on the theme. I developed my approach to using the marker signal through working with horses. I decided early on I wanted the click to be a gate keeper. That means about the only time I give my horses treats is after I have clicked. I want the message to be: “If you didn’t hear a click, don’t bother looking for food.” The exceptions involve rituals I have created around greeting and leaving. I give treats as I enter the barn and say hello to my horses, and again as I am saying good-bye, but the context is consistent and creates its own control of expectations.
At all other times, if I am giving a treat, it is for something I have clicked. This creates very consistent rules around the food. In the absence of the click, I can reach into my pocket to get my gloves or a tissue. My horses won’t be expecting food because I didn’t click.
If you sometimes feed a “just because” treat, you can create a lot of frustration. Your horse is left wondering what he just did that got you to reach into your pocket. “Just because” treats usually aren’t very consistent. That lack of consistency can throw a learner into an extinction process complete with all the “shaking of the vending machine” that goes along with it.
You’re wanting to be kind, and instead the carrots you’re feeding are just turning your horse into a scary monster. The click helps to manage this. Now he knows there’s no food unless and until he hears the click.
If you are new to clicker training, this may sound very restricting. You want to feed treats. Don’t worry. Once you start clicker training, you will have lots of opportunities to click and give your horse a treat.
Initially, the click is barely noticed by the horse. He sees you reaching into your pocket. That’s what he focuses on. You can get the same kind of mugging behavior that the goats were showing. The only difference is all that eagerness for the treats comes in a much larger package.
Over time you will see your horse respond to the click. It has begun to function as a reliable cue. When he hears that sound, he will stop to get his treat.
How do I know this? I do a lot of liberty work. Often the horse is at a considerable distance from me. In fact, I may be completely out of his sight. When I click, he stops. He heard that sound, and he knows what he needs to do to get his treat. Usually that means waiting quietly while I walk (not run) to him with the treat.
When cues are linked with positive reinforcement, they become predictors of good things to come. The sound of the click leads to good things, so my learner will want to figure out what he can do to get me to click again.
Pushing forward into my space, nudging my hands, pawing at me, if none of these things lead to a click, but backing up does, I’ll begin to see my learner actively backing away from me and these other less useful behaviors (from his perspective) will drop away. My learner will be using the backing behavior to cue me to make that funny sound that predictably, reliably leads to treats.
Over time he will learn that there are many behaviors that can get me to click. So now the noticing of cues moves back another step. He begins to pay attention to the thing that comes before the thing that comes before the thing that . . . . In other words he begins to notice the cues I am giving that signal to him what is the hot behavior that will most reliably lead to a click and a treat.
In all of this click serves as a gatekeeper. On one side are the behaviors that I want. On the other are the treats that my learner wants. It’s a win-win situation for both of us.
That understanding of the click’s function isn’t there at the beginning. Horses can be just as eager for their treats as the goats. They can crowd every bit as much into your space. But at liberty, I can show you that the click is a cue an educated horse is definitely responding to.
Why do I want this? I know many dog trainers have a much looser system with the click. They will often toss treats without first marking a specific behavior. Instead I want to give my horses so much practice responding to the click that it becomes automatic. They don’t even think about it. They hear the click, and instantly they are stopping.
Again, why do I want this? Simple answer – because I ride. Under saddle when I click, my horses all stop. I don’t have to actively stop them in order to get a treat to them. They stop on their own, and they wait patiently while I fish around in my pocket to get their treat. There’s no fussing or fidgeting. They have learned how to be patient. That’s a wonderful safety net to have when you are sitting on the back of your learner.
These goats were a long way from that standard. Riding was obviously not where we were heading. Instead they were going to be around small children. When someone clicks, backing up away from the treat pocket is a great response for a goat to have. That’s what I was working on in this session.
E’s leading session
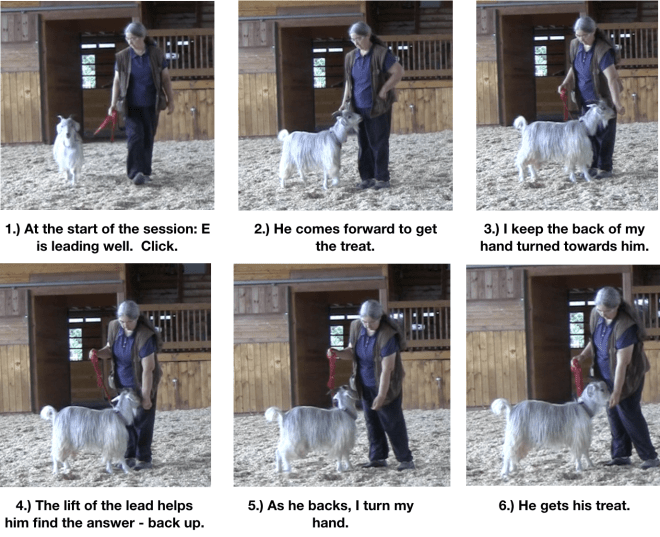
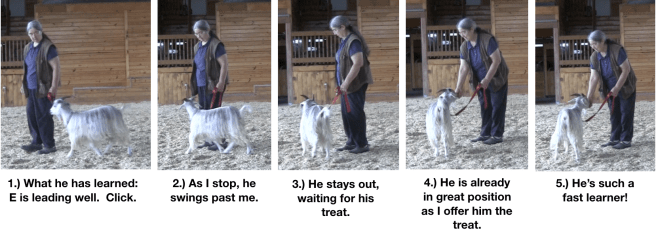
In the previous post I described P’s leading session and my focus on the treat delivery. Now it was E’s turn. I brought him out into the arena on a lead. He was also excellent. He’s so very gentle. He’s much easier to lead than P. That actually made this lesson a little harder for him. Because P can be very pushy, he’s had a lot more experience moving back from the treat. It was easier for him to make the connection and to understand that backing up is what got me to hand him a goody.
E was slower to catch on. When I clicked, I extended my closed hand out towards him. Instead of finding my open palm with the treats there for the taking, I had the back of my hand turned towards him. At first, he was confused. What was he supposed to do? I didn’t want this to turn into teasing, so I helped a little by lifting the lead up so it exerted a slight backwards pressure. It was a suggestion only. I was careful not to pull him back. The lead was there only to remind him about backing, to bring it further up in the “files” so he would give it a try.
In previous sessions I had introduced him to this collar cue. He had learned that backing led to a release of the pressure AND a click and a treat. I’d given the lift of the lead meaning. Now it was time to put it to use. The lead was acting as a prompt. He got it right away. I only had to use it three times, and then he was moving away from my closed hand on his own.
So now it was click, and he backed up to get his treat. When I extended my hand out where the perfect goat would be, he was exactly where he should be to get a treat.
You’ll need a password to watch this video. It’s: GoatDiariiesDay10E
I started to take E back, and then decided to let him have another go at the mounting block. E was a little uncertain at first but then he went across the mounting block all the way to the end. I had some foam mats at the far end. E jumped up on them. Contact points! Then he leapt high into the air for a twisting dismount. What fun!
We went back to the beginning, and he ran across the mounting block again. I loved the rat a tat tat sound of his hooves on the wood. At the far end he did another wild leap off the mounting block.
The two runs seemed to satisfy him. He followed me into the aisle and back to his stall. Getting him to go back in was easy. Dropping treats seems to be the incentive they need to turn going into the stall into a good thing. They could so easily become sticky at going back. They like to go exploring. And they definitely like the treats, the social attention, and the game. Planning ahead so returning to the stall is a good thing was paying off.
As always, I balanced the excitement of our training sessions with the quiet of cuddle time. P was particularly eager for attention. They are showing more and more enjoyment. Now when I scratch, they lean into my fingers. I can see their lips wiggling. None of this was there at the beginning. Now when I scratch them, I get a whole body response. Talk about reinforcing me!
The Goat Palace – Catching Up With Current Training
All this good prep has created more opportunities to give the goats adventures. Because they will now lead reliably, we can take the three youngsters into the indoor arena for playtime. I can lead Pellias and Elyan together without being dragged in opposite directions or pulled off my feet. On the rare days when the temperature is reasonable I’ve also been taking them out individually for walks.
Last summer Pellias was the bold one, but this winter oddly enough it is Elyan who has been up for longer adventures. We started out just walking a large circle immediately outside the lean-to. I would ask Elyan to go just a couple of steps – click and treat. When I walked off, I was always mindful of his response.
If he hesitated or stopped to look at his surroundings, I would wait for him. The slack was out of the lead, but I didn’t add any pull. When he oriented back to me, click, I gave him a treat.
If he rushed ahead of me, I would say “Wait” and stop my feet. As soon as he glanced back towards me, click, I gave him a treat. “Wait” became a reliable cue within one session.
I discovered this the next day when we took the three youngsters into the arena for a playtime. We turned then loose and let them do aerials off the mounting block. After a bit I headed towards the far end of the arena. Elyan was staying close to me. Pellias was a little further off. When they spotted a set of platforms, they started to run towards them. I said “Wait”, and Elyan immediately turned back to me. Click and treat. What fast learners these goats are! I hadn’t yet given Pellias the “Wait” lesson, but when he heard the click, he immediately turned away from the platform and came running back to me.
Walking out with them individually has confirmed even more for me that the click has taken on meaning. Pellias and Elyan have both become very good at staying by my side and keeping slack in the line. As we walk along, I’ll click, and they will immediately orient to me. This is happening now before I stop my feet or reach into my pocket. What began as just noise in the background has become a reliable and very clear signal – come get your treat!
I should mention that Thanzi has also gained walking out privileges. The first time I put a lead on her, she dragged me the length of the hallway to get back to the security of her pen. Now she stays glued to my side, and we can venture out for walks. That’s enormous progress. She was chosen to come here because she was such a strong puller. She’s so powerful, and now she is also so wonderfully light on a lead.
Trixie is another matter. The lead for her is definitely a cue – just not a positive one. If I am holding a lead in my hand, she shuts down completely. Never mind trying to put it on her. Just holding it creates this response. She is a work in slow progress. But I have written enough for today without going into the unwinding of her poisoned cues. That will have to wait for another day.
Coming Next: Day 10 Continued: Distractions!
Please Note: if you are new to the Goat Diaries, these are a series of articles that are best read in order. The first installment was posted on Oct. 2nd. I suggest you begin there: https://theclickercenterblog.com/2017/10/02/ Two of the goats I write about originally came for a twelve day stay in July. The July Goat Diaries track their training during this period. In November these two goats, plus three others returned. They will be with me through the winter. The “Goat Palace” reports track their current training. I wish to thank Sister Mary Elizabeth from the Community of St. Mary in upstate NY for the generous loan of her beautiful cashmere goats.
Don’t take score too soon. That sounds like a cliche, but when you’re training, it’s an important mantra to keep in mind. On Day 4 of his training P was leaping into the air in what I interpreted to be a display of frustration. Was it the extra energy created by adding in a second platform? Was I somehow teaching him to charge me? Should I get myself wound up into knots worrying about what I was seeing?
Or should I remain non-reactive to these outbursts and see what he presented over the next couple of sessions?
Don’t take score too soon keeps me from getting depressed over a session that doesn’t go as well as I would have liked. And it also keeps me from celebrating too soon when I have a good session. What I want to see is overall progress. I want to see the unwanted behaviors beginning to disappear, and I want to see them replaced with behaviors that make the time we spend together go more smoothly for both of us.
I could have said: I want the unwanted behaviors to be replaced with behaviors I like, but that sounds like a very lopsided and self-centered relationship. Hopefully, the behaviors I choose to reinforce are activities that my learner also enjoys.relationship.
Reinforcement can be viewed from the perspective of probabilities. When I see something I like, I click, and then I create on opportunity for my learner to do something I think he’ll like, such as eating a favorite treat. If my animal a.) notices and b.) wants what I’m offering, he’ll try to figure out what he can do to get me to offer it again. I’ll see the behavior I want beginning to occur more and more frequently under similar conditions. That’s when I can say I’ve reinforced the behavior.
If the unwanted behavior persists, I need to remember that something is maintaining or even strengthening that behavior. Dr. Susan Friedman reminds us to ask what’s the function? If the goats continue to present behavior I don’t like, I need to consider two questions: 1.) Am I reinforcing it in some way that I may not even be aware of? 2.) What function does that behavior serve? Asking this second question can help me understand what else in the environment may be maintaining the behavior.
Asking those questions is the first step. To answer them I need more data. In the afternoon session I collected more data and the “score card” began to show me that I was moving in the right direction. I didn’t film the afternoon sessions so I have just my journal notes.
The July Goat Diaries: P’s Afternoon Session
At 11 I spent a few minutes with the goats just scratching all their itchy spots. I was back at 4:30. I fed them some hay and then did barn chores.
When I went in to play with them afterward, they were definitely ready. I opened the outside stall door while I tidied up their stall. P went straight out and landed on the platform. I clicked, and he came in to get his treat, then went right back out to the platform.
E wasn’t sure what to do. In the end he decided to stay inside with me. While I was giving him some attention in the stall, P got frustrated and started standing up, spinning, and leaping. He was on the platform. Why was I not playing with him!
I closed the outside stall door but an eye on what P was doing. When I saw him going to the platform again, I clicked. When I saw P going to the platform again, I clicked for him. He came over to get his treat and then went straight back to the platform. I was liking these indicators that he knows the game, but I was concerned that I would confuse E. He had lots of fresh hay to eat, so I outside outside to play with P.
P was great. He stayed solidly on the platform, stood with a relaxed head position, not reaching out to get food, just head up in normal posture. I could step back to the fence, click, move forward to feed, and then step away again. When I walked around him, he turned with me.
On cue he followed the target to the next platform, got on it directly and stayed well. We did several rounds of this, then I left him with treats scattered on the mats. The session had been a great success.
E’s Session
I began with leading. (If you haven’t yet read the previous post, I suggest you begin with that. I explain in detail how I was re-introducing the lead to E and P.) E was excellent. He walked beside me keeping slack in the lead. He was so very soft as he responded to the collar cues. Excellent. So I set the platforms up. He was much more settled on them. There was less of the foot shuffling that he’d been doing in previous sessions. Nor was he stretching his nose out trying to get to the food. On cue he went back and forth between platforms.
I put the platforms away and let E out in the pen and got P in the stall.
I worked on leading with P. He was not as soft as E. A couple of times he tried to pull away from the restraint of the lead. It was clearly a well-rehearsed pattern. I waited without adding any pull to my end of the lead. As soon as he looked in my direction, click, I released the lead and gave him a treat. He wanted to go to the stall door which gave me an opportunity to ask him to turn back to me. Again, I waited. He glanced in my direction. Click and treat.
Why go through this process when they are both so good at staying at liberty with me? I want to be sure that they understand and will respond to the cues that a lead gives. I don’t want to be tricked into thinking they understand the lead when really all they are doing is following me.
Why does it matter?
Following me at liberty is great, but there are times when a lead is a useful or even a necessary tool. If I attach a lead, what happens when they do suddenly feel pressure from it? Does it create resistance, and panic? When it’s a horse we’re talking about instead of a goat that question really matters. I want my horses to know they can keep slack in the lead by softening into the feel. They will know how to walk beside me as though they were at liberty, and I will also have this additional communication tool working for us.
One of the great draws of clicker training is the ease with which we can teach liberty work. If you are training in a safe environment, you may never feel the need to put a lead on your animal. My horses lived for years at a boarding barn where leads were required. With so many people, and especially so many small children about, the rules said you had to have your horse on a lead any time you took him out of his stall. When my horses moved to my own barn, the halters became stiff from lack of use. We were all enjoying the camaraderie and freedom that living in a horse-safe environment created. But there came a point where I bought Robin a new halter. I loved the liberty work, but I missed the depth of subtle communication that the lead provides.
Shaping on a point of contact begins with safety. There are times when we need the safety net a lead provides. You can go this far, but no further. That’s the constraint the lead provides. It acts like a mobile fence.
This works for dogs as well as for horses. Running into the street, pulling away to get to another dog, chasing after a cat can all be prevented with the “fence” a lead creates. The reason to leave may be different, but the safety concerns are the same.
So in situations where the relationship and training may not yet be strong enough to keep an animal with you, the lead adds an extra layer of insurance. The question then becomes have we taught our animal how to respond to the constraints of a lead? Is it simply a case of resisting and discovering that there is no escape, that the only options are to give in and follow, or to have the pressure escalate? That’s the kind of background many animals and handlers have come from. For them leading is a poisoned tool.
The goats were learning through a different process. I was setting up solvable puzzles. I’ve taken the slack out of the lead. That’s the puzzle. Now can you solve it? Can you figure out which way to move to get your treat? I begin in simple environments with few distractions and few reasons for them to want/need to leave me. When one puzzle is solved, I present another. Each success builds their confidence. They know how to find the answer! The constraint of the lead is no longer seen as an annoyance or a restriction. It becomes a clue that helps them get to their reinforcement faster. When that transformation occurs in their understanding, you have turned the lead into a wonderfully effective, clicker-compatible communication tool.
This kind of training expands options. It creates freedom. We often think of a lead as a tool that restricts. But in this case it meant we could go more places. Both goats were working well. I finished the session feeling that it was time to expand their world. Instead of opening the back door into the outside run, we’d open the front door of the stall and expand their universe of options into the barn aisle. That would be the plan for day six of their training time with me.
P’s session ended with some soft scratching and back rubs. I left them to do the remaining barn chores, and then I got the chair out and sat with them to wind down the evening. They had fresh hay, but they preferred staying by me for head rubs, especially E who kept asking for more whenever I stopped. He was so very sweet. While I rubbed his jaw, he leaned on the arm rest and got dreamy eyed. They are delightful individuals to spend time with.
P on the left, E on the right, settling in for the night.
(Please Note: If you want to learn more about rope handling and shaping on a point of contact, please refer to my books, DVDs and on-line course, or come join me at a clinic. Visit theclickercenter.com for more information. I’ll also be teaching a lab on rope handling at this year’s Clicker Expos.)
The Goat Palace Journal – A Brief Update
“Don’t take score too soon” is also a good theme for the current Goat Palace sessions. Another metaphor that applies is that of making clay bricks. For each goat, over the last couple of days I’ve been working on the same lesson from one session to the next. Pellias and Elyan have very similar lessons using multiple platforms to teach heeling positions. Trixie is working in the hallway on her platform lessons. Thanzi gets the whole back pen to work on leading.
I am building “clay bricks”. In other words, I am accumulating a reinforcement history around a set of key behaviors. When I have built enough “bricks”, I’ll be able to assemble them into a house. The question is: will I be building a mud hut or a magnificent mansion? Right now, if I tried to build something with the bricks, I’d get the mud hut. Don’t take score too soon. As long as we’re having fun and it looks as though we’re heading in a good direction, we’ll keep building these bricks. These goats are so eager and so full of joy. No matter what we end up creating, it will be built with laughter.
I’ll save a detailed account of what I am doing with them for another day.
Remember to share the link to the Goat Diaries with your friends.
Please Note: if you are new to the Goat Diaries, these are a series of articles that are best read in order. The first installment was posted on Oct. 2nd. I suggest you begin there: https://theclickercenterblog.com/2017/10/02/ Two of the goats I write about originally came for a twelve day stay in July. The July Goat Diaries track their training during this period. In November these two goats, plus three others returned. They will be with me through the winter. The “Goat Palace” reports track their training. I wish to thank Sister Mary Elizabeth from the Community of St. Mary in upstate NY for the generous loan of her beautiful cashmere goats.
Coming next: Day 6 – Staying Positive with Constructional Training
I ended the previous section by saying the lead tells a story. I want my lead rope to be a welcome tool, one my clicker-trained horse is completely comfortable with. That’s the goal, but it’s often not where we begin. Often when I first attach a lead to a horse, what I encounter is resistance and concern. Lead ropes have been used for correction and punishment – so the horse is defensive. He’s telling me about is history, and I need to listen. I also need to respond in a way that doesn’t prove to him that he was right to be guarded.
I want to show him that the defenses he’s thrown up aren’t necessary. The castle walls, the moat with the sharks, the draw bridge, the boiling oil, the iron portcullis, and all the armored men lined up behind can all vanish, whisked away not through force, but through play. Mats are going to be the training tool I use.
To introduce a horse and handler to clicker training I focus on six foundation lessons. Teaching a horse to stand on a mat is one of those lessons. The mat is what the word implies. Think door mat, and you’ll have the right sort of size. You can use plywood, carpet squares, rubber mats. They all work as long as they contrast well with the surface they are on.
They are lots of different ways that you can teach a horse to step on a mat. Over the years I have used a variety of approaches, tailoring the choice to the needs of the team. But my favorite way, and the way I generally choose first is to imagine that the mat sits at the end of a runway of cones. I am trying to line up straight to my runway so I can bring my horse to a safe landing on the mat in the same way a plane would line up to a real runway. Here’s the lesson:
The Runway
Instead of castle walls with the mat as a drawbridge, I imagine an airplane runway. The sides of the runway are lined with cones that form an open V, funneling us down towards the mat at the end.
My horse, Robin is going to be our equine teacher for this lesson. He’s going to show you what the lesson looks like with an experienced “copilot”. I’ll also be describing what the lesson is like when you’re working with an inexperienced horse. I’ll be taking you from the first wobbly “flights” down the runway to the finessed balance that evolves over time. For now Robin is waiting expectantly for the game to begin.
If Robin is one of our equine teachers, let’s suppose the other is a pushy, somewhat nervous horse who has gotten into the habit over several years of dragging his person pretty much wherever he wants to go. In this lesson the pilot (me) is approaching in her single engine little plane (the horse). I’m being buffeted by strong winds. The plane (my horse) is rocking from side to side, trying to drag me off course. Can I even make the top of the runway? No! I abort to try again. I circle around, and this time I manage to get the nose of the plane, i.e. this horse, pointing into the open V of the runway. Click and treat. The wide end of the funnel helps me to be successful. I want to find ways to say ‘yes” to this horse, so I make the lesson as easy as possible by making the opening of the funnel extra wide. I’m setting up the environment to help ensure success. A narrow funnel would be much harder to get to with my determinedly pushy horse.
I had originally wanted to show a video of an inexperienced horse using the runway lesson, but computers being computers my editing program isn’t cooperating with that intent. So instead I enlisted Robin’s help. He’s my “dance partner”, or to stick with my metaphor of the runway, my copilot. I filmed him going through the pattern, and I’ve pulled still photos from the video to describe some of the key elements of this lesson.
It’s been a very long time since I have worked Robin through this foundation lesson. As always, I found it was worth revisiting the basics with him. No matter how skilled a horse becomes, the basics always reveal details that need polishing. So whether you and your horse are a novice team or one that is very experienced, the runway is a great lesson to explore.
Please note: This is not a stand alone lesson, nor is this JOYFULL Horses book intended as a clicker training how-to instruction manual. The prerequisites and a description of the handling skills needed for this lesson are presented in my DVD lesson series and in the on-line course. I am describing this lesson in detail here not not so much to teach you how to use it, but to illustrate some important concepts that are relevant to all good clicker lessons.
I’ll start with a short video which will give you a quick overview of the lesson.
There are a lot of important details in this 3 minute clip. I’m going to take the lesson apart literally frame by frame. I’ll be using stills pulled from the video to point out the key elements of this lesson. Enjoy!
The runway is part of a larger loop. There’s no beginning, middle, and end. A horse that is familiar with mats might begin, as Robin did, on the mat. The pushy horse I am starting with has never stepped on a mat and is worried by them. I would begin with that horse where we are picking up the pattern here, with Robin turning with me into the top of the runway. Note the slack in the lead. I probably would not be giving this much freedom to my pushy horse. he wouldn’t yet know how to read and respond to the subtle signals from my lead and body language. I would need to slide up the lead to signal my intent to turn. I would click and reinforce the horse as he responded to my request. This would bring him to a halt, ready for the next phase of the lesson.
Note how I have brought Robin into the runway. I’ve been mindful of the placement of the V. I’ve given us enough room to turn so Robin ends up in line with the mat. This exercise is about straightness. It is a wonderful lesson for helping crooked, pushy, unbalanced, nervous, or just plain wiggly horses.
Here Robin is beautifully lined up to the mat as he completes his turn into the runway.
In contrast here I’ve made my turn too early so there isn’t time to line Robin up straight to the runway. I originally taught the mat lesson without any cones for markers. People would walk their horses off from the mat and then come back around in too tight of a turn. There was no way their horses could line up to the mat and approach it on a straight path. These handlers were setting their horses up for a wiggly, crooked approach. The mat is about lining up straight to a mounting block, approaching the center of a jump on a straight path, crossing streams and other obstacles, stopping square at X in a dressage test, and performing any other task where precision and accuracy in the approach are needed. A novice horse needs the extra help that a long runway approach gives him. I set the cones out as guides for the handlers. They have to take their horses back to the mat by walking all the way out and around the line of cones. Targets aren’t just for our horses. Sometimes they are for us, as well.
You’re in the runway. Now what? This lesson is like a dream where you drift from one scene to another – never questioning the odd juxtaposition of images. In this part of the lesson I am doing “needlepoint” with this horse. That’s the image.
Needlepoint may not seem relevant to horse training, but the individual balance shifts we teach in the runway always make me think of the intricate stitches in a needlepoint tapestry.
Each stitch is an individual action. Each stitch must be carefully thought through before beginning the next. I may have to change colour often. I may only want one or two stitches of green before I switch to red. That’s how this part of the lesson feels to me. I will be asking for tiny shifts of weight. Each balance shift forms one stitch in this larger tapestry.
When I ask my horse for one tiny step forward, that’s one green stitch. If I’m working with a poorly balanced or pushy horse, I don’t want to take a step and then follow it with many more. Instead, just as this horse begins to lift his leg, I’m going to click. The click interrupts one thought – move forward – and replaces it with another – get your reinforcer. Before he has even really begun to move, he’s at a standstill again waiting for his treat He was thinking of barging past me, but that would have crashed our little “plane”. Instead disaster has been averted. He has taken a half step forward, and now he’s shifted his weight back slightly to get his treat.
He’s beautifully set up for the next stitch in our tapestry. I ask for another forward step. Click! Again, the power of the click interrupts him before he can charge forward. He is learning patience. He is learning self-control. He is learning to control his movements. He began with a throttle that was either at full power or completely turned off. Now we are gaining some adjustability. I can ask for a tiny amount of energy, and he can give me a soft, half step forward. Click and treat.
He is doing so well, it is time to land “the plane”. I put aside one image – the needle point – and we walk casually forward down the rest of the runway. As we approach the mat, I realize my co-pilot isn’t ready to stop. I walk over the mat myself and keep going, letting my co-pilot walk beside me.
We circle around back to the top of the runway. My co-pilot learns fast. The little plane is steadier now as we bank around the turn and face into the top of the V. Click and treat. This time I put red thread into my needle. I ask for backing. Again, I click on that single stitch. The plane wobbles a bit and goes off course. We are no longer pointing straight down the runway. It doesn’t matter. The pattern allows for many stitches of red.
Click by click we lay down a line of red stitches. The backing is smoother now, less hesitant, less wobbly. We have backed ourselves in a squarish turn that takes us out of the top part of the runway. I am using skills learned in previous lessons. My “copilot” may not be able to back straight yet, but I can still keep us in the vicinity of the runway by having him back in a square pattern. Straight will emerge as he learns how to handle these larger course corrections.
When you put enough of these fine needlepoint stitches together, you get a picture that looks like the one Robin is illustrating for us in this series of photos:
Robin’s adjustability and good balance has allowed him to come in straight to the mat. I’ve turned toward him to ask for one step back with his right front foot.
Robin has initiated a step back. As he does, I click and prepare to release the lead.
Robin has completed the single step back. You can’t see it, but my hand is opening on the lead even before his foot lands. What goes up must come down. It’s important to let go as I click and not to wait for the foot to land. If I stay on the line, I would be holding on way too long, giving my horse something annoying that he would need to push against. The timing needed to release a horse into the action you want takes deep practice focus. If you aren’t sure what I mean by deep practice, read my blog on this subject. (https://theclickercenterblog.com/2014/11/16/)
I’ve already clicked. Now it’s time to reinforce Robin with some hay stretcher pellets.
My “needlepoint tapestry” is made up of many stitches. I’ll ask Robin for another, single step back.
It may not look as though anything has changed, but Robin has unweighted his right front in preparation for backing. That’s my cue to be ready to click.
Robin has begun to take a step back – Click! Remember it’s important to click as he initiates movement. I’m not waiting to see the outcome of the weight shift (meaning the completed step back.) If I click as he initiates a movement, I am saying “yes” to that movement. This lesson is not about blocking or shutting down energy. I want energy. I want behavior. I want to say “yes” to moving even if the moving is being done by a pushy, inexperienced horse. When I click as he begins to take a step, I am saying “yes” to movement that in the past someone else may have punished. An inexperienced horse is expecting a “no”. Part of his pushiness comes from trying to rush past the obstacles he’s expecting me to throw in his path. Instead he hears a click! Surprise, surprise! He brings himself to a stop to get his treat. Self control and good balance will emerge out of saying “yes” when what his history tells him to expect is a “no”.
I’ve clicked Robin as he began to take a step back. The click is a cue to me to begin my reinforcement cycle. I’m reaching into my pocket to get a treat. But note also what my right hand is doing. I have moved it forward so the snap hangs straight down. I am giving Robin the full freedom of the lead. This is an important part of this lesson and one many people struggle with so I’ll be pointing it out again in other photos. The snap on my lead is going to become a tactile target for my horse to orient to. Moving my right hand towards Robin as I get the treat with my left is part of the teaching process that helps Robin tune in to the significance of the snap and it’s orientation.
Here’s the contrast. As I ask Robin to take a step, I’m using my right hand more actively on the lead. If he were a more inexperienced horse, I might need my hand here to help him maintain his balance as he takes a step forward. Otherwise, he might be falling into me with his left shoulder. (Note: if I were on Robin’s right side, things would be reversed. I would be feeding with my right hand and releasing the lead fully with my left.)
Here’s a common mistake. I’ve released with my left hand, but I’ve kept my right hand in place on his neck.
Even while I am reaching for the food, I am keeping my right hand in place. I refer to this as driving down a motorway with your emergency brake on. When a horse is unbalanced and pushing through you, it can feel as though you can’t let go completely. It takes focus to remember to release the lead completely with your right as well as your left hand. This is where you learn to truly let go. This is the beginning of floating on a point of contact – a heavenly feel for both horse and handler.
After all, you’ve got treats in your hand. Where is your horse going to go? This is the perfect time to experience letting go of him.
The runway lesson teaches the handler to be an agile thinker. Depending upon what happens with my horse’s balance, I may need to change in an instant the direction I want him to go. So while I am giving him his treat, I am already thinking about what I am going to do next. I don’t wait for him to fill in the “dance card” through my indecision. My body language is signaling the next clear intent. Can you tell what I’m going to ask him to do next? Answer: walk forward with me to the mat.
Robin has done a nice unit of “needlepoint stitches”. Now it’s time to let him move. I am releasing him to the mat.
In the photos it was time to release Robin to the mat. It is time to do the same for my less experienced horse. Once again, I’ll set the needle work image aside. I have asked this horse to stay focused with me through several steps. We have put down enough concentrated stitches. Now it’s time to move. We’ll walk casually towards the tip of the V and the mat. This time instead of walking over the mat, I may choose to stop on it. My co-pilot misses the stop and over swings past me. No problem. It’s a sloppy landing, but it won’t bring out the fire brigade, at least not this time. I am standing on the mat, clicking and treating my horse for standing quietly beside me. He can see that the mat did not swallow me up. Instead standing next to it produces lots of clicks and treats.
In contrast to a green horse Robin shows us a beautifully on-the-spot landing on the mat.
Robin is showing perfect mat manners. Even though he is eager to get to the mat because it represents an opportunity for reinforcement, he is walking with me on a slack lead. Mats are a great tool for teaching horses the emotional control they need to walk politely out to turnout and other exciting places. If your horse pulls or dances around you when you lead him, working with mats is a great lesson to teach.
Robin knows how to land on a mat. First, one foot . . .
Then a second foot . . .
Both front feet on the mat. Click! and . . .
. . . and initiate the reinforcement process. Note how I release the lead fully to Robin WHILE I reach into my pocket with my left hand to get the treat. Coordinating these two actions takes deep practice concentration. (https://theclickercenterblog.com/2014/11/16)
. . . Feed. Note how balanced we both are. I am encouraging good balance in Robin, AND I am also building a feel for good riding balance for myself. The mantra is: feed where the perfect horse would be. In this case that means Robin’s head is in line with his shoulders – not pulled off to the side towards me. I feed at a height that encourages him to lift up from the base of his neck. I want to feel him lifting up, supporting his own weight as I feed him. As he takes his treat, if I feel him leaning down onto my hand, that should signal to me that I need to change what I’m doing to encourage better balance in both of us.
I want to turn the mat into a conditioned reinforcer. If it becomes a predictor of good things, my horse will want to go to the mat. He’ll enjoy being on the mat. That means I’ll be able to reinforce other activities with an opportunity to return to the mat. So before we head back to the top of the runway, I cue Robin to give me a very familiar behavior, one I call: “the grown-ups are talking, please don’t interrupt”. Than means Robin is standing in his own space. My pockets are full of treats, but I am not being mugged. Robin adds the extra flourish of his beautifully calm focus and good balance to this important base behavior.
It’s click then feed for beautiful grown-ups, and then . . .
I invite Robin to leave the mat and walk off casually with me back to the top of the runway.
My green horse has also been standing beside me practicing good grown-ups. It’s time to walk off again and head back to the top of the runway. This time our entry into the V comes out perfectly. Click! That brings him to a halt so he can get his treat. I don’t have to actively stop him, cues he may not yet understand. That’s what the runway is going to teach him – whoa and go. As I give him his treat, I am deciding which colour thread to pick up, meaning should I ask him to go forward or back? I may decide to ask for a couple of green stitches, and then I’ll switch to red. It all depends upon the response I get from my “co-pilot” and where we are in the runway.
As my co-pilot becomes steadier and better balanced, we can work on an intricate pattern – one stitch forward, one stitch back, each one separated by a click and a treat. We are building control – not the force-based control of do-it-or-else, but the self-control of good balance. He is gaining the ability to change his balance – forward or back within a single stride. He doesn’t have to barge past me any more because he can regulate both his emotions and his balance.
So far I’ve asked Robin for a lot of backing. I need to balance that with requests to go forward – but remember, in the “needlepoint” phase of this pattern I am asking for only one step at a time.
As soon as he begins to initiate a step, it’s click . . .
. . . release the lead and begin the reinforcement process.
Again note how my right hand moves towards Robin releasing the lead fully to him. I have pointed this out before because it is a detail many find very difficult to coordinate. Their focus is on getting the food. It takes focused practice to coordinate the separate tasks both hands are doing. (https://theclickercenterblog.com/2014/11/16)
Many people push against the use of food during training, but clicker trainers have such an advantage because we feed treats. In this photo series you’ve seen how I can use the food delivery to help my horse become better balanced. Here I’ve drawn Robin slightly forward with my food delivery. This sets me up well to be able to turn into him to ask for my next request – backing.
As he begins to lift his left front foot, I am ready to click and release the lead.
Again, my right hand moves towards Robin to release the lead AS my left hand gets the food.
Even as he is taking the food from my hand, I am setting up my next request. Can you tell which direction we’ll be heading? Forward or back?
As soon as I’ve given him his treat, I release him to the mat. Note: this release to the mat is an important element. I don’t ask him to keep doing “needlepoint” all the way to the mat. I want to reinforce the concentrated work with an opportunity to move forward freely. The mat gives us a destination that offers even more reinforcement opportunities.
Give Them What They Want
For the horse who prefers nothing better than to nap under a tree, all this slow, step by step work is easy-peasy. It’s all that walking forward stuff to get to the top of the runway that this horse finds wearisome. So what this game sets up is a bargain. I’ll let him get all these easy clicks and treats for walking one step at a time provided he will walk with me when I ask him to head back to the top of the runway.
Remember the Premack principle from the previous article? (https://theclickercenterblog/2016/06/09) I’m reinforcing a lower valued behavior – marching on around the outside of my pattern – with a higher valued behavior – getting loads of clicks and treats for taking one small, low energy step after another followed by a chance to stand still at the mat. What could be better!
For the high-energy, foot moving, impatient horse Premack also works. I’m saying to this horse: if you will indulge me by giving me a couple of needlepoint stitches, I will not only make it worth your while by clicking and treating each one (thereby upping their value), I will also let you march forward down the rest of the runway. And if you will further indulge me by standing still on the mat where again I pay really well, I will let you march on, uninterrupted back to the top of the mat.
In both cases the Premack principle is at work. And in both cases I am turning all the segments of the loop into activities that gain value. Pretty soon, my slow-moving horse will be looking forward to the march back to the top of the runway, and my impatient horse will be showing me how softly and with such delicate control he can creep down the runway.
Stopping on Mats
For my inexperienced horse it’s time for the game to change again. I’m going to start using the skills he’s been learning in the runway.
When we get to the mat, instead of stopping so my feet are on the mat, now I’ll change course slightly in the runway so the mat is in line with my horse. If he steps over it the first time or two so his feet never touch it, that’s all right. We aren’t yet ready to land. But eventually, on one of the passes, I’ll do a test run. As we approach the mat, I’ll rotate slightly towards him as I slide up the lead. I’m indicating that we will be stopping. Our needle point has taught him how to listen to these signals. He’ll stop with his front feet just shy of the mat. Click and treat.
Here is Robin again showing us how much control and refinement the runway can help us build into leading:
I’ve released Robin to the mat. Note the slack in the lead. There’s no pulling to the mat, no forging ahead of me. We are walking together towards the mat. Exactly right.
I’ve brought Robin up to the mat, but I am deliberately asking him to stop just shy of it.
Frame 1: His front end stops beautifully, but . . .
Frame 2: Robin wasn’t expecting to stop before the mat. His front end stopped in response to my request, but his hind end took an extra moment to catch up to the change in the pattern. It’s a bit like a rear end collision at a traffic light. The first car stopped, but the second one didn’t. The result: Robin has stepped out to the side with his right hind. He could have plowed past me to continue on to the mat, but instead he has managed to stop his front end in response to my request. It’s only his back end that couldn’t quite stop in time.
He may have landed slightly out of balance, but he still responded perfectly to my request to stop his right front and then his left front foot, so he gets clicked. That’s my cue to begin the reinforcement process. I surprised him with a sudden change in pattern. That resulted in less than perfect balance in the stop, but he still gets reinforced for a correct response to my cues.
Feed so his head stays lined up with the rest of his body.
Now I’ll use his “needlepoint” skills to bring him the rest of the way onto the mat. That was the point of my abrupt halt. I wanted to create an opportunity to show you how these skills work.
Robin responds to very light cues on the lead. A very small change in my hand position is all that is needed to request a single, forward step with the right front.
Job done with the right front.
Now I ask for one step forward with the left front.
Job done again. With a very inexperienced horse I would have clicked and reinforced each footfall. With Robin I can connect these requests together via cues. Cues act as both prompts and reinforcers. I am only clicking after he has both feet on the mat, but I am still giving him plenty of “yes” information via the cues from the lead. Those cues contain an additional “yes” every time I release the lead.
I’ve clicked so now it’s time to feed.
I’ll further reinforce his good efforts to get on the mat by asking for “grown-ups”, a well known and highly reinforced behavior. Note how beautifully he maintains his balance, and his very calm, focused demeanor even though he is just inches away from the treats in my pockets.
I continue to use his “needlepoint skills” to ask him to take one step back off the mat.
Once he’s stepped back off the mat, I can ask him to come forward again. An inexperienced horse might become frustrated by all this toing and froing. He might be wanting me to make up my mind and decide which way I want him to go. But the “needlepoint” lesson in the runway has familiarized Robin with this type of request. They are just a series of changing dance steps. They were never taught as corrections. I want him to see them as a path towards reinforcement – never as a way to avoid punishment.
His front feet are back on the mat. Now I’m asking him to step up with his left hind. Click as the leg begins to lift.
Again the reminder to release with right hand as well as the left.
Feed for a job well done.
Ask for grown-ups to create added value for landing on the mat. Why go through all of this? Compare this photo with the one taken just moments before I asked Robin to step off the mat.
In both photos Robin is in grown-ups. He’s showing the calm focus and good balance that has been consistent throughout this session. But in the photo on the right Robin shows slightly more lift from the base of his neck. The difference is subtle, but it is there. It was created out of the rebalancing steps he took to back off and then, weight shift by weight shift, return to the mat. The control he has over his footfalls leads to the consistency we see throughout this lesson in his balance.
These photos were all pulled from a video. Now that we’ve gone through the details of this lesson, let’s have you watch the video again. How many of the photos you’ve been studying can you spot? They are just still frames taken from the video. How much more detail are you seeing now than you did when you watched this video the first time through at the beginning of the article? How many of the points that I covered are you spotting? I’ll bet you’re seeing the very deliberate release of my right hand and the use of the food delivery to help build good balance. What else pops out at you now that I’ve been pointing out the details of this lesson?
Constructional Training
For the inexperienced horse, as well as for Robin, the work in the runway builds the skills that are needed for the mat. That’s the strength of this approach. I haven’t started with the mat where a horse’s concern over stepping on an unknown surface might create problems. The focus of this lesson is to teach the horse to step on the mat, but that isn’t my end goal. The mat is a tool. Stepping on the mat is a way to get that energetic walk and those “needle point” skills that I’ll be using elsewhere in his training. And once my horse is comfortable with the mat, I can use it throughout his training as a reinforcer.
When I first introduced my horse to the overall game which we call clicker training, I had to deal with the food. It started out as a distraction. I held a target up for my horse to touch – which he did, eagerly enough. His curiosity served me well. Click and treat. Treat! You have food in your pockets. Never mind the target, I’ll have more of those!
The initial stages of clicker training are really a teaching process that transforms the food from a distraction into a useful tool. Once my horse understands that he gets the treats by taking his focus off my pockets and offering instead other behaviors that I like, then the game can really expand. It truly does become a game, a treasure hunt where solving the puzzle becomes even more reinforcing than the treat itself.
The mat works in a similar way. At first it is something to be avoided – stepped over or around, but never actually on. Then it becomes something to put a tentative, testing toe on. Clicks and treats! This isn’t so bad. What was all the fuss about!
Pretty soon you’ll have a horse who isn’t just stepping gingerly onto the mat, he’s rushing down the runway to get to it. Hurray!
Coming Next: Mat Manners. For every exercise you teach there is an opposite exercise you must teach to keep things in balance. The mat lesson helps you understand the importance of this statement. The runway lesson has helped create a horse who is eager to get to the mat. Now you need to explain that you’d like him to walk with you to the mat.
Remember, if you are new to the JOY Full Horse blog, click on the JOY Full Horses tab at the top of this page to find the full table of contents and links to each of the articles I have published so far.
I hope you will want to share these articles by sending links to this blog to your friends. But please remember this is copyrighted material. All rights are reserved. Please do not copy any of the “Joyful Horses” articles without first getting written permission from Alexandra Kurland, via theclickercenter.com
Also note: these articles are not intended as an instruction guide for introducing your horse to clicker training. If you are new to clicker training and you are looking for how-to instructions, you will find what you need at my web sites:
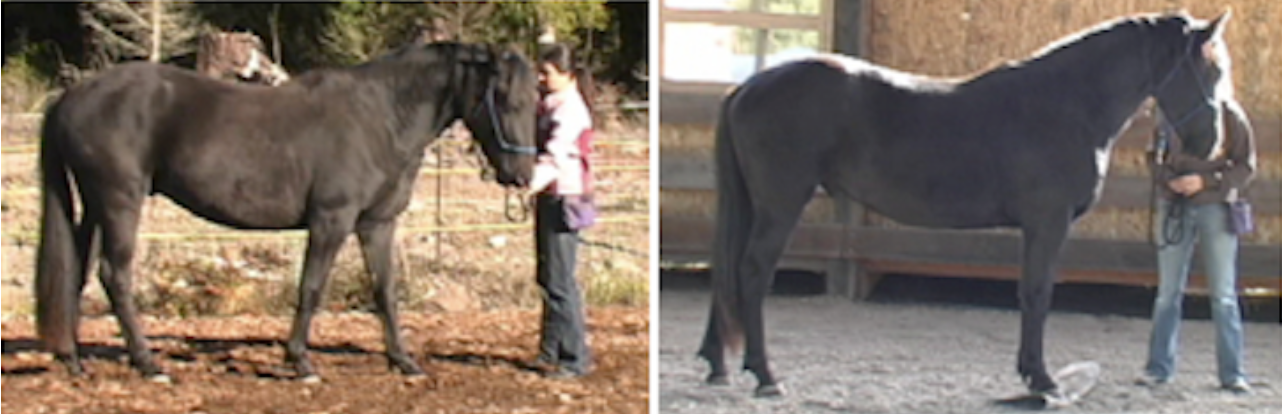
When I started Peregrine under saddle, my trainer said to me that he didn’t have the back strength to perform all the movements of upper level dressage, but he could still carry himself in the equilibrium of a high school horse. She didn’t mean in a few years. She meant now, as a young horse, we could expect him to lift up and carry himself in an engaged equilibrium.
This obviously isn’t Peregrine, but these two photos show clearly what is meant when I say he learned to lift and carry his own balance. The photo on the left shows Oliver, a percheron/quarter horse cross, as an almost two year old on day one of his first clinic with me. The photo on the right is also of Oliver. Look at how much more up and lifted he is throughout his body. He looks much older, but this picture was taken just twenty-four hours later. This beautiful balance comes from the lessons Peregrine has been teaching me.
That became the training criterion. When Peregrine was engaged, his stifles didn’t lock. I was learning to manage him so our rides no longer felt quite so on a knife’s edge of control. When I first started riding him, his stifles would lock up without warning. He would release them by catapulting me forward in a hard, rolling buck. As long as he was engaged, I could keep him from locking up, and he was a lot of fun to ride. But as soon as I got off and left him to manage his own balance, his stifles would be locking again.
He was eight years old. Clearly he was not going to outgrow this condition. And then he got Potomac horse fever. And then he was laid up for seven weeks with foot abscesses. And then we started exploring clicker training.
There had certainly been lots of people before me who used clicker training with their horses. So why did it stick with me? Why was I the one who buried herself in a computer for two years writing that first book on clicker training horses? And why have I continued to be so fascinated by it? The answer lies with Peregrine.
He was an interesting mix. He was a well trained horse, but he was also a horse with a lot of issues – all stemming from his locking stifles. I also had a huge repertoire to work with, both on the ground and under saddle.
1993 Peregrine in-hand – working on the lift needed for Spanish walk.
Ground work for me meant a lot more than lunging. It also meant classical work in-hand and a huge liberty repertoire. As Peregrine recovered from his hoof abscesses, I began to add the clicker into all of this other work. Before his lay up we’d been working on Spanish walk. I reshaped the leg lifts using the clicker. He was so elegant, and he clearly enjoyed the new way this lesson was being taught.
Spanish walk required a huge shift in his balance. In order to lift up into the front leg extensions, he had to engage his hind end to free up his shoulders. This was taught in conjunction with all of his other in-hand work. It was not presented as a separate “trick” behavior. I was asking Peregrine to carry himself forward in engagement – something the guidance of the marker signal helped him to figure out.
I was a month or two into this work when it occurred to me that I hadn’t seen Peregrine lock in his stifles in quite a while. I started paying more attention. I was right. His stifles weren’t locking – not under saddle and, even more telling, not on the ground, either.
For eight years we had been battling his stifles. After just a few months of clicker training, they had stopped locking. That’s when I knew that clicker training wasn’t simply another way to teach behavior. Yes, it’s great that we have a kinder way to teach horses to pick up their feet for cleaning, or to load into a trailer. That’s important, but clicker training goes deeper than that. It awakens our horses’ intelligence. I say it in this way because so much of training teaches horses only to follow, not to take any initiative. Clicker training lets them to be full partners in the learning process. They truly own what we are teaching them. The lessons aren’t simply things you do when someone directs you. Peregrine was learning how to manage his own body to keep himself more comfortable – all of the time – not just when I was around.
If clicker training had simply been another way to teach standard behavior, it would have been an interesting stepping stone, but it would not have held my attention in the way that it has for over twenty years. Peregrine showed me that it is so much more.
Happy 30th Birthday Peregrine. What a wise horse you are. Thank you for being my teacher.
Try Again
Years ago I learned to avoid the word “Try”, as in “I’ll try to get that done for you.” or: “I’ll try to make that meeting.” When someone tells you that, “try” translates to you might as well schedule something else. That person isn’t going to be there.
Try is a polite way of saying I don’t want to do that, but I don’t want to say so, or perhaps even admit to myself, let alone to anyone else, that I’m not going to do it.
Why does “try” have such a negative subtext? We were all raised on “The Little Engine That Could”: If at first you don’t succeed, try, try again. Try seems as though it should be one of those words that sits on the empowering side of the equation, not the other way around. How did “try” come to have such a negative association?
Psychologist, Carol Dweck, may have part of the answer. I wrote about the results of one her studies in my previous post. Students were given a test. Half the group were told: “You scored really well. You must be very smart.” The other half were told: “You scored really well. You must have worked really hard.”
Those two simple phrases produced profoundly different results. When the students were given the choice between taking a tougher test that would challenge them or another that was like the one they had just taken and done so well on, the students who were praised for being smart chose the easier test. When asked what they would do in the future if they were given a tough test, those same students said they would probably cheat. When they were given an opportunity to look over the test papers of other students, they looked at papers of students who had scored lower than they did. Looking at the test results of someone who did worse than they did made them feel better about their own performance.
In contrast the students who were praised for their effort chose the tougher second test. And when they were given a chance to look at the test papers of other students, they sought out those who had done better than they did. These students understood that ability was not fixed. Challenging themselves with tougher problems now would help them to perform better in the future. They had what Dweck refers to as a growth mindset.
The other students had fixed mindsets. When they were praised for being smart, they became locked in by those expectations. If they took on the tougher challenge and failed, people would know they weren’t smart after all. If you have to work hard to achieve, it means you aren’t a natural, you aren’t really smart. “Try, try again” was for people who needed to work hard, not the naturally gifted.
Fixed, set-in-stone mindsets are hard on horses. If a rider believes that talent is innate, she’ll have to buy a gifted horse, one with a long pedigree of champions behind him. If that horse struggles in his lessons, this rider will frustrate easily. Her horse “should” be able to do this. She’ll compare herself to all “those other” riders are already out competing on their horses, and she’ll feel like a failure.
Chunking down, building a solid foundation, taking the time it takes are all phrases designed to make this rider increasingly impatient. Natural talent doesn’t need to work through those training steps. This is a rider who won’t stick to any one training program. Instead, as soon as she hits a stumbling block, she’s looking elsewhere for answers. Trying again means she’s failed, that her horse isn’t good enough, she isn’t good enough. What a disaster.
Growth mindsets are great for horses. If you have a growth mindset, you enjoy the process of training – not just the end result. You know that it’s okay if your horse isn’t as naturally athletic as your friend’s horse. He tries really hard, and that’s what counts. You know try is like heart. It will carry him a long way forward.
Try harder.Try again. These are phrases that can make some people wince. Why should you try harder when what you’re already doing isn’t working? In a fixed mindset world you don’t believe that trying harder will make any difference. You’ll run from any suggestion that you should try again. “Try” is a miserable word if you have a fixed mindset.
But from a growth mindset perspective trying harder is something you’ll embrace. Try is great word. Try implies that you are reaching for something. You are challenging yourself, stretching yourself beyond your immediate comfort zone. Try is a great word if you have a growth mindset.
So here’s the question: how do you respond to “Try” – with excitement or glum resignation?
The Power of Yet
“Not yet” is another phrase that Carol Dweck has helped me to understand better.
In a Tedtalk she describes a high school in Chicago that doesn’t give failing grades. Instead, if students doesn’t pass a course, they get the grade – not yet.
Dweck loves this concept. As she put it: “If you get a failing grade, you think I’m nothing. I’m nowhere. But if you get a grade of “not yet”, you understand that you’re on a learning curve. It puts you back onto a path into the future.”
Students with a fixed mindset feel as though their intelligence is being tested. Failure is devastating because it reveals how inadequate they are, and there is no possibility for improvement. Dweck’s words to describe this were wonderfully evocative: “Instead of luxuriating in the power of yet, they are gripped in the tyranny of now.”
I was thinking about Dweck’s talk this past week while I was working with some horses I haven’t seen for a couple of months. No matter how many weeks – or even months it is between visits, these horses always remember what we were working on, and they are always eager for more. Their enthusiasm for learning would be any teacher’s delight. On this trip the lessons were mostly in-hand. I was focusing on how soft, quiet, and connected the communication between us could become. For each of the horses it became a dance of cues.
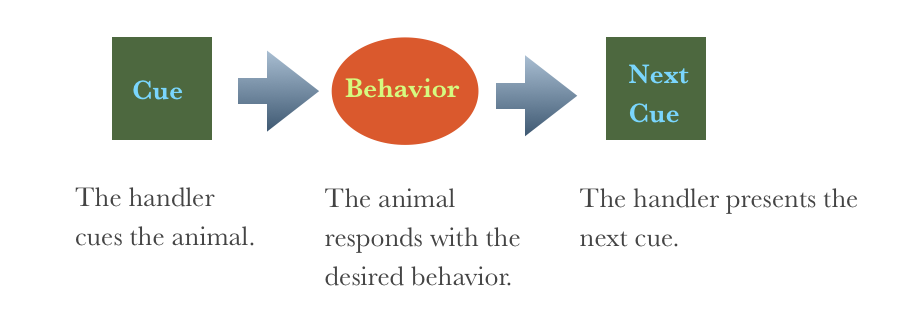
We tend to think of cues as something we give. I cue the horse to trot. He responds by trotting. The cue is a signal. The trot is the behavior I get in response. This is a very limited and limiting view of cues.
Cues are wonderfully layered and complex. The more you learn about cues, the more you appreciate what this means. Here’s an example: we’re not the only ones giving cues. Cues can also be given by our animals. When cues are truly working well there is a back and forth exchange. In fact, one of the fun by-products of clicker training is the behaviors that I have taught to my horse can be turned around and used by him to cue me.
When you recognize that cues are a two way street, you become much more aware of what your animals are trying to communicate back to you. Through this cue communication you become better at listening to your learner and adjusting your training to meet his needs. You’re thinking about the whole animal and not just the isolated behaviors you want to teach.
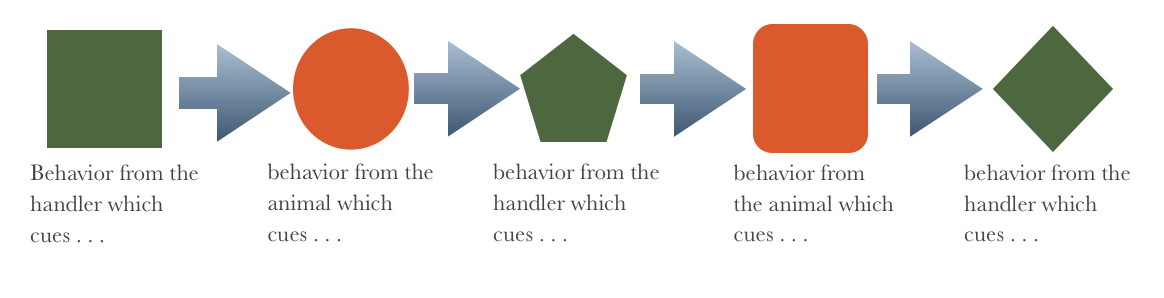
This raises the question: what is the difference between a cue and a behavior? Could you reach a point in your training where all you really have is just a series of cues?
On a macro scale this is how we normally think of cues:
In this schematic cues and behaviors are seen as two different things. But really a cue is also a behavior. You lift your hand to cue your dog to lie down. That hand signal is a behavior. When the dog responds correctly, that reinforces you for lifting your hand in that particular way and makes it more likely that you’ll do it again. The effect of cues works in two directions. They signal which is the next “hot behavior”, and they reinforce the preceding behavior.
When your dog lies down, we think of that as a behavior. But it’s also a cue to you to click and toss him a treat.
You say “trot” to get your horse to change gait. Producing that sound is a behavior. As are all the weight shifts, the changes of breath, the head tilts and anything else we may use to signal to our intent. But why did you ask for the trot at that particular moment? Were you responding to some subtle signals from your horse that said this would be a good time to trot? When you think about cue communication, this is how the graphic evolves: With people what would we call this back and forth exchange? How about a conversation?
That’s exactly what I was having with these horses. Back and forth – I listened to them, they listened to me. Out of this conversation one of the horses produced the most glorious trot. I was working him in a somewhat unconventional leading position. Instead of being at his head, I was by his hind end. As he trotted beside me, I had my hand resting on his hips.
It was an amazing trot – to the left. To the right he couldn’t manage a trot at all. I found myself saying “yet”. Thank you Carol Dweck. The trot was not there – yet.
I asked. He clearly knew what I wanted. I could have insisted, forced him to make more of an effort, to produce a trot NOW. I did not. Instead I listened to him. I let him cue me. This is how our relationship has always been. He wanted to shift his balance into a lateral flexion. Good idea. Let’s flow with that.
The next day the trot to the left felt even more glorious. And in this session, when I asked for the trot to the right, he went up into it with ease. Not yet had transformed into yes now!
More than that, the trot to the right was even better than it was to the left. The celebration over that wonderful trot was all the sweeter because it had not been there just the day before. I had chosen a teaching strategy that let me listen to my horse, that let me harness the power of yet.
“Yet” is a wonderful word. “He can’t trot to the right” is a door slammed closed. “He can’t trot to the right – yet” is a door held open to possibilities. Which do you want for your horse?
Dancing with Cues:
Here’s a bit of what can evolve when you dance with cues.
Written by: Alexandra Kurland
Published January 12, 2015
Please note: If you are new to clicker training and you are looking for how-to instructions, you will find what you need at my web sites: