JOYFULL Horses: Cues Evolve Out of the Shaping Process – Pt. 2

Cues evolve out of the shaping process.
I chose head lowering to illustrate how this works.  In Part 1 I ended with a reminder that there is always more than one way to teach every behavior.  I teach head lowering in many different ways.  The first, easiest way is through targeting. That’s a good start, but just because you can get head lowering one way doesn’t mean your job is done.  The more different ways you can trigger the behavior, the better.

Backing in a Square
You may not see the connection at first, but one of my favorite ways to teach head lowering is via backing in a square.  The reason for using this teaching process is because it generates a shift of balance from the forehand onto the horse’s hindquarters.  That in turn leads straight to improved performance under saddle.  You may not see the connection at first, but this way of asking for head lowering creates a very different balance from the one a horse is normally in when he drops his head.  The most frequent form of head lowering occurs when he’s grazing.

Robin back in square

Head lowering is taught via backing in a square.

Grazing is a forward-moving exercise.  Horses graze by walking slowly forward.  They don’t normally graze by walking backwards and eating the grass that they have already stepped on.  Grazing forward means they encounter fresh grass that hasn’t yet been crushed underfoot.

Grazing is a forward-moving exercise.

Panda grazing 1

Grazing is forward movement.

Not A Forward-Moving Exercise
The expression for teaching head lowering is: head lowering is not a forward-moving exercise.

At first glance this seems like a very clumsy sentence.  What you are saying is your horse can stand still and drop his head.  He can also walk backwards and drop his head.  So you aren’t saying he can’t move his feet.  He just can’t move his feet forward.

You most need head lowering when a horse is nervous.  A nervous horse needs to move.  If you were to try to ask him to drop his head AND stand still, you would bottle him up way too much.  Under this kind of enforced restriction, he might end up exploding like an over-coiled spring.

So you don’t say to this still learning-to-be-calm horse – “Stand still”.  You say: “You can move your feet all you want, but I get to choose the direction.  If you need to move, you can back up.  And to be more precise, you can back in a square.”

It’s best to teach this lesson when your horse is calm.  If your horse already understands how to back up in a square, he won’t feel trapped.  If something does make him nervous, it will be easier to remind him that backing is a great option, and dropping his head is even better.

Moving the Hips
Backing in a square lets you manage where in your work space you are going to be.  If your horse becomes even more nervous the further into your arena he goes, backing in a square lets you stay in the part of the arena he can handle.  It also keeps him from backing into other horses, ditches, fences, or the clutter that many of us have around our barnyards.  Horses learn very quickly what works.  Backing is hard work.  It’s not something horses normally choose to do on their own.  So if backing straight towards a barbed wire fence gets you to stop asking for backing, guess what your horse will learn fast: point your rear end towards anything sharp, or dangerous, and your human will let you go forward.

You can very quickly teach your horse to back towards ditches, blackberry canes,  wild roses, barbed wire, tractors, traffic, the one horse in the group that kicks.  You name it and if it’s something you don’t want your horse to back into, that’s what he’ll do.

Backing in a square circumvents that.  To back through a turn your horse needs to learn two skills.  The first one is obvious.  Your horse needs to back up comfortably.  You want him to back promptly when you ask, every time you ask.  He shouldn’t feel as though he is pulling his feet out of cement. He needs to move back fluidly.

You also need to be able to ask him to bring his hips to the inside, towards you.  Most of us know how to send a horse’s hips away from us.  If you ask a horse to bring his nose towards you, that will send his hindquarters away from you.  This is one of the first things a beginner learns.

Think about the instructions you give to someone who is holding a horse for you while you examine a cut on his hind leg.  You tell this person to stay on the same side that you’re on.  If the horse gets anxious, even a beginner handler will react by bringing the horse’s head towards her.  This will send his hips away.  If you were standing on the opposite side of the horse, you’d be knocked over.  You might try to push his hips away from you, but the effect the handler has with the lead is much stronger that any push you could give at his hind end.

You can get the horse to send his hips away from you, but that’s not the only direction you can influence.  A horse can move his hips in six directions.

Up and down.  Think about when he lies down and gets up again.

Robin lying down shavings

Forward and back.

To the left and to the right.

You want to be able to ask for each of these six directions, especially the last four.  Forward and back are easy.  You do that every time you ask your horse to follow beside you on a lead, and to stop and back up.

You’ve already seen how you can send your horse’s hips away from you.  Bend his nose towards you as he steps forward.  That sends his hips away from you.

To bring his hips toward you, you’ll do the opposite.  You’ll bend his head away from you as you ask him to back up. I teach this by asking him to back in a square.

Backing in a Square
If the size is suitable, I like to teach this in a stall.  The walls will help your horse understand that you aren’t just asking for backing.  You want him to turn.  Solving this puzzle helps him become more hind end aware.

Some stalls are just too small or too crowded with feed bins, water buckets, and hay racks to be good work spaces.  And some horses just aren’t comfortable in stalls.  They may feel crowded by their neighbors or anxious because the rest of the herd is outside. Asking them to work in this kind of confinement isn’t fair or productive.

So the next option is a small paddock, but again there can be problems here.  If you are slogging through muddy footing, it may not be safe for you or fair to your horse to ask for backing when you’re both pulling your feet out of ankle deep mud.  And it’s certainly not fair to ask him to back towards electric fencing – even if that fencing is turned off.

So another option is to lay out ground poles or cones in a large square, and to use those as the boundary markers.  If possible use a fence line for one side of your square.

backing in a square of poka dots

You don’t have to have a stall or small paddock to teach your horse to back in a square.  Here the square is built out of cones.

If I’m using ground poles or cones, I’ll pretend that I’m in a stall. I’ll have a designated “entrance”.  I’ll begin by walking my horse into the “stall” and stopping so his nose ends up at the “entrance”.  This gives me a reference point to return to after each click.

Initially, I’ll ask my horse to back just a step or two, click!.

Robin backing in square 1

As I am reaching for the treat, I’ll step forward.

My horse will also step forward to get his treat so we’ll end up back where we started at the entrance to our “stall”.

“Walking and Chewing Gum”
Feeding so he walks forward to the “entrance” is very important.  I don’t want to keep asking my horse to back up without taking him forward again to the front of the stall.  We would find ourselves all too quickly confronted with the back wall of the square before we’re ready.  The closer I get to the wall that’s behind him, the more reluctant my horse is going to be to back up.  He’ll be thinking: “What a stupid human!  Can’t she see there’s a wall behind me!  I can’t back up any more than this.”

In these two photos I’ve brought Robin in too close to the wall.  I’ve left him nowhere to go.  When I ask for a turn, he ends up crammed against the wall.  This could easily make a less experienced horse feel very nervous.

I don’t want to make a nervous horse feel more nervous because I’m crowding him up against a wall.  And I definitely don’t want my horse thinking I’m incompetent and stupid!  So instead, before we get too close to the back wall, I’ll reset him forward using my food delivery.

This is one of those tricky handling skills people struggle with.  They can walk.  And they can reach into their pocket to get a treat.  But doing both at the same time is hard.  It’s so like the expression about walking and chewing gum.  This is clearly a skill that must be learned and practiced.

Here are some points to look out for: You don’t want to begin your food delivery before you click.  That undermines the meaning of the click.  And you don’t want to get the food out of your pocket and then put your feet into motion.  That interrupts the flow of the pattern.
You want to click, then begin reaching into your pocket AS you turn to walk back to the front of his stall. You want this to become so automatic that you can do both together without thinking. That frees you up to focus on your horse’s response.

Dynamic Food Delivery
Now you could ask “why bother?”  Why not just click, feed where you are and then ask your horse to step forward, click, then treat again?  That accomplishes the same reset forward. It’s just broken down into more steps.

This certainly works, but it doesn’t gain you some extra bonuses.  Most important, I want my horse to understand that sometimes he needs to move his feet to get to the treat.  This active form of food delivery does many good things. It lets me reposition him so I can set him up for the next cycle of the behavior I’m focusing on.

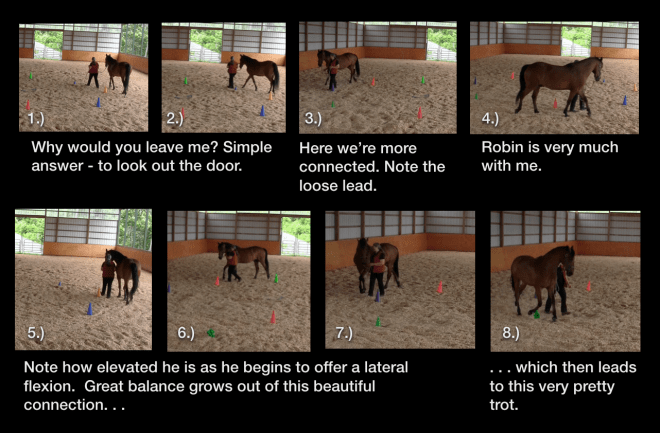
Earlier I described the “Why would you leave me?” game.  This lesson provides us with a great example where moving to get the treat really helps both you and your horse learn the “dance steps” of the pattern. (https://theclickercenterblog.com/2016/07/27/) In this lesson you are walking your horse around a circle of cones.  At some point you’re going to want to change direction.  You can do this via the food delivery.

Food delivery gives you a sneaky way to execute a complex series of steps that some horses find quite challenging.

Mapping Out The Dance
It’s very much like trying to figure out the steps for a new dance.  Once you’ve learned them, they seem effortless.  How could you ever have struggled over something so easy?  But right now you can’t figure out where to put which foot.  What a mess.  Arthur Murray where are you when we need you!?

That’s how your horse feels in the “Why would you leave me?” game.  You’re asking him to stop, back up, swing his front end across, and walk off with you in the opposite direction.  What a tangle!  But if you make this dance sequence part of the food delivery, he won’t be thinking about which foot to put where.  He’ll be following your lead before he’s even aware that he’s changed direction.  You’re programing in the dance steps BEFORE you ask for them directly.

So it’s: click, you do your part of the dance as you reach for his treat.  Next he does his part as he moves into position to take it from you. He’ll find it’s easy to stay with you.  The dance is completed without his having to think about how he’s done it.  You’re mapping this movement out in his nervous system.  Once the map is in place, it will be that much easier to ask directly for the dance steps.

Why would you leave me change of direction sequence Robin

Using Food Delivery in the “Why would you leave me?” game to map out a change of direction.

You’re also getting a chance to watch how he moves BEFORE you ask directly for the steps.  Does he back easily?  Is he able to rock back into his hindquarters and step across into the new direction?  No.  Then he may have some arthritis in his hocks or some other condition that needs protecting.  This kind of information makes a huge difference both in what you ask for and how you teach it.

Reading Your Dance Partner
The “why would you leave me?” lesson provides a great example of using dynamic food delivery.  It’s such a useful strategy, but in clinics I often encounter horses who have only been fed in place.  The first time I click and flow into my half of the dance, they don’t follow me.  Just like everything else, this is a strategy that must be taught.  I can’t expect my horse to understand that he needs to track my movement and move his feet to get his treat unless I have gone through a teaching process to explain this to him.

That’s a specific example of the basic training principle: you can’t ask for and expect to get on a consistent basis something you have not gone through a teaching process to teach to your horse.  That and safety always comes first are twined together as the guiding principles that direct all my training.  Following these two principles can help you avoid many training pitfalls and keep your training very positively oriented.

Normally, I teach the food delivery lesson early on.   It’s part of his first introduction to targeting.  (https://theclickercenterblog.com/2015/11/20/2015-clinic-season-an-introduction-to-clicker-training-day-1/)  Once my horse figures out that he may need to track my movements to get to his treat, he’s going to pay even more attention to my body language.  What hints or clues am I telegraphing that will let him know where he needs to be?

As he learns to step forward and back in response to the positioning of the treat, he’ll also be learning how to read me.  When I rotate my shoulders towards him and extend my arm out towards the point of his shoulder, he’ll back up.

This lesson is introduced in the very first clicker lessons.  I generally begin by having a horse touch a target.  I’ll hold the target out in front of him.  When he touches it, click, he gets a treat.

Robin coming forward for target

Robin has come forward to touch a target.

At first, I’ll make things easy for him.  I want him to be successful, so I’ll deliver the treat about where the target was.  He won’t have to move his feet to get to his treat.  In the photo above this would keep his head on my side of the stall guard.

I would eventually like to be able to ask him to back up.  If I’m working with a horse I don’t know, I won’t know what his past history with backing is.  Has it been used as a punisher so he resents being asked to back?  Does he have joint problems so backing is uncomfortable?   I’d like to get a “read” on how he feels about backing, so I’ll introduce it first via the food delivery.  As this lesson progresses, I’ll begin to step towards him so he has to back up to get his treat.

Robin backing in stall for food delivery

I’ve turned into Robin and extended my arm out towards the point of his shoulder.  He backs up to get to his treat.

I think of the image of a swing door.  If I swing the door (my torso) towards the horse, I am effectively closing the door, and he’ll back up.  If I rotate in the opposite direction, I’m opening the door.  I’m no longer blocking the space in front of him.  Instead I’m opening that space to him and inviting him with the gesture of my leading hand to come forward.

Cues Evolve – Adding the Lead
Once my horse is consistently coming forward to touch a target and backing up to get his treat, I can clip a lead to his halter.  Now I can combine the opening and closing of the “swing door” with cues from the lead.  My horse will respond perfectly.  I won’t need to escalate the pressure to “make” him back up.  This is a very clear case of the cues evolving out of the shaping process.

Here’s the summary of this lesson:
Beginning with some of his very first clicker training lessons, my horse learned to back up or come forward to get his treats.  That was easy.  In the process he became aware of the clues my body orientation was giving him so he could get to the treats more efficiently.  If the treats are going to be presented forward, there’s no point in getting ready to back up.  You need to read your human to know which one it’s going to be.

These hints can then be transferred to a different part of the movement cycle.  The hints are no longer part of the food delivery.  Now they are the main event.   They come before the click.  I’ll use them to ask for the behavior I want.  This process lets me use the food delivery to help my horse learn how to respond to the lead.

By tracing these reaction patterns back through a series of lessons, you can see how your horse’s ability to read your body language cues has been evolving beginning with the very first clicker lesson.  You have been building the components you’ll need one small step at a time for the more complex lessons that are to come.

This points up how important the foundation lessons are.  Ideally, no matter how complex a lesson may seem to an outside observer, for my horse the correct answer should be only one small, very attainable step away.  If I jump into the middle of a teaching progression, that won’t be the case at all.  I won’t have the underlying components in place.  I’ll be teaching my horse three or four new things all at once, and I’m likely to end up in a muddle.

In the backing in a square exercise I’ll want him to back up and then come forward to get his treat.  If he’s never moved his feet to get to his treat, he won’t understand what has just happened.  I clicked, but then I marched off before he could get his treat.  It will feel like a broken click, a broken promise, and he may shut down on me.  But, if in an earlier lesson I have taught him to walk forward to get his treat, this component will be well understood.  He’ll follow me forward to get his treat, so we’ll be set up to repeat the movement cycle.  I’m only introducing one new element at a time, not three or four.  In this case my horse already knows how to back up when asked, and to come forward after the click to get his treat.  The new element is he’s backing within a confined space.

The key to good training is this progressive, step-by-step building of components.  Lessons are only complex when they are not well prepared.  Build the underlying layers well, and you can turn the difficult into the achievable.

diagram of food delivery

This is one way in which cues evolve out of the shaping process.  Here’s another.

Cues Evolve: How Light Can Light Be?
Now that I have my horse backing easily when I rotate toward him as I slide down the lead, I’ll begin to notice that he is already backing before I can get very far down the lead.  Great!  My cues are getting lighter.  I’ve now opened up a whole new game to play.  The goal is to see how little I need to do to get a correct response from my horse. How little do I need to do to get him to back?  How far do I need to rotate? Look, I just move my shoulder slightly and he’s already backing.  Click!  Give him a treat with some laughter added on top.

Horses are superb masters at this game.  They have to be given the herds they live in. To keep from running into one another they need to be able to read and predict movement.

When Robin and I were sorting out one of the many leading patterns I’ve wrestled with, I’m sure he thought me the rudest, clumsiest dance partner ever! I was forever in his space, “stepping on his toes”.  How annoying!  When I finally figured out how to ask for the sequence I wanted without crowding into him, you could see from his expression the immense relief he felt.  Finally, he was getting somewhere teaching his very awkward pupil!

Who’s Not Showing Respect?
People are forever talking about respect – by which they usually mean the horse needs to mind his manners and stay out of their way.  But really this goes both ways.  We’re often the clumsy ones not understanding how to give our much larger dance partner the space he needs to maneuver.

Here’s something else to consider: when a horse is startled, he will often crowd in on top of us.  We humans often view this as very rude, disrespectful behavior.  But look at it from the horse’s point of view.  What should he be doing when his herd is threatened?  Bunch in closer together to make it harder for a predator to get at any one of them.  He isn’t being disrespectful at all. He’s trying to keep you both alive!  But that very generous act can get a human seriously hurt. That’s why we are teaching him some alternatives to crowding on top of us.

The food delivery has tuned you both into body language.  He now tracks you beautifully, and you’ve been able to transfer your cues to the front end of the process, ahead of the click.  You started out with a big obvious rotation of your body, but that’s now evolved into a whisper.  Tighten a shoulder muscle, and he rotates back.  What fun!

Now that he’s tuning into you, you’ll begin to notice even more ways in which your body language is giving him clues about what you want.  Before you can give your big deliberate cue, he’s already read what you want and responded to you.  You’ll need to decide if you want him to be this light, or do you want him to wait for a signal you’ve chosen.

This is often what people mean when they talk about attaching a cue to a behavior.  But as you can see the cues are already there.  It’s more a matter of deciding which of these signals are you going to highlight and make more definite.

You get to decide if you are going to make deliberate use of the small cues your horse is already using.  You can only do that if you understand the process so you can be on the lookout for these subtle cues.  Otherwise, if you block him when he starts to respond to these signals, you could end up confusing him.

One of the training mantras I repeat often in clinics is: don’t make your horse wrong for something you’ve taught him.

Being aware of the way in which cues evolve out of the shaping process is one of the ways you can help your horse to be right.

Coming Next: Starter Button and Constant-On Cues

Author’s note: Once again, I want to remind people that I am using these lessons to illustrate some important concepts.  These articles are not intended to give detailed, how-to instructions.  For those resources refer to my web sites, and to my books, DVDs, and on-line course.  In particular refer to my book, “The Click That Teaches: A Step-By-Step Guide in Pictures”, and the early DVDs in the DVD lesson series: Lesson 1: Getting Started with the Clicker, Lesson 2: Ground Manners, and Lesson 3: Head Lowering.  My on-line course will also provide you with very thorough how-to instructions.

Remember, if you are new to the JOY Full Horse blog, click on the JOY Full Horses tab at the top of this page to find the full table of contents and links to each of the articles I have published so far.

I hope you will want to share these articles by sending links to this blog to your friends.  But please remember this is copyrighted material.  All rights are reserved. Please do not copy any of the “JOY Full Horses” articles without first getting written permission from Alexandra  Kurland, via theclickercenter.com

Also note: these articles are not intended as an instruction guide for introducing your horse to clicker training.  If you are new to clicker training and you are looking for how-to instructions, you will find what you need at my web sites:

theclickercenter.com                    theclickercentercourse.com


JOYFULL Horses: Ten Things You Should Know About Cues: Number 5.) Cues Evolve – Part 1

Cues Evolve Out Of The Shaping Process

Review
It’s time again to add to our list of things I would want a beginner to know about cues.  So far we have:

1.) Cues and commands are not the same.
2.) Not all cues are verbal.
3.) Cues can come from inanimate objects.  You can have environmental cues.
4.) Our animals can cue us.

Here’s number 5: Cues evolve out of the shaping process.

The way in which cues evolve as we teach new skills leads us straight to play.  That makes this a very important concept to understand.

A common question people ask when they are teaching a new behavior is: when do I get to add a cue?  This is really the wrong question.  At least when you are working with horses, the cues are already there.  In fact you really can’t NOT cue.

If you are reinforcing your horse for putting his ears forward, where are you looking?  At his ears, of course.  When you want him to take a step back, your eyes shift down to his feet.  Your horse is going to notice these difference.  For him these are clues that will morph into cues. Even if you aren’t aware of them, they are still functioning to let him know what to do next to earn reinforcement.  So it isn’t a question of when you do you get to introduce a cue, but how do you transfer from the cue that is currently working to a new cue?  But before we can get to that question, we need to look in more detail at how those cues evolve in the first place  That’s what we’ll be exploring in this section.

Bear with me.  I’m going to be traveling through several different lessons, connecting up the dots of evolving cues as we go.

Head Lowering

Robin head lowering 1
To understand how cues evolve, let’s begin with this example: suppose I want to teach my horse to drop his head.  There are a number of reasons why I might want this behavior.

The first begins with safety.  A horse cannot simultaneously rear and drop his nose to the dirt.  If I can ask for head lowering, I can interrupt a potentially dangerous behavior.

Head lowering is also practical.  Even a short horse can become very tall when you’re trying to get a bridle or a halter on.  Asking him first to lower his head makes the task easier for you and more comfortable for him.

Head lowering leads to calmness.  This is not automatic.  The first time you ask a horse to drop his head, he’s not going to magically and instantaneously calm down.  In fact, a nervous horse can actually be made more nervous by being asked to lower his head.  With his head up he can scan the horizon line for predators more effectively.  So when you ask this anxious, on-guard horse to lower his head, he’s going to want to pop it right back up again.

Should you quit and ask for something else?  No. The answer is to keep working on head lowering, but, if you can, change the environment so he feels more at ease. Ask for it again and again over many training sessions.  As you begin to build some duration into the behavior, you will begin to see a different emotional state linking up with it.

Horses living in the wild spend twelve plus hours every day grazing.  Even horses living in stalls spend several hours a day eating.  That means they are spending a huge amount of time every day feeling relaxed enough to drop their heads and eat. The classically conditioned link between head lowering while grazing and an emotional state of calm relaxation is huge.  If we can tap into that same state by asking for head lowering, we’ve just created a powerful link between clicker training and a calm emotional state. That will serve us well as we progress forward in training.

Linking head lowering to calmness is something most people are familiar with.  Something you might not think about as much is this: head lowering is the counter balance to collection.  This is perhaps one of the most important reasons to teach head lowering because it takes you into riding excellence.

Keeping Things in Balance
One of the training mantras you want to always keep in mind is:

For every exercise you teach, there is an opposite exercise you must teach to keep things in balance.

If you ask a horse to engage and collect, you also need to ask him to lengthen and stretch out.  If you focus too much attention on collection, you may not have a way to tell him he can just relax and lengthen.  As a rider is learning about collecting, if she ends up compressing her horse, she will need a way to lengthen him back out so she can try again.  Asking a horse to stretch out in head lowering provides a powerful, and very important counter-balance both physically and emotionally to collection.

Robin pose and head lowering

On the left Robin is offering beautiful collection.  On the right head lowering balances his pose.

There’s Always More Than One Way To Teach A Behavior
I teach head lowering in many different ways.  The first, easiest way is through targeting.  I will simply have the horse follow a target down to the ground.  Click and treat.

robin head lowering green cone down

The easiest way to teach head lowering is through targeting.

That’s a good start, but just because you can get head lowering one way doesn’t mean your job is done.  The more different ways I can trigger the behavior, the better.

In the next installment I’ll look at one of the most powerful ways you can teach head lowering: via backing in a square.

Robin back in square

Head lowering is taught out of backing in a square.


Coming next: Backing in a square

Remember, if you are new to the JOY Full Horse blog, click on the JOY Full Horses tab at the top of this page to find the full table of contents and links to each of the articles I have published so far.

I hope you will want to share these articles by sending links to this blog to your friends.  But please remember this is copyrighted material.  All rights are reserved. Please do not copy any of the “JOY Full Horses” articles without first getting written permission from Alexandra  Kurland, via theclickercenter.com

Also note: these articles are not intended as an instruction guide for introducing your horse to clicker training.  If you are new to clicker training and you are looking for how-to instructions, you will find what you need at my web sites:

theclickercenter.com                    theclickercentercourse.com

JOYFull Horses: Cue Communication Continued: Part 6 – Just Tell me How You Feel

Listen to Your Horse
I’ve been describing a lesson I call “Capture the Saddle”.  It’s used to teach horses to line themselves up next to a mounting block.  In the previous section I talked about how you can turn this ordinary, everyday behavior into extraordinary “Grand Prix” level excellence.

Even before you have built the behavior to this point, you can use the mounting block as a measure of how your horse is feeling.  If your horse normally lines up well, but today he is swinging out or he’s walking off before you can get on, don’t assume that he’s “testing” you.  Instead ask him what’s wrong?  He knows standing at the mounting block leads to riding.  Why doesn’t he want to be ridden today?

Our horses work so hard to communicate with us.  We need to learn to be better listeners.  When we train them with play in our hearts, they will want to work with us.  If today they are saying “No” to riding, there’s a good reason.  It may not always be obvious, but we need to become good detectives and find the answer.

Detective Work
Ask most horse owners about the ancestral background of the horse, and they can tell you that horses are a prey species that evolved in open grasslands.  What they may not be as clear about are some of the consequences of that background.

Horses are herd animals because there is safety in numbers.  The flip side of this is there is danger in appearing to be vulnerable.  A lame or sick horse draws attention to itself and to the herd as a whole.  Show weakness, and you’ll be drawing in predators, so horses are very good at hiding their injuries.  They are protecting not just themselves, but their whole family.  It takes something acutely painful such as an abscess or a torn tendon to bring a horse hobbling to a stand still.  If they can hide an injury, they will.

So we have to be good detectives.  It may not be immediately obvious what is wrong, but if you keep looking, if you keep collecting data, you may be able to piece together enough clues to discover that the reason your horse fidgets at the mounting block has nothing to do with training and everything to do with the poorly fitting saddle that is hurting his back.

“Just Tell Me How You Feel”
Normally an angry or frightened horse gives lots of warning signals that he is about to explode.  If you punish those early warning signals in an attempt to stop a horse from biting, you can create that most dangerous of animals – a horse that gives no warning signals and goes straight to attacking when he has been pushed over threshold.

Just as horses can learn to withhold these signs of stress, they can learn the opposite.  Instead of punishing them for fidgeting and refusing to step up to the mounting block, if you show them instead that you will listen to them, they will become more comfortable about expressing how they feel.

Just as we can actively teach a process that leads to intelligent disobedience, we can teach our horses to express more openly how they are feeling.  When we listen to them in a context such as the mounting block, they begin to generalize the concept and offer us a truer picture of how they feel both physically and emotionally.

Peregrine for years bounced from one health crisis to another.  The  aftermath of a bout of Potomac Horse fever sent him on a downward health spiral that took several years to sort out.  During that time I was grateful for his grumpy faces.  I needed to know from one day to the next how he was feeling.

He was never punished for making faces.  The rule was he could make faces.  He just couldn’t act out on them.  Because I was listening, he never needed to.

Saying “No”
Sometimes the reason a horse says “No” to us, is not because there is something wrong with him, but because there is something that isn’t right with us.

This was driven home to me by a horse I met in a clinic many years ago.  The horse was on loan to one of the course participants.  She was a very clicker-experienced horse who was used to being handled by a skilled and very tactful owner.

Some horses are incredibly generous teachers.   They seem to enjoy working with beginners.  They are truly worth their weight in gold as they make up the heart of a good lesson string.  Round-bellied ponies who take care of their young riders are treasures.  Solid citizen campaigners who will take you over your first jump no matter how out of balance or how scared you are are the salt of the earth.

This mare was none of those things.  She was a finely-trained artist who expected a high level of expertise and delicate feel from all her human partners.  Unfortunately the woman who was working with her wasn’t able to live up to this mare’s exacting standards.

They started out well enough.  I had them walking around a “why would you leave me” circle of cones.  The mare started out by offering what she knew – beautifully balanced steps of shoulder-in on the circle.  The handler clicked, gave her a treat and then slid down the lead.  The mare wasn’t happy.  Something was wrong, but it wasn’t clear yet what it was.

They went through a couple more cycles.  The handler slid up the rope, and the mare walked off in shoulder-in, click and treat. Only now she was beginning to grab the lead before the handler could get more than a few inches down the rope.

“That’s as far as you’re going, little miss,” she was effectively saying.

We stopped, put the mare away and worked with the handler.  We had her slide down the lead while someone else held the snap end.  She felt soft enough to us.  There was nothing especially harsh or abrupt in the way she handled the lead.  We made a few adjustments to the details we did notice, and then we brought the mare back out.  Things were not much better.  Hmm.  We put her away again and went back to rope handling basics.

Our handler told us she had the same sort of issues with her own horse.  Clearly both horses were trying to tell her something.  This was a puzzle we needed to solve.

We brought the mare back out, but now we let her be the teacher.  The instructions were to wait until she showed her handler that she was ready to begin a new cycle.  Not until her horse cued her was she to slide down the lead.

They stood side by side.  The handler had her hands folded together about waist height.  That’s the cue for a behavior which I call “the grown-ups are talking, please don’t interrupt”. It is one of the very first lessons which I teach a horse.  The horse is clicked and reinforced when he keeps his nose pointing forward, away from the handler’s treat pouch.  Over time it evolves and branches off into many different behaviors.


Robin Runway return to mat grups 2016-06-18 at 6.21.41 PM

Robin shows us a beautiful baseline for “the grown-ups are talking, please don’t interrupt” behavior.

The grown-ups are talking:

  • is the formation of ground tying which means, among others things, you can groom a horse while he stands at ease.
  •  transforms from a simple at-ease posture into the pilates pose.  This is a “grand prix” behavior.  The horse engages the same muscles he uses under saddle to collect himself for advanced performance. Only instead of doing this in motion, he is collecting at the halt.  It is wonderfully good for a horse’s overall muscle tone and can help maintain a horse’s back strength for riding.

The Conversation
This mare had a beautiful pilates pose which she normally was perfectly happy to offer.  Now she just stood next to this handler in a flat, at-ease stance.

The handler was waiting in grown-ups for she wasn’t sure what.  She let out her breath, and the mare posed.

“Slide down the lead,” I quietly instructed her.  The handler did as she was told.  There was no biting at her hand. Instead the mare flowed into a beautifully balanced shoulder-in.  Click and treat.

The handler waited again.  Again, she let out her breath, and again the horse posed.  “She’s telling you she’s ready for you to go on,” I told her handler.  “Let the pose be the cue to you that she’s ready for you to slide down the lead.”

The mare had been trying her best to tell us what was wrong.  When this handler slid down the rope, she held her breath.  That made her feel tighter, heavier.  It made her feel as though she was shouting at this very light horse.

Either we humans weren’t as sensitive as this mare, or the handler hadn’t been holding her breath when she practiced the rope handling with us.  But at least with this horse she was definitely holding her breath. Without meaning to she was applying too much pressure.  This horse didn’t like it and neither, apparently, did her own horse.  When we gave the mare a way to signal to us when things were more to her liking, we could not only see what was going on, we could solve the problem.

Fixing the “Fixers”
As I watched this handler more closely throughout the weekend, I saw lots of little ways in which she was keeping the pressure on.  It was so subtle, it was easy to miss.  The pressure wasn’t coming from her hand on the lead, it was coming from her expectations and to be blunt – her neediness.  She was a rescuer.  She wanted to “fix” this mare. But this mare didn’t see herself as broken.

When we gave the mare permission to lead the dance, she was able to show us all that she wasn’t broken.  Her handler needed to breath, smile and set aside the “poor horse” energy that was clogging up the relationship she brought to all the horses she worked with.  She saw horses as sad little infants in need of rescuing and fixing.

If you don’t see yourself as either a baby or broken, you don’t want someone mother henning you and trying to “fix” you.  There are definitely times when my horses aren’t feeling well, and they want to be cuddled.  And there are horses who have fallen on hard times and really do need to be rescued.  But that’s not forever.  At some point that event sits in their distant past, and they are no longer “broken”.  When we surround them with “fix it” energy, some of these horses can begin to feel restricted and annoyed.

It’s very much like a toddler who squirms out of his mother’s protective arms.  “I can do it myself!”  He’s beginning to exert his own independence.  “I can tie my own shoes!”  At some point you have to let him try.

At some point we have to stop treating our horses like infants in need of our constant care and supervision.  They are our partners in the best and truest sense of that word, and sometimes our partners get to take the lead.

This handler needed to play more.  She wanted to be a nurturer, and for some horses that is exactly what is needed.  But every good mother knows there is a place for play, as well.

When my horses wrap themselves around me in beautiful lateral work, they make me smile.  I laugh with them.  We are dancing together, and for both horses and humans there is no better of expression of Joy than that.


This article ends this section on “Cue Communication”. 

Coming Next in our list of “Ten Things You Should Know About Cues” is: Number 5: Cues Evolve. 

The way in which cues evolve as we teach new skills leads us straight to play.  That makes this a very important concept to explore.  

Remember, if you are new to the JOY Full Horse blog, click on the JOY Full Horses tab at the top of this page to find the full table of contents and links to each of the articles I have published so far.

I hope you will want to share these articles by sending links to this blog to your friends.  But please remember this is copyrighted material.  All rights are reserved. Please do not copy any of the “JOY Full Horses” articles without first getting written permission from Alexandra  Kurland, via theclickercenter.com

Also note: these articles are not intended as an instruction guide for introducing your horse to clicker training.  If you are new to clicker training and you are looking for how-to instructions, you will find what you need at my web sites:

theclickercenter.com                    theclickercentercourse.com

JOYFull Horses: Cue Communication Part 5: Grand Prix Behaviors

Pre-Ride Safety Check List
In the previous article I described in detail how to teach your horse to line himself up next to a mounting block using the “Capture the Saddle” lesson.

Capture the Saddle approach mounting block 44

I know there are many ways to get to this end behavior that do not use the reins, but remember this lesson is part of your “preflight safety check”.  Just as an airplane pilot inspects his plane before takeoff, the rider is “inspecting” her horse.  She’s making sure that the connection to the reins works.

At clinics I don’t always know the riding skills of the people I’m working with.  I want to see the handler teach the “capture the saddle” lesson in this way so I know she understands how to use the rein to connect to her horse’s hindquarters.  If something spooks him and he starts to jump forward, building this in as an automatic reaction can redirect him out of what might otherwise turn into a bolt or a buck.

“Grand Prix” Mounting Block Behavior
Getting on safely at the mounting block is only step one in this lesson.  In the next phase the handler leaves her horse a few steps away from the mounting block.  He is to wait there until she calls him over to line up next to the mounting block.  This is normally taught with backchaining.  Gradually the step or two turns into greater and greater distances.  The “Grand Prix” version of this behavior is the horse comes at a canter, ignoring all distractions, and lines himself up.

Grand Prix behaviors
Most of us have seen Grand Prix horses, perhaps not in person, but certainly on video.  We’ve watched them at the Olympics, in dressage and jumping competitions.  We can all admire those horses. Perhaps you even dream of being the rider on one of these magnificent horses.  Or maybe you think, I could never do that. “I’m just a recreational rider”.  You might not dream of having a Grand Prix dressage horse, but you can certainly have “Grand Prix” behaviors.  That’s a goal that is well worth pursuing, especially when it is done playfully.

A horse who stands beautifully for grooming, and then picks each foot up for cleaning when you just point to it is showing you beautiful “Grand Prix” behavior.  When he canters over from the center of the arena and lines himself up next to the mounting block, that’s most definitely “Grand Prix” behavior.

Robin target knee 2016-06-18 at 3.48.33 PM

Robin is showing beautiful, beyond-the-ordinary foot care manners. He is targeting his knee into my waiting hand.  This makes it so very easy for me to clean his foot.


Think about your own horses.  What “Grand Prix” behaviors could you teach them?  Excellence comes in many forms.  It doesn’t have to be a competition-oriented behavior to be impressive training.  In my barn a favorite summertime activity is our nightly watermelon party.   It may not seem like much of a “Grand Prix” behavior, but waiting patiently while a favorite treat is passed out shows impressive self-control.  Turning the ordinary into the extraordinary is the fun of clicker training!

Have Fun!

Coming Next: Cue Communication Part 6: Just Tell Me How you Feel

Remember, if you are new to the JOY Full Horse blog, click on the JOY Full Horses tab at the top of this page to find the full table of contents and links to each of the articles I have published so far.

I hope you will want to share these articles by sending links to this blog to your friends.  But please remember this is copyrighted material.  All rights are reserved. Please do not copy any of the “JOY Full Horses” articles without first getting written permission from Alexandra  Kurland, via theclickercenter.com

Also note: these articles are not intended as an instruction guide for introducing your horse to clicker training.  If you are new to clicker training and you are looking for how-to instructions, you will find what you need at my web sites:

theclickercenter.com                    theclickercentercourse.com


JOYFull Horses: Cue Communication continued: Part 4 – Capture the Saddle – A Targeting Game

Constructional Training

When I shared the runway lesson with you in the June 2016 posts, I talked about constructional training.  That’s where you teach the skills you’ll need for a particular task BEFORE you need to use them.  Before you build a house – or even a birdhouse – you must first learn how to use a hammer.

That’s what we’re doing with the mounting block lesson.  I’m going to use the “Why Would You Leave Me?” game to teach my horse the skills he’ll need to line himself up to the mounting block BEFORE I take him anywhere near the mounting block. (Refer to the previous installment of JOYFull Horses: https://theclickercenterblog.com/2016/07/27/ and Lesson 5 in the Click That Teaches DVD Lesson Series: “The Why Would You Leave Me?” Game)

In training we talk about breaking each lesson down into smaller steps so it becomes easier for your learner to understand what is wanted.  Constructional training is another way of looking at this basic teaching strategy.  What are the skills you need for the task at hand?  Do you have those skills?  Yes, then the task will be within your reach.  No, then build the skills first.

When you build skills first, you find that each new thing you ask for is really just an easy step beyond what you already have.  So before I play what I refer to as the “capture the saddle” game, I first build the skills I’ll need for this lesson via the “why would you leave me?” lesson.

Capture the Saddle – A Targeting Game

Robin wwylm facing very connected good at 12.06.42 PM

Photo 1.) Why would you leave me? At this point in the lesson, Robin’s answer would be: I can’t think of a single reason. I’m happy to stay right here by your side.

Why would you leave me?  Answer: I can’t think of a single reason.  I’m happy to stay right here by your side.

When that’s the answer, you have a horse who is ready to walk with you to the mounting block.

I’ve pulled some photos from a video of the “capture the saddle” lesson.  The resolution isn’t the greatest since they come from a video, but they illustrate well how the lesson works.  The horse I am working with is a young haflinger who didn’t know how to stand well for mounting.

Capture the saddle with owner -baseline

Photo 2.) Getting a Baseline.

His owner didn’t use mounting blocks so this was a new concept for him.  When she asked him to stop with her beside the mounting block, he kept going.  He ended up facing in the opposite direction.  Previous experience had taught him that it was a good idea to keep the saddle well away from her.  This is a very common scenario, one many riders have to deal with.

capture the saddle overswings with owner 2

Photo 3.) This is a horse who doesn’t understand mounting blocks.

We can’t expect this horse to understand instantly what is wanted.  Instead we went through the steps that would teach him how to line up next to a mounting block so his rider could easily get on.

capture saddle baseline b

Photo 4.) We want to go from this . . .

capture saddle baseline c good

Photo  5.) . . . to this.

We weren’t just teaching him to line up next to a mounting block.  That could easily have been done with targeting.  He was also learning how to soften and respond to rein cues.  That’s an important extra that this lesson gives us.  His owner reported that he was an incredibly wiggly horse who was very difficult to ride.  BEFORE she gets back on, the mounting block lesson will help him to be better balanced and more connected to her.

Photos 6-8

Photos 6-8.) The three photos above show how I begin with the “Why would you leave me?” lesson.  He’s learning to walk with me.  Note, as I approach the mounting block, I am not holding onto the reins.  I want him to stop with me as I step up onto the mounting block.

Capture the Saddle approach mounting block baseline 4

Photo 9

Photo 9.) He doesn’t know this part of the lesson.  He’s not expecting to stop at the mounting block, so he over shoots the mark.  That’s okay.

I could teach this part of the  lesson in many different ways.  I could use targets and mats to help him out, but remember, I want to prepare this horse for riding.  Riding includes not just all those times when things are going great.  It also includes the sudden scares that can send even the most solid of riding horses jumping to the side.

The mounting block lesson confirms that your horse understands how to respond to your rein cues.  It provides an essential safety net for those times when things are going wrong, and it is also a core building block for creating the great performance we all dream of having when things are very right.

Photos 10-12

So in photos 10-12, I have taken the left rein, and I am asking this horse to soften and bend his nose towards me.   That causes his hips to  swing out away from me.  Essentially his front end is stopping before his hind end.  The extra momentum from his hind end causes him to swing around to the front side of the mounting block. In horse training language he is yielding his hips.

He has ended up facing in the opposite direction from the one in which we started.   (Photo 13)  That’s more than okay.  I’ll first ask him to take a step or two back so I can easily reach the right rein.

Photos 13-16

Next I’ll have him soften and come around me on his right rein.  (Photo 14)  As he swings back to the opposite side of the mounting block, I’ll again ask him to take a step back.  (Photo 15)  This does two things.  It helps him to rebalance, and it gives me access to the left rein. (Photo 16)

By the time I get on, I will know that he will soften and yield his hips to both reins.  Many people get in a hurry with this lesson.  They become too goal oriented.  They are thinking only about getting on.  I am thinking about the ride ahead.  I want it to be safe.  That’s first and foremost.  And then I want it to be fun – for both the horse and the rider.  That’s not going to happen if the horse is out of balance and disconnected from his rider.  So the “capture the saddle” lesson is really one that should be process not goal driven.  Yes, I want my horse to line up next to the mounting block, but it’s not a race to see who can teach this the fastest.  Each time this horse swings wide, he’s giving me another opportunity to explain rein cues to him.

As he comes past me again on his left side, I let go of the rein and reach out towards the saddle.  (Photo 17)  He’s not ready to let me get to the saddle.  In the photos below you see that he swings wide again.  (Photos 18-19)  That just gives me another opportunity to ask him to soften to the right rein. (Photo 20)

At no point in this do I want the horse to feel as though I am punishing any of his responses.  This is about teaching him WHAT TO DO. It is not about blocking or stopping unwanted reactions.

Photos 17-20.)

As he swings past the mounting block, I can again ask him to take a step or two back. (Photo 21)  This helps him to rebalance, and it also gives me access to the left rein.  I’ll ask him to step forward to line up along side the mounting block. (Photo 22)

Photos 21-22

As he comes past me again on his left side, I LET GO OF THE REIN.  (Photo 23)

capture the saddle 17 close up

Photo 23.)

This is very important.  I don’t want to block him to make him stand still.  Remember always – you want energy. You want your horse to move his feet.  This lesson redirects his energy.  It doesn’t block it.  You are releasing him into a halt, not stopping him from moving.  There is a huge difference.  (I’ll refer you again to my books and DVDs for a more in depth discussion of this very important concept. Visit theclickercenter.com)

As I release the rein, I am reaching up to touch the saddle.  (Photo 23)  Click and treat.  (Photo 24.) The clickable moment for this phase of the lesson occurs as my hand makes contact with the saddle.  So this lesson begins with rope handling and ends with targeting.

Capture the Saddle approach mounting block 18

Photo 24.)

I’d like him to come forward half a step so he is in a better position for me to get on.  I use the left rein to ask for this step. (Photo 25.)  As he begins to respond, I again release the rein and touch the saddle.  (Photo 26.) Click and treat.  (Photo 27.)  We’re making progress.  This time he doesn’t swing away.

Photo 25-27.)

Photos 28-30.) I ask him for another small step forward.  (28.) This time when I reach out for the saddle, he’s in perfect position.  (29.) Click and treat. (30.)

Photos 28-30.)

Remember though, it isn’t so much about the goal of lining up next to the mounting block as it is about his response to the reins.

So far I have clicked and reinforced him just for letting me make contact with the saddle.  Now I am making it harder.  I have stepped all the way up onto the mounting block so I can lean down onto the saddle and add some weight.  I’m really seeing if I can “capture it”. (Photo 31.)

Capture the Saddle approach mounting block 26

(Photo 31.)

(Photo 32.) The answer is – not yet.

Capture the Saddle approach mounting block 27

(Photo 32.)

He swings wide out from under my hands.  Again, this is okay.  It gives me another opportunity to ask him to soften and yield his hips.  All of this bending and connecting to the rein helps him to become more supple and better balanced.  That’s going to help him be more connected to his rider.

So as he swings around past me on the left rein, I’ll again ask him to rebalance by taking a step or two back, and then I’ll bring him back in front of me first on the right rein, and then on the left.  (Photos 33-36.)

Photos 33-36)

As he passes the mounting block, I again let go of the rein and reach for the saddle. (Photo 36.) He’s better balanced than he was in the first couple of passes, and he’s in a much better position.  It’s easy for me to touch the saddle.  This time I can really grab the saddle.  (Photo 37.) Click and treat. (Photo 38.)

Photos 37-38.)

I use the word grab because I don’t want to be delicate in this.  I want this horse to really feel me taking the saddle in my hands.  This is the target position.  As soon as I have both hands on the saddle – Click!

Photos 39-40

I’ve asked him to go forward another step (Photo 39.) and this time he swings a little too wide so I can’t reach the saddle.  (Photo 40.) The pattern should be familiar by now.  I ask him to swing back around via the right rein, (Photo 41.) then I bring him forward past me on the left rein. (Photo 42.)

Photos 41-44

He comes in really close to the mounting block.  It’s easy to capture the saddle.  (Photo 43.)  Click and treat.  (Photo 44.) This isn’t an ideal orientation for getting on, but we’re making good progress.

I ask him to come forward one small step.  This adjustment puts him into a great position for me to get on.  Click and treat. (Photos 45-47.)

Photos 45-47

He’s made great progress.  We’ve gone from the photo on the left (48) to the one on the right (49) in just a couple of passes.

Photo 48-49

It’s time for a break.

Capture the Saddle approach mounting block 45

Photo 50

I’ve gotten down from the mounting block.  (Photo 50.) We’re going to walk a large “why would you leave me?” circle back to the mounting block.  Remember that means I’ll be asking him to walk beside me without my needing to take the reins to keep him with me. (Photo 51.)

Photos 51-54

I approach the mounting block hands free.  (Photo 51.)  As I step up onto the mounting block, he stops on his own.  (Photo 52.)  He’s brought the saddle into perfect position.   I can really grab hold of the it and truly capture it.  (Photo 53.)  Click and treat.  (Photo 54.) This is a horse who is telling me he’s ready for me to get on.

As the horses figure out that they get clicked for bringing the saddle to our waiting hands, they become increasingly clever about lining themselves up to whatever we are using for a mounting block.

It’s great fun having your horse bring the saddle to your waiting hands. (Photo 55.)

Icky mounting block - hands up

55.) This horse is bringing the saddle to his rider’s waiting hands.

Photo 55

Sometimes a horse will misjudge the approach and ended up slightly angled out to the side.  You know he has truly understood the lesson when,  without any prompting from you, he steps sideways so he can bring the saddle to your waiting hands.  That’s a horse who really understands the game.  Click and treat.


As this video shows, sometimes a mounting block is a tree stump, or in this case a metal gate.  When a horse understands the capture the saddle lesson, he will line himself up to anything you treat as a mounting block.

If you have a horse who dances around a mounting block, this lesson will definitely help you.  But please note: this article began with a discussion of constructional training.  The more preparation you bring to it, the easier the lesson will be.

The preparation goes beyond the “Why Would You Leave Me?” Game.  It’s a matter of looking at what comes before what comes before the lesson you want to work on.

What comes before the “Why would you leave me?” Game?  Lots of preparation.  That’s prep for your horse AND prep for you.  Anytime you use a lead or reins, you want to practice first without your horse so your handling skills are horse-friendly and clicker compatible.  The how-to instructions for using reins and leads is beyond the scope of this single article.  For that please visit: theclickercenter.com and theclickercentercourse.com


Coming Next: Cue Communication Part 5: Grand Prix Behaviors

Remember, if you are new to the JOY Full Horse blog, click on the JOY Full Horses tab at the top of this page to find the full table of contents and links to each of the articles I have published so far.

I hope you will want to share these articles by sending links to this blog to your friends.  But please remember this is copyrighted material.  All rights are reserved. Please do not copy any of the “JOY Full Horses” articles without first getting written permission from Alexandra  Kurland, via theclickercenter.com

Also note: these articles are not intended as an instruction guide for introducing your horse to clicker training.  If you are new to clicker training and you are looking for how-to instructions, you will find what you need at my web sites:

theclickercenter.com                    theclickercentercourse.com

JOYFULL Horses: Cue Communication Continued – Part 3: The Mounting Block Lesson

In the previous section I described how I taught Peregrine to line himself up to a mounting block.  He was already an experienced riding horse who was familiar with mounting blocks so this was an easy lesson.  I used two targets to bring him into position.  The first brought him to the mounting block and the second took him forward a couple of steps so he ended up positioned exactly where I needed him to be in order to get on.

Capture the Saddle
I teach the mounting block lesson very differently these days.  The lesson is called: “Capture the Saddle”.  (Refer to Lesson 11 in The Click That Teaches DVD Series: “Capture the Saddle”.)  It begins with rope handling and directed learning and ends with targeting.  I teach it in this way because I regard the mounting block lesson as a final safety check before a rider gets on.  The lesson shows how well connected you and your horse are to one another.  BEFORE you get on and need to rely on them for your safety, it confirms that you BOTH know how to communication via the reins and are comfortable with their use.

A horse that has been well prepared with good ground work will breeze through this lesson.  The prerequisite is a lesson that I have named: The “Why Would You Leave Me?” game.  I will refer you to the DVD of that name for the details on how to teach this lesson.  (This is Lesson 5 in The Click That Teaches DVD Lesson Series)

The “Why Would You Leave Me?” Game
The overall description is this: the handler sets out a circle of cones and then leads her horse around the circle.  The basic question is: can the handler let go of the lead/rein and have her horse stay with her like a dog heeling at her side?  Or when she let’s go, does her horse wander off the circle, lag behind, rush ahead, or push into her to cut across her path?  Where is his attention – with her or elsewhere outside of the circle?

Robin wwylm far end collecting 1 at 11.59.50 AM

Robin has his attention on me as we walk around the “Why Would You Leave Me?” circle.

It doesn’t matter if the horse can do this perfectly at liberty, wearing nothing on his head.  Lots of things change when a horse is “dressed” for riding.  The horse that walks beautifully by your side when he’s wearing nothing, may become an anxious freight train when he’s wearing a bridle.

Bridling 2

Some people may jump to the conclusion that a horse who becomes anxious when he’s wearing a bridle dislikes having a bit in his mouth, but that may be a red herring.  If we went back to that horse’s first encounter with a bit, we might discover that he was one of those youngsters who always seemed to have something in his mouth.  His handlers were forever taking lead ropes, brushes, halters out of his reach.  If you left anything close enough to grab, he would have it in his mouth. So when he was offered a bit, there was nothing unpleasant about it.  It was something he could put in his mouth, and finally his people didn’t snatch it away from him!

But then the reality of riding set in.  Riders bounced uncomfortably on his back.  His saddle pinched his shoulders, and worst of all, when he guessed wrong or headed off in his own direction, his riders jerked on the rein so the bit hurt his mouth.  It wasn’t long before someone approaching him with a bridle became a predictor of unpleasant things to come.

Of course, this isn’t the only outcome for riding.  The sight of the bridle can mean a fun clicker game is about to begin.  But for a horse who has been ridden with corrections, the bridle often triggers unpleasant associations.

You could decide to work exclusively at liberty, or you could help this horse out by explaining away his anxiety about halters, leads, bridles, and saddles.  Every time you explain away a fear, you remove a potential source of stress for your horse.  That’s a process that’s worth doing.

Expectations
When I first get on a horse, I like to walk off from the mounting block on a loose rein. (And yes I do use mounting blocks.  I feel very strongly that they are a courtesy to the horse.  They save strain to his back.  You save strain to yours, and you protect your saddle from becoming twisted.)

Icky at mouting block 2 photos at 11.18.23 AM

I want the horse to stand patiently at the mounting block until I signal to him that I am ready for him to walk off.  I’ve watched too many horses who barely let the rider settle into the saddle before they take off.  The rider is snatching up the reins and blocking the horse before they’ve even gone two steps.  The horse protects himself by throwing his head up and tightening his jaw which then hollows his back.  The ride has barely begun, and already they are in a training hole.  It’s a long way from play for either horse or rider.

When I get on, I expect my horse to wait patiently while I get myself organized and settled into the saddle.  I appreciate these good manners, so I always click and treat the horse for standing well.  I’m sure there will be some who feel that the horse should not need to be be reinforced for behavior that he knows well, but I like to say “thank you” by marking good responses with a click and a treat.  It costs so little to maintain this ritual.  I ride with clicker treats at the ready.  Offering one as a thank you takes no real effort, and it means that my horses can be trusted to stand quietly at the mounting block.

When we are ready, I cue the horse to walk off.  I want him to walk off on a loose rein.  On a green horse, this may not be possible.  Two steps on from the mounting block I may be picking up the rein and sliding down asking for the hip, but the goal is to have a horse who leaves the mounting block in an energetic, but relaxed walk.  The reins are long.  I don’t want to be shortening them up and restricting the walk in any way.

This is important.  It gives me time to evaluate how my horse is feeling on that day.  Where is his back?  Does everything feel as it should, or is there a stiffness or an uneven feeling that I need to be aware of?  What is his energy level? How does everything compare to previous rides?  Can I feel the effect of the previous lesson in the start-up?  What is available to me?  What do I need to work on?  As Mia Segal (June 9, 2016 post)  would say, if you know the questions, you have the lesson.

Walking Off Casually and the “Why Would You Leave Me?” Game
Walking off casually gives us time to come together as a riding pair.  It gives me time to evaluate where my horse is on that particular day, both physically and emotionally.  But walking off casually is not a given.  It is something I have actively taught to my horses.  It begins on the ground with the very first leading lesson and is further expanded upon in the “Why Would You Leave Me?” game.

This lesson is best taught on a circle.  Every time the horse takes his focus away from the handler and begins to leave the circle, the handler slides down the lead and brings the horse back onto the circle.  The handler is essentially asking the question: why would you leave me?

This is such an important question to ask.  Are you leaving because the environment is too distracting? In that case perhaps the best option is to move to a less distracting location.  And note the distractions could be from things the horse is afraid of and wants to get away from, such as a tarp that’s come loose over the shavings pile.  Or it could be things the horse wants to go towards, such as grass or his pasture buddies.

Are you leaving because you are so full of energy that you can’t walk at my pace?  Are you leaving because you aren’t balanced enough to stay on a circle?  Are you leaving because you’re afraid of me?

wwylm collage

Robin begins by being momentarily distracted by something out the back door, and ends with some lateral work and a beautifully balanced, connected trot.

These are all questions I want to ask and have answered before I put my bones up on the horse.  That’s the purpose of the “Why Would You Leave Me” game.  The end result will be a horse who walks with you without needing to be held there with a lead.

We begin on a circle so the loop keeps repeating itself.  If your horse tends to crowd into you as you pass by the gate, and you missed noticing until he was already pushing you off the circle, don’t worry.  You’ll come around to that point again, and you will be better prepared to ask for what you WANT him to do.  Eventually,  you’ll be able to leave the set pattern of the circle and walk complex patterns.

In this video Panda shows off her “heeling” skills.  She’s working with Sue Bennett, one of the coaches for my on-line course.  Sue and Panda have just met, but that doesn’t matter to Panda.   She’s happy to stay connected.  Why would you leave me? For no reason at all.

My thanks to my coaches: Michaela Hempen and Asfaloth for the bridling pictures; Monty Gwynne and Icaro for the mounting block; Sue Bennett and Panda for the heeling video (and Ann Edie for letting Sue play with her guide horse); and Robin for the “Why Would You Leave Me?” photos.

Also please note: I am not attempting to provide complete instructions for any of the lessons I have described in this post.  Nor have I detailed how to ride in a way that is clicker compatible.  That’s not the function of these posts.  You will find very thorough instructions in my books, DVDS, and on-line course.  Visit: theclickercenter.com    theclickercentercourse.com

Coming Next: Cue Communication Part 4: Capture the Saddle – A Targeting Game

Remember, if you are new to the JOY Full Horse blog, click on the JOY Full Horses tab at the top of this page to find the full table of contents and links to each of the articles I have published so far.

I hope you will want to share these articles by sending links to this blog to your friends.  But please remember this is copyrighted material.  All rights are reserved. Please do not copy any of the “JOY Full Horses” articles without first getting written permission from Alexandra  Kurland, via theclickercenter.com

Also note: these articles are not intended as an instruction guide for introducing your horse to clicker training.  If you are new to clicker training and you are looking for how-to instructions, you will find what you need at my web sites:

theclickercenter.com                    theclickercentercourse.com

JOYFull Horses: Cue Communication continued

Behaviors Become Cues
In the previous section I wrote about Panda and the guide work she performs.  Just as guide work made the perfect example for understanding environmental cues, it also shows so clearly how this back and forth cue communication works.


Panda environmental cues

This is a particularly challenging form of curb for a guide because there is no clear difference between the end of the sidewalk and the start of the driveway, but Panda was always consistent at stopping where she should.  Even when the surface was repaved, changing many of the familiar environmental cues, she was rock solid in her guide work.  The driveway is the entrance to the parking lot for the district school buses so there was always a lot of traffic in and out.  Stopping accurately at this crossing was essential.


When Panda gets to a curb, she stops.  If it’s the up curb on the far side of a street crossing, she’ll put one foot up on the curb.  This tells Ann not only that there is some sort of obstacle in front of them, but where to look for it.

Ann finds the obstacle by searching for it with her foot.  She then cues Panda to go forward.  Panda walks on.  Ann may then tell her to trot on with a “hup, hup” verbal cue.  Panda will increase her speed by breaking into a brisk trot.  But she may then stop and pull to the side.  Perhaps a pedestrian is coming in the opposite direction pushing a baby carriage and walking a dog.  There isn’t room to pass, so Panda alerts Ann that there is “a situation” ahead by stopping and moving them over to the edge.

Traffic checks are another great example of cue communication.  It’s up to Panda to alert Ann and either to refuse to go forward, or to back them up out of harm’s way.

In all of these examples Panda is using the behaviors we have taught her in their appropriate context to provide Ann with the information she needs.

Mounting Blocks as Cue Communication
Cue communication can take other more subtle forms.  One of the early behaviors I taught to Peregrine via the clicker was to line himself up to the mounting block.  He was already very good about walking with me to the mounting block and standing quietly while I got on, but I wanted to add a bit of clicker flourish to the behavior.  So I used two targets.  The first brought him to the mounting block and the second took him forward a couple of steps so he ended up positioned exactly where I needed him to be in order to get on.

The targets quickly faded to hand signals. I was able to leave him in the center of the arena, walk the ten to twenty feet over to the mounting block, and call him to me. He would come and line himself up without my having to make any adjustments via the reins.

It became a favorite behavior.  In fact, if I forgot and started to lead him to the mounting block, he would hang back.  How silly of me!  I’d let go of the reins and head by myself to the mounting block.  He’d wait until I signaled to him, and then he’d come directly over and line himself up.

This behavior could always be counted on night after night even in a busy arena.  Peregrine would wait in the middle of the arena while all the other horses went past.  When the coast was clear, I’d cue him to come.  He never wandered off to visit with the other horses or to look for the scraps of hay which could always be found in the arena.  Coming when cued was a consistent, sure-fire behavior – except . . . every now and then he would stall out in the center of the arena.  I’d cue him to come, and he’d just hang back.

I never forced him over to the mounting block.  Instead I checked his feet, I listened for gut sounds, I took his temperature.  Hanging back from the mounting block was his way of telling me that something was wrong.  It was my early warning sign that he wasn’t feeling well.

Trust Your Horse, Trust the Process
I can just hear the harrumphers now.  What nonsense!  All you’re doing is teaching your horse that he doesn’t have to listen to you.  You’re letting him get away with not coming.  You’re rewarding him for hanging back.  You’re just going to get a horse who never goes to the mounting block.

Except that’s not what happened.  I trusted Peregrine, and I trusted the work we were doing together.  I truly believed that riding was fun for him.  He wanted to be ridden.

He showed me this in so many ways.  We’d be working on shoulder-in, adding our clicker bells and whistles to the basic movement.  He’d give me an extra lift through his shoulders, and I’d click and pull a peppermint – his favorite treat – out of my pocket.

He could hear the crinkle of the wrapper as I was undoing it.  Through the saddle I could feel his excitement.  If the paper was very stuck to the peppermint so he had to wait a bit longer than usual, he’d give a soft nicker of anticipation.  Finally!  I’d reach down, and he’d take the treat gently from my fingers.  I’d hear the quick crunch of the candy, and then he’d be ready to move on.  I’d touch the reins and without missing a beat he would pick up into another stride of even more glorious shoulder-in.  How could I not click that!

Of course he loved to ride!  Riding was the ticket to laughter, to lots of praise, to scritches on the neck, and best of all to peppermints!

So on the nights when he hung back, I knew he wasn’t feeling well, and I always listened.  He’d had a long series of serious health issues following a bout of Potomac Horse fever.  I needed this early warning system to be up and functioning so I could monitor his health.

Capture the Saddle
I teach the mounting block lesson very differently these days.  The lesson is called “Capture the Saddle”.  It begins with rope handling and directed learning and ends with targeting.  I teach it in this way because I regard the mounting block lesson as a final safety check before I give the okay for a rider to get on.

A horse that has been well prepared with good ground work, will breeze through this lesson.  The prerequisite is a lesson that I refer to as the “Why Would You Leave Me?” game.  In the next section I’ll describe both these lessons and the reasons for them.

Coming Next: Unit 4: Cue Communication continued: The Mounting Block Lesson

Remember, if you are new to the JOY Full Horse blog, click on the JOY Full Horses tab at the top of this page to find the full table of contents and links to each of the articles I have published so far.

I hope you will want to share these articles by sending links to this blog to your friends.  But please remember this is copyrighted material.  All rights are reserved. Please do not copy any of the “JOY Full Horses” articles without first getting written permission from Alexandra  Kurland, via theclickercenter.com

Also note: these articles are not intended as an instruction guide for introducing your horse to clicker training.  If you are new to clicker training and you are looking for how-to instructions, you will find what you need at my web sites:

theclickercenter.com                    theclickercentercourse.com


JOYFULL Horses: Unit 4: Cue Communication

Everything  You Need to Know About Cues
At the end of Part 1 I asked: What are ten things you would want a beginner to know about cues?  That seemed like a simple enough question, but look where it has taken us – to neuroscience and the affective emotional systems, to habits and what maintains them, to TAGteaching and the focus funnel, to guide training for horses, to Feldenkrais work and asking questions, to the Premack principle and the creative use of imagery in training.

All that and we still have only three things on our list:

1.) Cues and commands are not synonyms.
2.) Cues are not just verbal signals.  They can include weight shifts, hand gestures and other body language signals.  
3.) Cues can come from the environment.

And now here’s number 4.) Cue Communication

Icky mounting block - hands up

Cue Communication
We tend to think of cues as coming from us, but cues can also be given by our animals.  The behaviors we teach them can be turned around and used by them to communicate back to us.

When we recognize that cues are a two way street, we become much more aware of what are animals are trying to communicate to us.

Panda was the poster child for environmental cues.  She can serve the same function for cue communication.  Guide work is dependent upon the back and forth exchange of cues.  I described earlier Panda’s traffic checks.  That’s a great example both of environmental cues and cue communication.  The moving car is the signal for Panda to stop and back up.  Her actions cue Ann.  Ann must interpret Panda’s sudden change of behavior correctly and allow her to move her out of harm’s way.


Everyday Conversations
Good training is about cue communication.  It’s a two way street.

When novice trainers first encounter cues, they often think that they are something only they give.  Most of us have spent time around dogs, either our own or a friend’s.  We’re used to telling dogs to sit, to lie down, to come, to leave it!  These are all cues (or possibly commands – depending upon how they were taught) that we’re giving to the dog.

But what about that sad-eyed look the dog is giving you that gets you to stop working on the computer, get up, walk to the coat closet, put on your jacket and your outside shoes, take the leash off the hook where it’s hanging, attach it to your dog’s collar, open the back door and take him out for a walk.  That was quite the complex chain the dog set in motion just by raising his eyebrows and giving you “that look”.

He probably further cued the internal components of the chain by jumping up, wagging his tail, running to the back door, sitting quietly while you put on shoes and jacket and attached the lead.

Back and forth throughout this sequence there was a dance of cues.  Some were given by you, some by the dog.  It is so like talking on the phone.  You have a long story to tell.  What maintains the conversation?  The little interjections your listener gives you that tell you she’s still on the line, still listening to you.  The call hasn’t been dropped by your cell phone network, nor has she gone off to feed her horses.  Without those little sounds cueing you that the connection is still active, and she’s still on the other end of the line, your story would stutter to a stop.

“Are you still there?” You may find yourself asking this as you talk on the cell phone.

“Are you still walking to the door?”  Your dog wags  his tail, or goes into a play bow.  Yes!  That just redirected the human from the kitchen back on track to the door.

We tend to think of cues as coming from us, but cues can also be given by our animals. When you live with animals, you become as much cued by their behavior as they are cued by you.  We know the look our cats give us when they want to be picked up for a cuddle, when they want to be set down again, or let out, or fed.  We become well-trained humans.

Animal Trainers – The Ones to Really Learn From!
I have always known how much my behavior is being cued by my animals.  I know those “looks”.  I have learned to interpret them and respond appropriately to them.  It’s no good picking your cat up for a cuddle when what she wants is to go out.  She’ll simply squirm out of your arms to repeat – louder – her cue.  She knows what many people who travel in foreign countries also believe.  If the foreigner doesn’t understand your language, repeat what you just said, only louder.  In the cat’s case, this often works!

Cats are superb trainers.  They are experts at arranging their households to their liking.  If you want to learn about training – watch your cats.  You don’t need to go any further to find a master trainer!

A Well-Trained Human
Cats are very good at taking the behaviors we have taught them, and turning them around to cue us.  I became very aware of this when one of my cats was a small kitten.  She wanted to see what I was having for breakfast and perhaps share it with me.  I didn’t want to encourage this behavior, so I took advantage of her interest to teach her to sit.  I followed the same procedure I had seen dog trainers use.  I held a small tidbit over her head.  As she looked up to see what was in my fingers, her hindquarters sank towards the floor.  Click!  I gave her a tiny bit of the buttered toast she was so interested in.

Two or three reps were usually enough to satisfy her curiosity. She would go off and leave me alone to enjoy my breakfast without the constant interruption of a too inquisitive paw pushing its way onto my plate.

Over the course of several days the sit began to evolve.  Now we had a proper down on your rump sit.  Click and treat.

One morning she added a slight paw lift.  I grew that from a slight lift of her front foot into a “high five” wave.   It was very cute.

And that’s when she turned the tables on me.  I was in the kitchen not far from the refrigerator.  She very deliberately sat down, lifted her paw and gave me my cue.  It was so like the dog handlers who cue “sit” and “down” with a hand signal, only in my case the cue set in motion a much more complex chain.  I walked to the refrigerator, opened the door, reached in, lifted out the tub of margarine, took off the lid, put a small dollop on the tip of my finger, reached down and let her lick it off my finger.

I had to laugh.  I knew exactly what had just happened.  She had turned everything around, and she was cueing me!

I also understood more clearly than I ever had before that the behaviors we teach our animals can be used by them to cue us.

JOYFULL HORSES: TRANSFORMING HORSE TRAINING INTO PLAY

In the previous sections I used the image of a runway to teach a horse to step on a mat.  The point of using this image is to get you thinking creatively, with imagination.  That’s what takes you far, far away from the mind set of do-it-or-else training.

Transforming Horse Training Into Play
We’ve all watched skilled trainers, whether in person or on video.  I’m sure you’ve taken in a variety of images of how things are done.  Now suppose you’re handed a horse who is pushy, or won’t stand still for saddling.  You’ve seen how professional horse trainers deal with this in what often seems like no time at all.

It’s so easy to put on their “hat” and fall into the same-old, same-old of traditional horse training solutions.  But remember – when you are watching one of those skilled trainers, you aren’t just watching fifteen minutes of training.  You are watching fifteen minutes plus fifteen years.  That’s a lot of experience – and a lot of mistakes made and lessons learned – to get to the point where things look easy.

Easy isn’t the only criterion we’re looking for.  I remember watching a video of a trainer who was working with what was described as a “lazy” horse.  The owner wanted to be able to lunge the horse, but her horse stayed in close to her and wouldn’t move out.  There are all kinds of reasons why a horse would lock in close to a handler.  One might be that the horse has learned that staying in close is the safest place to be.  If that was the case for this horse, the trainer took his safety away.  He charged into the horse with his lunge whip, sending the horse leaping away to the side.

The trainer was using negative reinforcement.  His timing was excellent.  As soon as the horse was in motion, he stopped cracking the whip.  But the instant the horse slowed down, he was on the attack again.  It took just a couple of turns around the circle to convince that horse that he needed to keep moving.  Easy.  The battle was over in just a few minutes.

The trainer stood in the middle of the lunge circle touting the virtues of his technique.  The horse continued to trot around him the whole time he was talking to the audience.  He no longer even needed to lift his whip.  It was an impressive result.

But I was thinking about the lesson from the horse’s perspective.  If one of us were trapped in a round pen with someone peppering bullets at our feet, wouldn’t we run?  And we’d keep on running until we dropped from exhaustion.  If we slowed down, the person in the middle would just need to gesture with the gun to get us running again.

It is the same thing.  So easy isn’t enough.  I can look at the behavior that emerges – a horse moving at a steady pace around me at liberty and think that’s a fun result.  The question becomes: how can I get to that behavior but in a more learner-friendly way?  How can I take this, or any other lesson, and turn it into true play for both myself and my horse?

One of the principles that is common to ALL good training methods is this:

There is ALWAYS more than one way to teach every behavior.

If you really believe that and know how to put this principle into practice then this leads you to the answer.

You’re going to break the task down into smaller components so your horse understands what is wanted in each step.  You want him to be more than just comfortable with what is being asked.  You want him to be eager to play.

Using Props
To teach horses to step on mats, I set out the V runway pattern.   The cones help handlers line their horses up with the mat so they have room to come to it on a straight line.  When I first taught mats, I didn’t put the cones out.  But then I saw that handlers would leave the mat and cut back around on such a tight turn that the horse had no chance to line himself up again straight to it.

They did the same thing at mounting blocks.  If the horse shifted away from the mounting block, they would walk off on a tight circle that gave the horse little opportunity to come in straight.  The missing step was the handler’s ability to visualize the path she needed to take to give her horse the most success.

So I set out the V shaped line of cones.  The length of the “runway” obliged the handler to go out far enough so that she had room to line her horse up to the mat.

I could have set the mats out in a parallel lines.  Then I would have had a different kind of runway, and I would have used different images to describe it.  It might have become the catwalk for a fashion show.  The horse would be a model sashaying her way down the runway – stopping periodically to show off her costume.

Instead I set them out in a V so the handler would have a wide funnel entrance and a better chance of getting the horse into the top of the runway.  It’s only experienced pilots and co-pilots who can successfully enter into the top of a narrow runway.  Novice teams need the wider opening.

Playing with Images
Playing with images takes you away from relying solely on the standard-issue horse training approaches you may already know.  It puts you into a creative place where you can come up with your own patterns, images, and techniques that work for your horse.

People often feel that they have to follow exactly the instructions given by a clinician or riding instructor.  I offer the runway as a starting point.  I suggest that you begin with my image.  Understand how this process works; learn the basics of good rope handling; see what it gives you when you have a horse who welcomes the information the lead provides; and then become creative.  Invent your own images to help teach the skills your horse needs to meet your personal training goals.

Creativity
For me, there’s no better indicator of success than hearing from someone that they have found a new way of teaching a familiar lesson.  They don’t go about it exactly the same way I do.  Their horse has shown them a different way, just as my horses often show me new ways to teach old things.

Creativity is at the core of our being.  When a handler clutters up her work space with cones, empty supplement containers, bags of shavings, and who knows what else, and sees in that clutter a better way to teach a lesson, I know she has understood the greater game.  She is becoming creative and inventive.  She is creating new games.  For both horse and handler it has become true play.

Robin with shavings 2016-06-22 at 5.54.53 PM

You might not want to put quite so many shavings bags into your “play ground”, but clutter can definitely contribute to creative ideas.

Coming Next: Unit 4: Cue Communication

Remember, if you are new to the JOY Full Horse blog, click on the JOY Full Horses tab at the top of this page to find the full table of contents and links to each of the articles I have published so far.

I hope you will want to share these articles by sending links to this blog to your friends.  But please remember this is copyrighted material.  All rights are reserved. Please do not copy any of the “Joyful Horses” articles without first getting written permission from Alexandra  Kurland, via theclickercenter.com

Also note: these articles are not intended as an instruction guide for introducing your horse to clicker training.  If you are new to clicker training and you are looking for how-to instructions, you will find what you need at my web sites:

theclickercenter.com                    theclickercentercourse.com

JOYFULL Horses: Mat Manners

In the previous installment I introduced you to constructional training.  I used the runway lesson to teach your horse to step on a mat.  Instead of going directly to the mat, you first taught your horse the skills he’d need to make this an easy lesson.

So now you have a horse who is eager to get to his mat.  He isn’t just gingerly stepping a toe onto the edge of the mat, he’s rushing ahead to get to it.  Hurray!  You’re part way through this lesson.

For every exercise you teach there is an opposite exercise you must teach to keep things in balance. 

The mat lesson helps you understand the importance of this statement.  You’ve got a horse who is eager to get to the mat.  Now you need to explain that you’d like him to walk with you to the mat.

Robin runway walk casually to it 2016-06-22 at 2.34.16 PM

Robin shows his great mat manners, walking with me to the mat.

Robin halt on mat 2016-06-22 at 2.34.39 PM

He lands on the mat in beautiful balance.  He’s going to continue to be our equine teacher for this lesson.  In the following photos you’ll see how to build great mat manners.

Mat Manners
You’re now ready for the next level in this “runway” game.

You want a horse who is eager to get to the mat, who regards it as a fun place to be, a place where lots of good things happen, but you also want a horse who walks with you to the mat.  You don’t want your co-pilot taking over complete control.  You still want to make some of the decisions.   So now if he starts to grab the throttle stick from you, you can use your “needle point” skills to ask him to stop and back up.

I know that’s mixing a lot of metaphors.  Let’s see how this works.

Robin mat back one step 2 2016-06-22 at 4.16.26 PM

Robin and I are practicing our “needlepoint”.  I’m asking for a single step back. (Refer to the previous post: https://theclickercenterblog.com/2016/06/21)

Rushing doesn’t lead to the mat.  It leads to needle point.  But needle point is not a bad thing.  Your co-pilot understands what is wanted.  I tend not to click for course corrections.  So that first backing step won’t be rewarded with a click and a treat.  But when we’re back on pattern, and I ask for the next step, perhaps asking now for one green stitch forward – that I’ll click and treat.

Robin walk one step to mat 2016-06-22 at 4.18.01 PM

In the “needlepoint” part of the runway lesson I’m asking Robin for one step forward.

Robin walk off to mat 2016-06-22 at 4.18.14 PM

After a click and a treat, I release him to the mat.

We’re back in sync with one another, still a few steps away from our landing pad.  I’ll release the controls to my co-pilot, and we’ll walk together with slack in the lead.  I won’t need to help him get to the mat.  He knows how to land our little craft.  He stops, perhaps not perfectly square yet, but with both feet on the mat.  Click and treat!

Robin on mat grups 2016-06-22 at 2.56.18 PM

Again, he lands beautifully on the mat.

And now the game changes yet again.  I want the mat to be a versatile tool.  I want my horse to remain on the mat while I move around him, or even away from him.  The mat provides the foundation for what is referred to in the horse world as ground tying – the horse stays on the spot where you left him as though he was tied.

Robin on mat grups at distance 2016-06-22 at 2.56.57 PM

The mat is a great tool for teaching ground tying.

101 Things
So the new game becomes “101 things a handler can do while a horse stays on a mat.”

This is a variation on the theme of a game which many canine clicker trainers play with their dogs.  It’s called “101 Things a Dog Can Do With A Box”. The handler presents a dog with a box.  Each novel behavior the dog offers gets clicked.  So if the dog sniffs the box, he gets clicked.   If he sniffs it again, he doesn’t get reinforced.  But if he paws the box with his right front foot, he does.  Now if he sniffs the box or paws it with his right front – nothing.  But if he changes and paws with his left front, click and treat.

This was a popular game early on amongst canine clicker trainers, but for a lot of reasons I never played an equine version of it.  One of the more fuddy-duddy reasons was I really didn’t want my horses learning all the creative things they can do either with their bodies or with things.  I didn’t want them thinking they can do fancy leaps into the air with me on their backs or open their stall door latches whenever it pleased them.  If they discovered these talents on their own, so be it, but I didn’t need to be an accomplice in this kind of cleverness. (That’s especially true when it comes to stall latches!)

So 101 things was out for my horses, but it is very much in for the handlers.  I need them to be creative.  So the game becomes – every time your horse lands back on the mat, you have to come up with a new behavior a handler can do while a horse stands on a mat.

At first this is easy.  Your horse lands on the mat, and you might ask him questions about handling his mane.  Will he continue to stand on the mat while you run your fingers through his mane?  Yes.  Click and treat.  Repeat this several times and then walk off casually back around to the top of the runway.

Robin toss rope 2016-06-22 at 2.38.14 PM

I begin by “parking” Robin by tossing the lead over his neck.  Draping the lead over his neck quickly becomes a cue to stand.

Robin on mat play with mane 2016-06-22 at 2.57.44 PM

With Robin “parked” on the mat, I can begin the “101 things a handler can do while a horse stands on a mat” lesson. In this round of the game I am stroking his mane.  The lead rests over his neck in the “parked” position.  I’m not holding on to it, but I can easily pick it up should he walk off.

Next time you get back to the mat, you have to think of something else to do.  It could be you simply expand running your fingers through his mane to stroking down his neck and along his shoulder.  Or you could decide to play the game more like “101 things you can do with a box”.  You stroked his mane in the last round, so now you’re going to think up a completely different sort of behavior.  “Will you stand on the mat while I bend down to tie my shoe?  Oh, I don’t have shoe laces!  Never mind my shoe still needs to be checked.”

Robin on mat tie shoes 2016-06-22 at 3.00.36 PM

“Will you stand still while I tie my shoe?”  Yes, click then feed.

Most people can easily play a couple rounds of this game but then they begin to get stuck for ideas.  They are too much in their “horse-training” head.   They’ve already stroked their horse from head to tail and picked up all four feet. What else can they do?  They are running out of ideas.

The Opposite of Flooding
Time to channel their inner child or their inner kindergarten teacher.  You can ask your horse for horsey things like dropping his head, or putting his ears forward, or letting you walk behind him and groom his tail.

Robin on mat ask for foot 2 2016-06-22 at 2.39.13 PM

While Robin stands on a mat, I can ask for horsey things. In this case I am touching him at his elbow as a cue for him to lift his foot.

Robin on mat knee target 2016-06-22 at 2.39.27 PM

As Robin lifts his foot, I have him target his knee to my hand.

Robin on mat take foot 2016-06-22 at 2.41.41 PM

From here it is easy to ask him to target his foot to my hand.  (This is an easy way to teach a horse to pick up his feet.)

You can play silly games with your horse.  Can he stand still while you run around pretending to be an airplane?  Bzzzz, Bzzz – coming in for a crash landing into the mountain (horse).  Click and treat.

Robin on mat airplane 1 2016-06-22 at 3.03.26 PM

When you run out of “horse training” games, you can play silly ones.  In this case I’m pretending to be an airplane.  I even include the sound effects of a buzzing  engine.

Robin on mat hug 1 2016-06-22 at 3.04.16 PM

My favorite kind of “crash landing”.

I love watching the horses watch the people.  This is the best entertainment they’ve had in years!  What will their human do next!?

Robin on mat airplane rgt side 2016-06-22 at 3.03.56 PM

Robin isn’t sure what to make of my behavior.  What a very strange human!


This type of training is done routinely when you are prepping a youngster for riding.  The handler waves things around and jumps up and down.  The goal is to desensitize the horse so he doesn’t spook at unexpected movement.  But instead of creating an entertaining game for the horse, it is often done with flooding.

Here’s an example of how flooding works.  Suppose a horse is afraid of flapping saddle blankets.  He scoots away.  The blanket pursues him, matching him move for move until finally he gives up and stands still.  Next comes another scare, this time it might be an umbrella opening and closing in his face.  The horse learns he can’t escape.  The best he can do is stop.  That makes the umbrella go away  – for the moment, but it is back again in the next instant.  He learns finally that no matter what happens, no matter how afraid he is, he can’t get away.  He gives up and stands still while the handler flaps tarps around his body, and up over his head, covering his eyes so he cannot see to run even if he wanted to.  He’s given up flight because he has given up.

The handler isn’t playing, except maybe at being a “horse trainer”.  And this most certainly is not a game for the horse.

I want to create something very different for the horses I interact with.  It needs to be play for both of us.  I want my horse to know that he does have a choice.  His voice most certainly counts.

Teaching the skills you need before you use them; building success and confidence through patterned exercises; and – most important – really listening to your horse helps transform these lessons into true play for both of you.

Playing with Language
I’ve written about mats many times.  I’ve described in detail the rope handling techniques that are used.  I’ve referred to the runway image.  (I definitely spend too much time in airports.  I can rarely teach a weekend clinic without making some reference to airplane travel.)  I’ve also referenced the needle point image because to me this section of the lesson always makes me think of the fine, detailed work that needle point represents.

What I haven’t done before is used quite so much of this type of imagery in describing the lesson.  My point is not to force you into a mold where you have to be thinking – okay what colour thread am I supposed to be picking up and why?  If you’ve never done needle point or other fine detailed handiwork, this image will feel foreign and forced.  If you haven’t traveled on as many airplanes as I have over the last few years, the runway image may not jump out at you as you set your cones out in a V.

My point is not to get you using these images.  My point is to get you thinking creatively, with imagination.  That’s what takes you far, far away from the mind set of do-it-or-else training.

airplane landing.png

Coming Next: Transforming Horse Training Into Play

Remember, if you are new to the JOY Full Horse blog, click on the JOY Full Horses tab at the top of this page to find the full table of contents and links to each of the articles I have published so far.

I hope you will want to share these articles by sending links to this blog to your friends.  But please remember this is copyrighted material.  All rights are reserved. Please do not copy any of the “Joyful Horses” articles without first getting written permission from Alexandra  Kurland, via theclickercenter.com

Also note: these articles are not intended as an instruction guide for introducing your horse to clicker training.  If you are new to clicker training and you are looking for how-to instructions, you will find what you need at my web sites:

theclickercenter.com                    theclickercentercourse.com