Patterns
Play evolves out of success. Play evolves when both learner and teacher are relaxed and confident in the process. Good technique, attention to detail, attention to your learner’s emotional needs are the breeding ground for play.
In the previous section I talked about base positions and movement cycles, and how they can be used to create high success rates. These create repeating patterns. You are doing the same sequence of behaviors over and over again. I’ve heard people say they don’t like drilling patterns. Their animals get bored. They get bored. Patterns, they will tell you, are the death knell to good training.
All I can say is that’s not been my experience. Horses thrive on patterns. They like the predictability of knowing what is coming next. They like being successful.
They aren’t the only ones. We thrive on patterns. Want proof. Look at how easily we fall into them. We are creatures of habit, which means we are creatures of patterns. Rather than fighting against this tendency, I’m going to use it to my advantage.
I’m going to create tight, clean, repeatable loops. I’ll follow the mantra of loopy training. When a loop is clean, I get to move on. And not only do I get to move on, I should move on.
When my whole behavior cycle is clean, I’ll change my criteria slightly. Maybe I’m teaching my horse to back up through a corner. I’ll begin by getting just a step or two of backing. I’ll ask for this well away from the corner. I’ll start out very micro in my requests. I’ll be satisfied at first with just slight shifts of his balance. I don’t need a full step back to get the process started. Even a slight rock back is enough. Click. I’ll feed him so he rocks forward to the starting point. I have a movement cycle. He is in position to begin again.
When the loop is clean, it’s time to move on. That’s what keeps the use of patterns from becoming boring. They are changing, growing, becoming more complex, more interesting at such a rapid pace. I am reinforced by the progress I experience in every session. I don’t stay stuck on one criterion, drilling away at it until it feels stale and begins to fall apart. My steps are small, my criterion precise, and that means my horse and I experience tremendous success.
The process reminds me of bending a coat hanger. The more you bend it, the softer it gets. So, as my horse rocks back and forth between the ask and the food the delivery, he will be getting softer and softer. The clickable point will shift seamlessly. I’ll ask him to rock back a little more, click, feed forward. A couple of clicks later, I can ask him to take a full step back, click, feed forward. I’ll build that loop, let it stabilize briefly, and then move on to the next small shift in criterion. As my loop expands, my pattern will grow increasingly complex, but always I am expanding it one very achievable, small step at a time.
My pattern will become a large, predictable, repeatable loop. My learner won’t be worrying about what is coming next. He knows the pattern well. It’s click, check in with the handler to see where the food is going to be delivered, retrieve your treat, and then continue on to the next well-rehearsed step in the pattern. Because every element in the pattern has been taught with such clarity and with positive reinforcement, every element can serve as a reinforcer for the behaviors that precede it.
That’s another benefit of this process. The behaviors that I have taught through my clean loops can now be used to reinforce other elements in my ever-growing pattern. I can place the click and treat at strategic points wherever I feel the added information they provide is needed. Adding to their motivating value, every behavior in a well-constructed pattern also serves as a reinforcer. If you want to understand how to teach patterns as complex as a dressage test using the clicker, this is the key that will unlock that puzzle. Going micro creates the macro.
This is a game that’s fun to play because it is so easy for you both to win. Isn’t that one of the characteristics of play? You’re both winners.
Coming Next: How Clicker Trainers Play
Remember, if you are new to the JOY Full Horse blog, click on the JOY Full Horses tab at the top of this page to find the full table of contents and links to each of the articles I have published so far.
I hope you will want to share these articles by sending links to this blog to your friends. But please remember this is copyrighted material. All rights are reserved. Please do not copy any of the “JOY Full Horses” articles without first getting written permission from Alexandra Kurland, via theclickercenter.com
Also note: these articles are not intended as an instruction guide for introducing your horse to clicker training. If you are new to clicker training and you are looking for how-to instructions, you will find what you need at my web sites:
Heating Up a Behavior In the previous section you learned how to teach your horse to back through a square. There are many practical reasons why you would want this kind of maneuverability in your horse. For starters it’s important that horses understand that they can swing their hips so they don’t feel trapped in tight spaces. I’m sure you can see why this would be important. What may not be as obvious is the link between backing in a square and head lowering.
To get to this lesson, you’re going to take a little detour. You’re going to leave the stall for a few minutes while you make head lowering a “hot” behavior.
Training Detours
The reason for this detour is this way of teaching head lowering out of backing can be a hard lesson. I learned it originally from John Lyons where essentially you were closing down all options but the one you wanted. You were taking away choice. It is often taught when horses are over threshold. It’s a powerful lesson that can bring a horse back under control.
There have been times over the years working with horses at clinics where I have been very glad I knew how to make this lesson work. When a horse is panicking because he is away from home, you need management tools that can safely and without undue force, bring him back under control. If you ever find yourself on the other end of the lead from a horse who is having an emotional meltdown, you may be very grateful that you know how to make this lesson work.
But, and this is a big but, I want to be a constructional trainer. I want to teach a skill before I need to use a skill.
That means I want to teach my horse how to solve the puzzle that this head lowering lesson presents BEFORE I need to use it. I want to tease apart what can be a hard lesson into it’s underlying component parts. Instead of taking away choice, I want to give it back. Instead of this feeling like a hard lesson where doors are slammed shut, I am presenting it in a series of easily understood steps. If my horse ever does have a moment of panic, he will know how to solve the puzzle.
Think about how this would feel for yourself. When you’re afraid, if someone asked you what 27 divided by 3 is, you might momentarily struggle to find the answer, but you know basic math. You’d be able to give the answer. But suppose you’re asked for something you’ve never done. Now you’re really in a panic. You can’t solve this additional puzzle. You feel even more trapped. You’re afraid of the environment, and now you are struggling to figure out what your inquisitor is demanding of you. That’s definitely not how I want my horses to experience training. Controlling the environment and breaking training down into small steps transforms an inquisition into a reasonable lesson.
This is essentially showing you how you can take training you may have learned from a traditional, correction-based system and transform it into something that is very clicker compatible. That’s why I have taken so much time to describe the step-by-step teaching process that is going to take us from backing in a square to head lowering.
Priming the Pump
To make the jump from backing into head lowering, I’m going to “prime the pump”. I’m going to make head lowering a super “hot” behavior.
To show you how this works answer the following questions:
What colour is snow?
What colour is the house the US President lives in?
What colour is a sheet of typing paper?
What colour is the opposite of black?
What colour are clouds?
What colour is a bride’s gown?
What do cows drink?
Many people will say milk. They’ve been primed to say milk because they are thinking about things that are white. But, of course, cows drink water, not milk.
We’re going to prime the head lowering pump by asking lots of questions where head lowering is the answer. It’s like having a stack of files on your desk. At the moment the head lowering file may be buried at the bottom. It’s in there somewhere, but you’ve forgotten it’s even there. Bring it to the top of the stack, and now you’ll be thinking about it. Make every file you open a head lowering file, and pretty soon that’s the only answer you’ll be expecting to give.
Priming The Head Lowering Pump
The easiest way to get head lowering is through targeting, so that’s how you’re going to begin. You’ll have your horse track the target down, click and treat.
Another easy way is to milk the line down as you bend down softly inviting your horse to join you. The expression milking the line refers to your fingers stroking down either side of the line. You aren’t pulling down, and you aren’t fixing your hand firmly around the lead. You are simply drawing your fingers along the rope in a soft invitation.
Placing your hand on your horse’s poll is yet another way. By now he may drop his head readily because he knows head lowering has been paying well recently so why not try it again. Click and treat.
It’s no accident that head lowering is the go-to option. When you put your hand on his poll, it’s clear you want something, but no clicks are coming for just standing still. When you withhold your click, you’ll see a resurgence of the behavior that was just earning high rates of reinforcement – in this case, head lowering. For a discussion of resurgence and how to use it in training refer to the May 2015 articles on Resurgence and Regression: https://theclickercenterblog.com/2015/05/21/
Head Lowering from Backing in a Square
The pump is now primed. Head lowering is a super hot behavior. It’s time to return to the backing in a square lesson. You were asking your horse to back through a corner. As he swings his hips to the inside, his head is going to drop ever so slightly. This doesn’t happen because he’s relaxing. It’s more matter of counter-balancing. As his hips swing to the side, his head will counter balance that move by dropping slightly.
You’re going to be looking for this subtle balance shift. At first, it may be very small, so you have to be on the lookout for it. Instead of releasing the lead as soon as he’s backing, you’re going to wait for this tiny head drop. Your hand will stay on the lead to say: “I want something”. As soon as you get the response you’re after, you’ll release it.
This isn’t a change in the way you’re playing this game. You haven’t suddenly switched from a starter button to a constant-on cue for the backing. What has changed is the criterion you’re looking for. Now it isn’t backing. It’s that slight drop in his head. You’ve been getting it in different ways. Now you’re simply triggering it out of backing.
Head lowering is a hot behavior, so your horse will catch on fast. He’ll start to drop his head even before he’s stepping back. This is golden. You now have a super reliable way of asking for head lowering, one that will work even when he is feeling nervous and anxious.
Calm Down Now!
Why are you teaching head lowering in this way? Why not simply stay with the easier, less technically-difficult-to-teach methods? It’s a simple answer – even the most mellow horse can have a moment when his world is falling apart. You never know when you might suddenly find yourself holding onto a horse who is becoming increasingly worried. Maybe your friend has just taken her horse out of the arena, or maybe his best buddy is being turned out without him. Whatever the reason your horse has suddenly gone from working quietly to exploding into a freight train’s worth of energy. You need to keep both you and your horse safe. Putting him away, or turning him loose to work things out at liberty may not be an option, so what else can you do?
Again, it’s a simple answer. Ask him to back in a square. This moves his shoulders out of your space and keeps him from crashing over the top of you. As he backs, you’ll be displacing his head up and to the outside. The more anxious he is, the higher his head will be as he takes a step back. When he swings his hips to the inside, he’ll have a tendency to drop his head. This isn’t because he’s calming down. It’s a matter of counter-balancing. The drop of his head tends to happen as he steps to the side.
Be ready for this. As soon as you feel even the first inkling of head lowering, be certain to release the lead.
Even if you don’t manage to get a click in, the release of the lead will jump start the process. You’ll be ready the next time to reinforce the behavior not just with the release of the lead but with a click and a treat, as well. Repeat this a few times, and you will very quickly have a horse who lowers his head not just a tiny amount, but all the way to the ground.
Priming the pump helps the horse make the connection. When you activate the lead, he’s going to try head lowering because head lowering has been the go-to answer. Click and treat. When you need it the most, activating the lead will head straight to head lowering. (In the next unit we’ll address stimulus control so head lowering isn’t the only behavior you get when you touch the lead.)
Heading Toward Lighter Than Light Cues
Cues for head lowering will definitely grow out of this shaping process. When you slide down the lead asking for that slight displacement of his head to the outside, he’ll know you’re after head lowering.
How light can you be? Will he lower his head from just a soft touch on the lead? From a hand gesture? How can you morph that head lowering trigger into ever more subtle cues?
Playing with Cues
You can play even more with this process. Head lowering is hot. So let’s see what else can trigger the head lowering response. Stroke your hand along your horse’s back. If he’s been a little anxious, the long brush strokes your arm makes over his back may feel soothing. If you see him drop his head even a little, click and treat. Resume stroking his back again. He’s catching on to this new clicker game. He’s beginning to make connections fast. After just a couple of clicks, you’ll see that stroking his back cues him to drop his head. Very neat!
You can install all kinds of fun “buttons” all over your horse. And it’s not just head lowering that you can trigger. If you understand the overall concept of how this priming process works, you can install “buttons” for ears forward, for the pilates pose, for forward motion, for backing, etc.
“How’d you do that?”
As you play with this game, the question you’ll be hearing from your friends will be: “How’d you do that?”
“How did you get your horse to back up by pulling on his tail?”
“How did you get your horse to drop his head by tickling his belly?”
“How did you get your horse to run towards you by sitting in a chair?”
You don’t have to give away all your secrets (unless you want to). You can give them the best answer of all – playfully.
Author’s note: I want to remind people that I am using these lessons to illustrate some important concepts. I’ve included a lot of how-to instruction in this unit, but I have also left a great deal out. I can’t fit everything that needs to be said about head lowering into the length of an article. It was never my intent that these articles would give that kind of complete detailed, how-to instructions. For those resources refer to my web sites, and to my books, DVDs, and on-line course. In particular refer to my book, “The Click That Teaches: A Step-By-Step Guide in Pictures”, and the early DVDs in the DVD lesson series: Lesson 1: Getting Started with the Clicker, Lesson 2: Ground Manners, and Lesson 3: Head Lowering. My on-line course will also provide you with very thorough how-to instructions.
Coming Next: Ten Things You Should Know About Cues: Number 6.) Getting What You Want When You Want It: Stimulus Control
Remember, if you are new to the JOY Full Horse blog, click on the JOY Full Horses tab at the top of this page to find the full table of contents and links to each of the articles I have published so far.
I hope you will want to share these articles by sending links to this blog to your friends. But please remember this is copyrighted material. All rights are reserved. Please do not copy any of the “JOY Full Horses” articles without first getting written permission from Alexandra Kurland, via theclickercenter.com
Also note: these articles are not intended as an instruction guide for introducing your horse to clicker training. If you are new to clicker training and you are looking for how-to instructions, you will find what you need at my web sites:
In the previous post I used the process of teaching a horse to back in a square to illustrate several ways in which cues evolve out of the shaping process. I showed you how you can use food delivery to move your horse through a particular motor pattern. When you first teach a horse to come forward to touch a target, it’s easy to have him step back to get to his treat. Body language cues evolve easily out of the food delivery. Now if you turn into him to ask for backing, he’ll know what you want. The cue for backing evolved out of the shaping process.
Horses are masters at reading subtle changes in body language. They are good at seeing what comes before what comes before what you are asking for. In the wild a horse needs to be good at predicting the future to stay out of trouble, both within the herd and when a predator is on the hunt. So horses are good at spotting the little clues that tell them what you’ll be asking for next. After all, the better they learn to read you, the more successful they’ll be. Those clues help them to get to their reinforcers faster.
Starter Button and Constant-On Cues
In Part one of this section, I focused on teaching your horse to back in a square. That’s the precursor to teaching head lowering. So let’s continue on to that part of the lesson. Remember you’ve been asking your horse to back from the front of his stall a step or two toward the back wall. The stall may be his actual stall, or just a square marked out with cones or ground poles. Once these steps come easily, you can begin to build duration. You’ll need to decide if your cue is a starter button or a constant-on cue.
A starter button cue is exactly what it sounds like. Think about how you use your key to turn on your car’s ignition. You turn the key and as soon as you hear the engine start, you let go. You don’t keep turning the key. You assume that once your car starts it’s going to keep going until you turn it off. If it does stall out, you’ll restart it with the turn of the key.
Your backing cue can work in the same way. When you slide down the lead, you expect your horse to begin to back. But do you hold on to the lead the whole time he’s backing, or do you let go once he’s initiated the movement? The later would be a starter button cue.
If you hold on, you’re using the lead as a constant-on signal. You’re in effect saying: “As long as this signal is present, you’re to keep backing. When it goes away, you’re to stop.”
In her book, Lads Before the Wind, Karen Pryor described how she taught her dolphins to spin and to keep spinning as long they could hear a certain signal. It was an easy way to build duration in a behavior, especially working as she was with multiple animals.
The problem with using the lead as a constant-on signal is it can effect your horse’s balance. You can experience this yourself. You’re going to hold the snap end of the lead so you get the horse’s perspective of this lesson. Have a friend slide down the lead to ask for backing. First, she’s going to hold on until you have given her the number of backing steps she wants. That’s the constant-on cue.
Next have her slide down, but she’s to let go AS SOON AS you’re in motion. If you stall out, not sure what she wants, she’s to slide down again and restart the behavior. Once you are backing freely, she’s to let you back several steps before she clicks. That will bring you to a stop. Remember, as you are backing, she is NOT keeping an active hold of the lead.
So now you’ve sampled both constant-on and starter button cues.
Question: Which way did you prefer? If you are like most people, you’ll prefer the starter button. The other will feel heavier and more demanding. You’ll also notice that there was a difference in how you backed. With the starter button your steps will be longer, more even, better balanced.
The Horse’s Perspective
There’s a lovely expression that I refer to often in clinics: Go to people for opinions and horses for answers. In this case you were the horse. You don’t have to take my word for it. You can test out the two different versions of how you ask for backing and decide for yourself which one you prefer.
One of the things I like about clicker training is we can experience directly so many of the lessons we give to our horses. Holding on to the lead with a constant-on cue comes much more easily to most people. You have to make a conscious effort to let go. If there’s no difference, there’s no reason to change. But once you’ve experienced for yourself from the horse’s perspective the difference in the feel and the impact it has on your balance, it becomes a lot easier to pay attention to the detail of letting go.
Years ago at one of the big horse expos I had a trade booth set up directly across the aisle from a company that sells electronic shock collars for horses. All weekend long I got to watch their sales video. It featured a mare who had a foal at her side. The mare was a cribber. They were using the shock collar to discourage the cribbing.
Each time she reached out to the fence, they would zap her with the collar. Over and over again as the video played, I got to watch her jump back from the shock. That was hard enough to watch. What made this even worse, when they shocked her, her foal had just started to nurse. Think of the associations that was creating!
As part of their sales pitch they were letting people feel the shock the collar produced. Toward the end of the weekend when things were quieting down, I went over to have a feel. They had the collar set at the lowest setting. You didn’t get a jolt. Touching an electric fence is much worse, but even so it was exceedingly unpleasant. That was the lowest setting.
I asked to feel the setting the mare was given.
“Oh on. We don’t let people take that level of shock.”
Soap Box Time
It made me appreciate clicker training all the more. To the best of our ability to simulate experiences, there’s nothing we do to the animals that we do not also let people experience. I can slide down the lead and let you feel what the horse feels at his end of the lead. I can set up training games and let you go through the same puzzle solving process. I can click and feed – maybe not hay stretcher pellets, but something more to your liking.
We are confronted by so many different opinions about how best to train our horses. We can’t always know how something feels to a horse. I can’t wear a bit or carry a rider on my back, so I can’t replicate every experience, but here’s my standard. Your horse should not have to go through any training procedure which you are uncomfortable watching.
Note, I do not say which you are uncomfortable doing to your horse. You may not have the skill to take your horse through a particular lesson. You may be using a trainer to help teach your horse something that requires more experience than you currently have. But you should be able to watch everything that’s done to your horse. If something makes you squirm, it’s okay to speak up for your horse. There is always, ALWAYS another way to train everything you want to teach.
A good trainer will respect you more for standing up for your horse, and a good trainer will find another way to teach the lesson. A punitive trainer with a narrow tool box will tell you this way is for the good of the horse, and you have to let him finish. He’ll tell you if you let the horse get away with being disrespectful, you’ll ruin him.
These are red flags. Thank him very much for his opinion and take your horse home. You don’t have to be a clicker trainer to know how to break a lesson down into small steps. You don’t have to be a clicker trainer to be fair to a horse. You just have to be a good trainer. So take your horse out of harm’s way, and find someone to help you who is a true teacher not a bully.
Backing with Starter Button Cues
That’s enough standing on a soap box. Let me step down off of mine and get back to the backing in a square lesson. Hopefully, you got a friend to help you, and you were able to feel the difference between a starter button and a constant-on cue. You know for this lesson you want the lead to act as a starter button cue. Once your horse initiates backing, you’ll release the lead and walk back with him.
Now note, this means that there is a constant-on cue in this process. As he backs, you’re walking forward toward him. Walking toward him is your constant-on cue. You want him to keep backing out of your way as you walk into his space. That cue is evolving out of the shaping process.
Again, if he stalls out too soon, you’ll restart the “engine” by sliding down the lead.
You’ll ask him to back a couple of steps, being mindful that you are still in a stall and there’s a wall behind him.
After the click, you’ll use your food delivery to reposition him forward.
This begins a new movement cycle.
As you ask him to repeat the cycle, you’ll see him backing with more confidence. Not only does he understand what you want, he’s backing over ground he’s already stepped on. He knows now that it doesn’t contain any hidden traps. It’s safe to step back. Each time you ask him, it becomes easier and more fluid. That’s in part why you do this back and forth dance. It is like bending a metal coat hanger. At first the hanger is very stiff, but the more you bend it, the softer and easier it becomes.
A Change in the Game
Now that you have a horse backing easily, you’re going to change the game once again. Instead of feeding forward after the click, now you’re going to feed right where you clicked.
Again, this can trip people up. They spent so much mental energy figuring out how to feed forward, and now they have to change all that and keep their feet still.
Why the change? You’re ready to tackle the puzzle that the back corner of the stall presents. So many horses feel trapped in this kind of situation. They forget that they can just swing their hindquarters over. When they get in a corner, instead of simply stepping back and to the side, they panic and push forward into the handler.
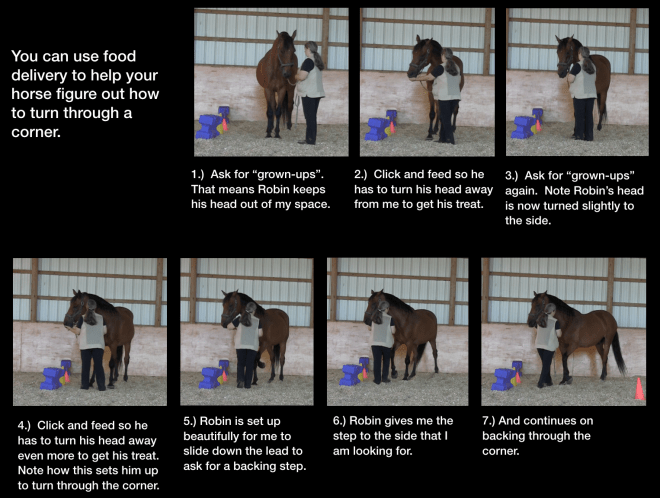
You’re going to show your horse that he has another option. You have him at a halt with his rear end close to the back wall. You’re going to slide down the lead and ask him to turn his head away from you. Your body orientation is still saying back, but you ARE NOT pushing into him AT ALL with the lead. There is no backwards force on the lead. There doesn’t need to be.
If you add a feel of pushing him back before he has figured out how, he’ll just feel trapped. All the pressure will go down into his hocks. Especially if he has any arthritis in his hocks, this will make him feel even more anxious, and it will be harder yet for him to figure out what he’s to do.
More “Being the Horse”
Instead you are simply going to ask him to turn his head away from you. You can experience what this does simply by standing up for a moment. Put your hands on your hips so you can really feel the effect. Begin by looking straight ahead. Now turn your head to one side and look over your shoulder. What did your hips do? They counter balanced the movement by swinging in the opposite direction.
As you ask your horse to bend his nose more and more to the outside, he’ll become aware of the answer to the puzzle. All he has to do is follow the turn of his hips, and he can back up out of this corner. Putting him in the corner makes it easier for him to figure out the answer. The structure helps you. I just don’t want to put him prematurely in the corner before he’s comfortable enough with backing to be able to find the answer in a relaxed manner. That’s the reason for all the back and forth prep.
If your horse doesn’t understand your request to move his head away from you, there’s a simple way to prep this part of the lesson. Use food delivery to set up the response. Begin by asking him to stand next to you in the “grown-ups are talking” position.
When you click, instead of presenting the food so he continues to keep his head in this position, you’ll extend your arm past where his nose is so he has to turn his head to get his treat. As he moves, you’ll step forward, filling the space he’s vacating. You’ll repeat this until the food delivery has created the weight shift you need to ask him to turn his hip so he can back through the corner. This is an easy way to ask for what can be a very challenging maneuver for some horses. The goal is to make this as easy and understandable as possible so your horse is very comfortable being asked to back through turns. (For another view of how to use food delivery to set up the behavior you want refer to the May 6, 2016 post on Using Environmental Cueshttps://theclickercenterblog.com/2016/05/06/)
Whichever approach you use, you now have him backing one step through the corner. Click and treat. You can ask for another step, or perhaps it is time to walk him forward again out of the stall to give him a break.
Once your horse is comfortably backing through all four the corners of the stall, it is time to change the game yet again. Now you’re going after head lowering.
Heating Up a Behavior
To get to this lesson, you’re going to take a little detour. You’re going to leave the stall for a few minutes while you make head lowering a “hot” behavior.
Remember, if you are new to the JOY Full Horse blog, click on the JOY Full Horses tab at the top of this page to find the full table of contents and links to each of the articles I have published so far.
I hope you will want to share these articles by sending links to this blog to your friends. But please remember this is copyrighted material. All rights are reserved. Please do not copy any of the “JOY Full Horses” articles without first getting written permission from Alexandra Kurland, via theclickercenter.com
Also note: these articles are not intended as an instruction guide for introducing your horse to clicker training. If you are new to clicker training and you are looking for how-to instructions, you will find what you need at my web sites:
Cues evolve out of the shaping process.
I chose head lowering to illustrate how this works. In Part 1 I ended with a reminder that there is always more than one way to teach every behavior. I teach head lowering in many different ways. The first, easiest way is through targeting. That’s a good start, but just because you can get head lowering one way doesn’t mean your job is done. The more different ways you can trigger the behavior, the better.
Backing in a Square
You may not see the connection at first, but one of my favorite ways to teach head lowering is via backing in a square. The reason for using this teaching process is because it generates a shift of balance from the forehand onto the horse’s hindquarters. That in turn leads straight to improved performance under saddle. You may not see the connection at first, but this way of asking for head lowering creates a very different balance from the one a horse is normally in when he drops his head. The most frequent form of head lowering occurs when he’s grazing.
Head lowering is taught via backing in a square.
Grazing is a forward-moving exercise. Horses graze by walking slowly forward. They don’t normally graze by walking backwards and eating the grass that they have already stepped on. Grazing forward means they encounter fresh grass that hasn’t yet been crushed underfoot.
Grazing is a forward-moving exercise.
Grazing is forward movement.
Not A Forward-Moving Exercise
The expression for teaching head lowering is: head lowering is not a forward-moving exercise.
At first glance this seems like a very clumsy sentence. What you are saying is your horse can stand still and drop his head. He can also walk backwards and drop his head. So you aren’t saying he can’t move his feet. He just can’t move his feet forward.
You most need head lowering when a horse is nervous. A nervous horse needs to move. If you were to try to ask him to drop his head AND stand still, you would bottle him up way too much. Under this kind of enforced restriction, he might end up exploding like an over-coiled spring.
So you don’t say to this still learning-to-be-calm horse – “Stand still”. You say: “You can move your feet all you want, but I get to choose the direction. If you need to move, you can back up. And to be more precise, you can back in a square.”
It’s best to teach this lesson when your horse is calm. If your horse already understands how to back up in a square, he won’t feel trapped. If something does make him nervous, it will be easier to remind him that backing is a great option, and dropping his head is even better.
Moving the Hips
Backing in a square lets you manage where in your work space you are going to be. If your horse becomes even more nervous the further into your arena he goes, backing in a square lets you stay in the part of the arena he can handle. It also keeps him from backing into other horses, ditches, fences, or the clutter that many of us have around our barnyards. Horses learn very quickly what works. Backing is hard work. It’s not something horses normally choose to do on their own. So if backing straight towards a barbed wire fence gets you to stop asking for backing, guess what your horse will learn fast: point your rear end towards anything sharp, or dangerous, and your human will let you go forward.
You can very quickly teach your horse to back towards ditches, blackberry canes, wild roses, barbed wire, tractors, traffic, the one horse in the group that kicks. You name it and if it’s something you don’t want your horse to back into, that’s what he’ll do.
Backing in a square circumvents that. To back through a turn your horse needs to learn two skills. The first one is obvious. Your horse needs to back up comfortably. You want him to back promptly when you ask, every time you ask. He shouldn’t feel as though he is pulling his feet out of cement. He needs to move back fluidly.
You also need to be able to ask him to bring his hips to the inside, towards you. Most of us know how to send a horse’s hips away from us. If you ask a horse to bring his nose towards you, that will send his hindquarters away from you. This is one of the first things a beginner learns.
Think about the instructions you give to someone who is holding a horse for you while you examine a cut on his hind leg. You tell this person to stay on the same side that you’re on. If the horse gets anxious, even a beginner handler will react by bringing the horse’s head towards her. This will send his hips away. If you were standing on the opposite side of the horse, you’d be knocked over. You might try to push his hips away from you, but the effect the handler has with the lead is much stronger that any push you could give at his hind end.
You can get the horse to send his hips away from you, but that’s not the only direction you can influence. A horse can move his hips in six directions.
Up and down. Think about when he lies down and gets up again.
Forward and back.
To the left and to the right.
You want to be able to ask for each of these six directions, especially the last four. Forward and back are easy. You do that every time you ask your horse to follow beside you on a lead, and to stop and back up.
You’ve already seen how you can send your horse’s hips away from you. Bend his nose towards you as he steps forward. That sends his hips away from you.
To bring his hips toward you, you’ll do the opposite. You’ll bend his head away from you as you ask him to back up. I teach this by asking him to back in a square.
Backing in a Square
If the size is suitable, I like to teach this in a stall. The walls will help your horse understand that you aren’t just asking for backing. You want him to turn. Solving this puzzle helps him become more hind end aware.
Some stalls are just too small or too crowded with feed bins, water buckets, and hay racks to be good work spaces. And some horses just aren’t comfortable in stalls. They may feel crowded by their neighbors or anxious because the rest of the herd is outside. Asking them to work in this kind of confinement isn’t fair or productive.
So the next option is a small paddock, but again there can be problems here. If you are slogging through muddy footing, it may not be safe for you or fair to your horse to ask for backing when you’re both pulling your feet out of ankle deep mud. And it’s certainly not fair to ask him to back towards electric fencing – even if that fencing is turned off.
So another option is to lay out ground poles or cones in a large square, and to use those as the boundary markers. If possible use a fence line for one side of your square.
You don’t have to have a stall or small paddock to teach your horse to back in a square. Here the square is built out of cones.
If I’m using ground poles or cones, I’ll pretend that I’m in a stall. I’ll have a designated “entrance”. I’ll begin by walking my horse into the “stall” and stopping so his nose ends up at the “entrance”. This gives me a reference point to return to after each click.
Initially, I’ll ask my horse to back just a step or two, click!.
As I am reaching for the treat, I’ll step forward.
My horse will also step forward to get his treat so we’ll end up back where we started at the entrance to our “stall”.
“Walking and Chewing Gum”
Feeding so he walks forward to the “entrance” is very important. I don’t want to keep asking my horse to back up without taking him forward again to the front of the stall. We would find ourselves all too quickly confronted with the back wall of the square before we’re ready. The closer I get to the wall that’s behind him, the more reluctant my horse is going to be to back up. He’ll be thinking: “What a stupid human! Can’t she see there’s a wall behind me! I can’t back up any more than this.”
In these two photos I’ve brought Robin in too close to the wall. I’ve left him nowhere to go. When I ask for a turn, he ends up crammed against the wall. This could easily make a less experienced horse feel very nervous.
I don’t want to make a nervous horse feel more nervous because I’m crowding him up against a wall. And I definitely don’t want my horse thinking I’m incompetent and stupid! So instead, before we get too close to the back wall, I’ll reset him forward using my food delivery.
This is one of those tricky handling skills people struggle with. They can walk. And they can reach into their pocket to get a treat. But doing both at the same time is hard. It’s so like the expression about walking and chewing gum. This is clearly a skill that must be learned and practiced.
Here are some points to look out for: You don’t want to begin your food delivery before you click. That undermines the meaning of the click. And you don’t want to get the food out of your pocket and then put your feet into motion. That interrupts the flow of the pattern.
You want to click, then begin reaching into your pocket AS you turn to walk back to the front of his stall. You want this to become so automatic that you can do both together without thinking. That frees you up to focus on your horse’s response.
Dynamic Food Delivery
Now you could ask “why bother?” Why not just click, feed where you are and then ask your horse to step forward, click, then treat again? That accomplishes the same reset forward. It’s just broken down into more steps.
This certainly works, but it doesn’t gain you some extra bonuses. Most important, I want my horse to understand that sometimes he needs to move his feet to get to the treat. This active form of food delivery does many good things. It lets me reposition him so I can set him up for the next cycle of the behavior I’m focusing on.
Earlier I described the “Why would you leave me?” game. This lesson provides us with a great example where moving to get the treat really helps both you and your horse learn the “dance steps” of the pattern. (https://theclickercenterblog.com/2016/07/27/) In this lesson you are walking your horse around a circle of cones. At some point you’re going to want to change direction. You can do this via the food delivery.
Food delivery gives you a sneaky way to execute a complex series of steps that some horses find quite challenging.
Mapping Out The Dance
It’s very much like trying to figure out the steps for a new dance. Once you’ve learned them, they seem effortless. How could you ever have struggled over something so easy? But right now you can’t figure out where to put which foot. What a mess. Arthur Murray where are you when we need you!?
That’s how your horse feels in the “Why would you leave me?” game. You’re asking him to stop, back up, swing his front end across, and walk off with you in the opposite direction. What a tangle! But if you make this dance sequence part of the food delivery, he won’t be thinking about which foot to put where. He’ll be following your lead before he’s even aware that he’s changed direction. You’re programing in the dance steps BEFORE you ask for them directly.
So it’s: click, you do your part of the dance as you reach for his treat. Next he does his part as he moves into position to take it from you. He’ll find it’s easy to stay with you. The dance is completed without his having to think about how he’s done it. You’re mapping this movement out in his nervous system. Once the map is in place, it will be that much easier to ask directly for the dance steps.
Using Food Delivery in the “Why would you leave me?” game to map out a change of direction.
You’re also getting a chance to watch how he moves BEFORE you ask directly for the steps. Does he back easily? Is he able to rock back into his hindquarters and step across into the new direction? No. Then he may have some arthritis in his hocks or some other condition that needs protecting. This kind of information makes a huge difference both in what you ask for and how you teach it.
Reading Your Dance Partner
The “why would you leave me?” lesson provides a great example of using dynamic food delivery. It’s such a useful strategy, but in clinics I often encounter horses who have only been fed in place. The first time I click and flow into my half of the dance, they don’t follow me. Just like everything else, this is a strategy that must be taught. I can’t expect my horse to understand that he needs to track my movement and move his feet to get his treat unless I have gone through a teaching process to explain this to him.
That’s a specific example of the basic training principle: you can’t ask for and expect to get on a consistent basis something you have not gone through a teaching process to teach to your horse. That and safety always comes first are twined together as the guiding principles that direct all my training. Following these two principles can help you avoid many training pitfalls and keep your training very positively oriented.
Normally, I teach the food delivery lesson early on. It’s part of his first introduction to targeting. (https://theclickercenterblog.com/2015/11/20/2015-clinic-season-an-introduction-to-clicker-training-day-1/) Once my horse figures out that he may need to track my movements to get to his treat, he’s going to pay even more attention to my body language. What hints or clues am I telegraphing that will let him know where he needs to be?
As he learns to step forward and back in response to the positioning of the treat, he’ll also be learning how to read me. When I rotate my shoulders towards him and extend my arm out towards the point of his shoulder, he’ll back up.
This lesson is introduced in the very first clicker lessons. I generally begin by having a horse touch a target. I’ll hold the target out in front of him. When he touches it, click, he gets a treat.
Robin has come forward to touch a target.
At first, I’ll make things easy for him. I want him to be successful, so I’ll deliver the treat about where the target was. He won’t have to move his feet to get to his treat. In the photo above this would keep his head on my side of the stall guard.
I would eventually like to be able to ask him to back up. If I’m working with a horse I don’t know, I won’t know what his past history with backing is. Has it been used as a punisher so he resents being asked to back? Does he have joint problems so backing is uncomfortable? I’d like to get a “read” on how he feels about backing, so I’ll introduce it first via the food delivery. As this lesson progresses, I’ll begin to step towards him so he has to back up to get his treat.
I’ve turned into Robin and extended my arm out towards the point of his shoulder. He backs up to get to his treat.
I think of the image of a swing door. If I swing the door (my torso) towards the horse, I am effectively closing the door, and he’ll back up. If I rotate in the opposite direction, I’m opening the door. I’m no longer blocking the space in front of him. Instead I’m opening that space to him and inviting him with the gesture of my leading hand to come forward.
Cues Evolve – Adding the Lead
Once my horse is consistently coming forward to touch a target and backing up to get his treat, I can clip a lead to his halter. Now I can combine the opening and closing of the “swing door” with cues from the lead. My horse will respond perfectly. I won’t need to escalate the pressure to “make” him back up. This is a very clear case of the cues evolving out of the shaping process.
Here’s the summary of this lesson:
Beginning with some of his very first clicker training lessons, my horse learned to back up or come forward to get his treats. That was easy. In the process he became aware of the clues my body orientation was giving him so he could get to the treats more efficiently. If the treats are going to be presented forward, there’s no point in getting ready to back up. You need to read your human to know which one it’s going to be.
These hints can then be transferred to a different part of the movement cycle. The hints are no longer part of the food delivery. Now they are the main event. They come before the click. I’ll use them to ask for the behavior I want. This process lets me use the food delivery to help my horse learn how to respond to the lead.
By tracing these reaction patterns back through a series of lessons, you can see how your horse’s ability to read your body language cues has been evolving beginning with the very first clicker lesson. You have been building the components you’ll need one small step at a time for the more complex lessons that are to come.
This points up how important the foundation lessons are. Ideally, no matter how complex a lesson may seem to an outside observer, for my horse the correct answer should be only one small, very attainable step away. If I jump into the middle of a teaching progression, that won’t be the case at all. I won’t have the underlying components in place. I’ll be teaching my horse three or four new things all at once, and I’m likely to end up in a muddle.
In the backing in a square exercise I’ll want him to back up and then come forward to get his treat. If he’s never moved his feet to get to his treat, he won’t understand what has just happened. I clicked, but then I marched off before he could get his treat. It will feel like a broken click, a broken promise, and he may shut down on me. But, if in an earlier lesson I have taught him to walk forward to get his treat, this component will be well understood. He’ll follow me forward to get his treat, so we’ll be set up to repeat the movement cycle. I’m only introducing one new element at a time, not three or four. In this case my horse already knows how to back up when asked, and to come forward after the click to get his treat. The new element is he’s backing within a confined space.
The key to good training is this progressive, step-by-step building of components. Lessons are only complex when they are not well prepared. Build the underlying layers well, and you can turn the difficult into the achievable.
This is one way in which cues evolve out of the shaping process. Here’s another.
Cues Evolve: How Light Can Light Be?
Now that I have my horse backing easily when I rotate toward him as I slide down the lead, I’ll begin to notice that he is already backing before I can get very far down the lead. Great! My cues are getting lighter. I’ve now opened up a whole new game to play. The goal is to see how little I need to do to get a correct response from my horse. How little do I need to do to get him to back? How far do I need to rotate? Look, I just move my shoulder slightly and he’s already backing. Click! Give him a treat with some laughter added on top.
Horses are superb masters at this game. They have to be given the herds they live in. To keep from running into one another they need to be able to read and predict movement.
When Robin and I were sorting out one of the many leading patterns I’ve wrestled with, I’m sure he thought me the rudest, clumsiest dance partner ever! I was forever in his space, “stepping on his toes”. How annoying! When I finally figured out how to ask for the sequence I wanted without crowding into him, you could see from his expression the immense relief he felt. Finally, he was getting somewhere teaching his very awkward pupil!
Who’s Not Showing Respect?
People are forever talking about respect – by which they usually mean the horse needs to mind his manners and stay out of their way. But really this goes both ways. We’re often the clumsy ones not understanding how to give our much larger dance partner the space he needs to maneuver.
Here’s something else to consider: when a horse is startled, he will often crowd in on top of us. We humans often view this as very rude, disrespectful behavior. But look at it from the horse’s point of view. What should he be doing when his herd is threatened? Bunch in closer together to make it harder for a predator to get at any one of them. He isn’t being disrespectful at all. He’s trying to keep you both alive! But that very generous act can get a human seriously hurt. That’s why we are teaching him some alternatives to crowding on top of us.
The food delivery has tuned you both into body language. He now tracks you beautifully, and you’ve been able to transfer your cues to the front end of the process, ahead of the click. You started out with a big obvious rotation of your body, but that’s now evolved into a whisper. Tighten a shoulder muscle, and he rotates back. What fun!
Now that he’s tuning into you, you’ll begin to notice even more ways in which your body language is giving him clues about what you want. Before you can give your big deliberate cue, he’s already read what you want and responded to you. You’ll need to decide if you want him to be this light, or do you want him to wait for a signal you’ve chosen.
This is often what people mean when they talk about attaching a cue to a behavior. But as you can see the cues are already there. It’s more a matter of deciding which of these signals are you going to highlight and make more definite.
You get to decide if you are going to make deliberate use of the small cues your horse is already using. You can only do that if you understand the process so you can be on the lookout for these subtle cues. Otherwise, if you block him when he starts to respond to these signals, you could end up confusing him.
One of the training mantras I repeat often in clinics is: don’t make your horse wrong for something you’ve taught him.
Being aware of the way in which cues evolve out of the shaping process is one of the ways you can help your horse to be right.
Remember, if you are new to the JOY Full Horse blog, click on the JOY Full Horses tab at the top of this page to find the full table of contents and links to each of the articles I have published so far.
I hope you will want to share these articles by sending links to this blog to your friends. But please remember this is copyrighted material. All rights are reserved. Please do not copy any of the “JOY Full Horses” articles without first getting written permission from Alexandra Kurland, via theclickercenter.com
Also note: these articles are not intended as an instruction guide for introducing your horse to clicker training. If you are new to clicker training and you are looking for how-to instructions, you will find what you need at my web sites:
Review
It’s time again to add to our list of things I would want a beginner to know about cues. So far we have:
1.) Cues and commands are not the same. 2.) Not all cues are verbal. 3.) Cues can come from inanimate objects. You can have environmental cues. 4.) Our animals can cue us.
Here’s number 5: Cues evolve out of the shaping process.
The way in which cues evolve as we teach new skills leads us straight to play. That makes this a very important concept to understand.
A common question people ask when they are teaching a new behavior is: when do I get to add a cue? This is really the wrong question. At least when you are working with horses, the cues are already there. In fact you really can’t NOT cue.
If you are reinforcing your horse for putting his ears forward, where are you looking? At his ears, of course. When you want him to take a step back, your eyes shift down to his feet. Your horse is going to notice these difference. For him these are clues that will morph into cues. Even if you aren’t aware of them, they are still functioning to let him know what to do next to earn reinforcement. So it isn’t a question of when you do you get to introduce a cue, but how do you transfer from the cue that is currently working to a new cue? But before we can get to that question, we need to look in more detail at how those cues evolve in the first place That’s what we’ll be exploring in this section.
Bear with me. I’m going to be traveling through several different lessons, connecting up the dots of evolving cues as we go.
Head Lowering
To understand how cues evolve, let’s begin with this example: suppose I want to teach my horse to drop his head. There are a number of reasons why I might want this behavior.
The first begins with safety. A horse cannot simultaneously rear and drop his nose to the dirt. If I can ask for head lowering, I can interrupt a potentially dangerous behavior.
Head lowering is also practical. Even a short horse can become very tall when you’re trying to get a bridle or a halter on. Asking him first to lower his head makes the task easier for you and more comfortable for him.
Head lowering leads to calmness. This is not automatic. The first time you ask a horse to drop his head, he’s not going to magically and instantaneously calm down. In fact, a nervous horse can actually be made more nervous by being asked to lower his head. With his head up he can scan the horizon line for predators more effectively. So when you ask this anxious, on-guard horse to lower his head, he’s going to want to pop it right back up again.
Should you quit and ask for something else? No. The answer is to keep working on head lowering, but, if you can, change the environment so he feels more at ease. Ask for it again and again over many training sessions. As you begin to build some duration into the behavior, you will begin to see a different emotional state linking up with it.
Horses living in the wild spend twelve plus hours every day grazing. Even horses living in stalls spend several hours a day eating. That means they are spending a huge amount of time every day feeling relaxed enough to drop their heads and eat. The classically conditioned link between head lowering while grazing and an emotional state of calm relaxation is huge. If we can tap into that same state by asking for head lowering, we’ve just created a powerful link between clicker training and a calm emotional state. That will serve us well as we progress forward in training.
Linking head lowering to calmness is something most people are familiar with. Something you might not think about as much is this: head lowering is the counter balance to collection. This is perhaps one of the most important reasons to teach head lowering because it takes you into riding excellence.
Keeping Things in Balance
One of the training mantras you want to always keep in mind is:
For every exercise you teach, there is an opposite exercise you must teach to keep things in balance.
If you ask a horse to engage and collect, you also need to ask him to lengthen and stretch out. If you focus too much attention on collection, you may not have a way to tell him he can just relax and lengthen. As a rider is learning about collecting, if she ends up compressing her horse, she will need a way to lengthen him back out so she can try again. Asking a horse to stretch out in head lowering provides a powerful, and very important counter-balance both physically and emotionally to collection.
On the left Robin is offering beautiful collection. On the right head lowering balances his pose.
There’s Always More Than One Way To Teach A Behavior
I teach head lowering in many different ways. The first, easiest way is through targeting. I will simply have the horse follow a target down to the ground. Click and treat.
The easiest way to teach head lowering is through targeting.
That’s a good start, but just because you can get head lowering one way doesn’t mean your job is done. The more different ways I can trigger the behavior, the better.
In the next installment I’ll look at one of the most powerful ways you can teach head lowering: via backing in a square.
Head lowering is taught out of backing in a square.
Coming next: Backing in a square
Remember, if you are new to the JOY Full Horse blog, click on the JOY Full Horses tab at the top of this page to find the full table of contents and links to each of the articles I have published so far.
I hope you will want to share these articles by sending links to this blog to your friends. But please remember this is copyrighted material. All rights are reserved. Please do not copy any of the “JOY Full Horses” articles without first getting written permission from Alexandra Kurland, via theclickercenter.com
Also note: these articles are not intended as an instruction guide for introducing your horse to clicker training. If you are new to clicker training and you are looking for how-to instructions, you will find what you need at my web sites:

 Heating Up a Behavior