Ten Things You Should Know About Cues: Number 8.) Cues Can Change and Be Changed: Part 1
Change Happens
So far we’ve looked at: 1.) Cues and commands are not the same. 2.) Not all cues are verbal. 3.) Cues can come from inanimate objects. You can have environmental cues. 4.) Our animals can cue us. 5.) Cues evolve out of the shaping process. 6.) You need to get what you want when you want it. That is you need stimulus control. 7.) You can teach behavior in pairs to build stimulus control.
So now you have a cue attached to a behavior and the behavior is under some level of stimulus control. But is that really the case? Cues not only evolve out of the shaping process. They keep on evolving. The cue you started out with is probably not the cue you’ll end up with.
There are many reasons why cues change. Some are deliberate. We changed them. And sometimes cues change because we weren’t paying attention. Change happens. Cues evolve out of the shaping process, and they keep on evolving. So number 8 becomes:
8.) Cues Can Change and Be Changed.
What Comes Before What Comes Before
Horses are very clever at figuring out what comes before the behavior that comes before the behavior that comes before the behavior you want. Did you follow all of that? Your horse will.
Suppose you’ve been sliding down a lead to ask your horse to go forward. He responds. Click and treat.
He’s eager to get his treat, so he’s watching you. You start to slide down the lead. He knows the answer. He’s like the smart kid in class who has his hand up even before the teacher has finished asking the question. “I know the answer! Pick me! Pick me!”
Your horse knows the answer. He’s walking off before you can get even half way down the lead. You love the promptness and softness of his response. Click and treat.
You ask again and your horse responds even sooner. He’s noticing the slight rise of your shoulders just before you begin sliding down the lead.
And then he notices the little intake of breath that precedes the lift of your shoulders.
And now you just begin to think about asking him to walk off, and he’s already doing it!
Whoa! Stop! This is a little too light!
How Light is Too Light?
At some point you have to set some boundaries around how far back in the chain you want him to go. You need to establish where you want to position your “get ready, get set, go” cues. Maybe you enjoy a horse who is so super light no one can see how you’re asking. Or maybe you want your horse to wait until you give a more definite, concrete, visible cue. In either case, you get to decide.
Learning to wait for a cue is part of stimulus control. Again, you can be a “drill sergeant” or a “game master”.
Wait
“Wait” is a great cue to have.
So are “Get Ready” and “Get Set”.
These aren’t necessarily verbal cues. “Get ready” may be a glance in his direction. “Get set” might be a shift in your balance. “Go” is your raised eyebrow. That’s how sensitive and tuned in horses can become.
The problem is your horse will keep moving your “Get ready, get set, go!” cues. He’ll be ready to go on the “Get set” of your shift of balance, and he’ll have found a new, even more subtle “Get ready” cue. At some point you’re going to need to tell him to “Wait”. When he starts to jump the gun, you’ll need to reset him back into your base position.
“Wait” stabilizes your cues at a level of response you can manage. What does wait mean to your horse? What are you waiting for? Signs of relaxation. Teach your horse to settle. You don’t want him always on edge waiting for the next cue. Can he relax, take a breath, stand quietly?
Now get ready. Remember the effect of cues works in two directions so waiting will be reinforced by the cue to get ready.
Get set.
Go!
The game is on. Have fun!
Coming next: Changing Cues and Tap Root Behaviors
Remember, if you are new to the JOY Full Horse blog, click on the JOY Full Horses tab at the top of this page to find the full table of contents and links to each of the articles I have published so far.
I hope you will want to share these articles by sending links to this blog to your friends. But please remember this is copyrighted material. All rights are reserved. Please do not copy any of the “JOY Full Horses” articles without first getting written permission from Alexandra Kurland, via theclickercenter.com
Also note: these articles are not intended as an instruction guide for introducing your horse to clicker training. If you are new to clicker training and you are looking for how-to instructions, you will find what you need at my web sites:
JOY FULL Horses: Ten Things You Should Know About Cues: Number 7: Stimulus Control and Teaching Cues in Pairs
Reminders
The rules surrounding play grow out of a core understanding of cues. Again we have:
1.) Cues and commands are not the same. 2.) Not all cues are verbal. 3.) Cues can come from inanimate objects. You can have environmental cues. 4.) Our animals can cue us. 5.) Cues evolve out of the shaping process. 6.) You need to be able to get what you want, when you want it, and only when you want it. In other words, you need stimulus control.
This brings us to:
7.) You can build great stimulus control by teaching behavior in pairs.
Balancing Cues
At first glance stimulus control is the opposite of play. The very name itself is anti-play. Control and play don’t seem to belong together in the same sentence. And yet even play has rules. Watch two dogs rough housing together. If one gets too rough and keeps pinning his partner to the ground or is forever grabbing the tug toy away, the second dog will quit playing. The game isn’t fun any more. It just became a little too much like real life. So play has rules.
Stimulus control certainly implies rules. The structure of stimulus control can feel very rigid. That doesn’t sound like fun. But remember: play stops being play when it begins to feel unsafe. Stimulus control – taught playfully – is part of play.
So how do you teach the balance of cues without turning into a strict disciplinarian? You don’t want to turn into an old-fashioned teacher standing over her pupils with a ruler in one hand ready to smack the wrists of anyone who gets out of line. That would take you a long way from the playful state that clicker training represents.
Playing with stimulus control comes from remembering everything we have covered so far: cues can be all sorts of different signals; cues evolve out of the shaping process; cues are a two way street. This brings us to another important concept: building a full understanding of cues works best when you use behaviors your horse enjoys.
Building a Repertoire of Behaviors
One of the horses I’ve gotten to know well is a charmer of a lusitano named Zatcho. He makes me laugh which is always a good thing. He stands well over 16 hands which is tall for a lusitano. One of the things I love most about him is the way he looks down at me. It’s as though he’s saying: “You’re a very entertaining little person.”
For many years he was a very successful dressage horse, but his life path was derailed by a tendon injury. With me he is learning a different sort of performance work.
Early on in our relationship I introduced him to mats. By mats I mean doormat-size pieces of plywood. Most horse regard such unfamiliar surfaces as things to be avoided. But once they understand that mats are perfectly safe to step on, and standing on them generates lots of reinforcement, they are eager to go to a mat.
When Zatcho started out, he thought mats were indeed very odd. They certainly weren’t something to stand on! It took him a long time to warm up to the idea of mats as foot targets.
Lots of horses will take one tentative step at a time onto the mat. Zatcho had his own distinctive style. He would lift a front foot high into the air and stand posed like that. He looked like a statue. All he needed was a European King or conquering hero sitting on his back to complete the picture.
I reinforced Zatcho’s eccentric approach to the mat. A leg that goes up must eventually come down. Zatcho pieced together enough of these legs lifts to creep himself to the edge of the mat. Ever so gingerly he let one foot come down so it just barely touched the mat. As he kept his toe balanced there, I clicked and treated in rapid fire succession.
I could imagine him thinking: “Hmm. Curiouser and curiouser. What funny creatures these humans are that this makes them happy!”
Eventually Zatcho fell in love with mats. He also fell in love with leg lifts. He would stand on the mat with one front leg elevated high in the air. He did look grand, but I knew this was a behavior that could easily get out of control.
For every behavior you teach there is an opposite behavior you must teach to keep things in balance.
Actually, it might be more accurate to say there are three behaviors you need to teach: the original behavior; an opposite behavior; and a neutral behavior that sits between these two.
Base Behaviors
This is an area where people often trip up. I’ve seen dog owners spend huge amounts of time teaching a dog to wave first the left front paw and then the right. They leave out the middle step which is keep both front feet on the ground. It’s easy to see how that can happen. That’s the base behavior they started with. It doesn’t seem as though you need to teach it in conjunction with the paw lifts.
They are forgetting that training is not just about teaching new skills. Even more important is teaching your learner when to perform those skills.
I wasn’t teaching Zatcho how to lift up a front leg. This was something he already knew well. What I was showing him was WHEN offering that behavior would pay off.
This is really what it means when you say:
You can’t ask for something and expect to get it on a consistent basis unless you have gone through a teaching process to teach it to your horse.
Zatcho already knew how to stand still, how to lift up a front leg, how to do most of the things I wanted him to do. The question was would he do them when I asked? That’s what training is really about. Getting the behavior is just the first small step. If I wasn’t asking for it, would he still be throwing the behavior at me in the hopes that it would pay off?
So Zatcho needed to be reinforced for “down” as well as for up. He needed to be reinforced at least as much for having two feet on the ground as he was for the more flamboyant leg lifts. Teaching these behaviors as a pair kept them in balance.
But then I added in a third behavior – a hug. Zatcho was enchanted. He loved hugging. He loved swinging his enormous head into my waiting arms and letting me engulf him in a hug.
An Equine Ostrich
Zatcho it turned out was really an ostrich at heart. He loved “burying his head in the sand.” He had always been a little nervous when he was in the far end of the arena. If he could bury his head in my arms, it seemed his worries vanished. Instead of trying to rush back to the security of the near end, he was now happy to linger in the far end. What curious creatures these horses are! They are supposed to be flight reaction animals, but Zatcho found comfort in standing on a mat with his head buried in my arms!
I was equally enchanted by the hugs, but this behavior, even more than the leg lifts, needed to be kept in balance. No one would thank me for training this horse to fling his head into their torso any time he felt a little nervous or he wanted a treat. This was absolutely a behavior that had to have clear rules attached to it.
So we developed a game. I set out a whole series of mats scattered around the arena. Zatcho would land on one, and we’d play a game of “Simon says”. I had three behaviors I was working with: leg lifts, four on the floor, and the hugs.
Zatcho was learning about cues and stimulus control. There was a serious intent behind these lessons, but he was learning about them playing a fun game. I was using the behaviors he enjoyed most to explain this so very important concept.
Zatcho loved giving hugs.
He loved jacking his knees up to his eyebrows.
Four on the floor added an extra twist to the game which meant he had to pay close attention to my cues. But it was easy to be right when all the behaviors were so well understood and equally rewarding.
Clicker “Drill Sergeants”
So what has this got to do with play? When you’re working on stimulus control, it’s easy to become a clicker drill sergeant.
“Up”
“Down”
“Up”
“Down”
“Left”
“Right”
“Attention!”
You can begin to feel as though you’re just barking orders, or every repeated cue is just another question on a test. How many errors did your animal make today? What’s the grade?
That’s not play.
But how can you not laugh when one of the behaviors is an enormous hug which your horse flings himself into. How can you not laugh when your horse find such obvious delight in lifting his knees up past his elbows?
Laughing with our Horses
My attitude is what determined whether this was a school drill or recess. Zatcho loved the behaviors not simply because they paid well, but because they made me laugh. He’s a social animal. Engaging with an uptight, rigid disciplinarian might earn lots of treats, but he’s going to feel a lot safer with someone who is relaxed and laughing.
Neuroscientist, Jaak Pansepp, has established that rats laugh. We don’t know yet if horses do as well, but I think it’s safe to say a horse would rather be around a light-hearted handler who is in a playful mood rather than one who is simply enforcing the rules.
Play helped Zatcho learn. It also made the lessons more fun for me. I looked forward to our sessions together because they were Play Full.
The Bottom Line Summary
So what is the bottom line?
1.) Play stops being play when things feel unsafe. Stimulus control is a critical step in the teaching process.You can have a cue attached to a behavior, but without the additional understanding of when that behavior is appropriate, you can easily feel out of control.
2.) Not all behaviors have to be under the same degree of stimulus control. If you are riding a dressage test, it matters very much that your horse canters when you say canter, and not at other times. But out on a trail, another rider might not care if her horse picked up a trot instead. What is much more important to her is that her horse comes in when called out of his twenty acre pasture.
You may also want some behaviors that your horse feels comfortable offering when he wants to ask for attention or when he’s not sure. I use the “pose” in this way.
Robin was my first “poser”. It became an important behavior for him because he’s such an eager clicker horse. For years I had to keep him at a large boarding barn that had limited turnout. As soon as I arrived at the barn, he was wanting my attention. While I was busy with the evening chores, I didn’t want him to feel frustrated or left out. I certainly didn’t want the proverbial toddler banging the kitchen pots and pans to get attention.
So I gave him default behaviors which cued me to click and treat. Essentially I was under excellent stimulus control. Every time he cued me with the pose, I responded promptly by clicking and reaching into my pocket for a treat. I believe very much in being a well-trained human!
If Robin wanted to eat his hay or doze in the back corner of his stall, that was fine with me. It meant I could get through my chores without interruption. But if he wanted to play, all he had to do was pose, and – click! – I would detour over to give him a treat. I was the one under stimulus control! The pose may have begun as a behavior which I taught to Robin. It became a cue which he could use to get my attention. However you view it, it worked out great for both of us.
3.) For every behavior you teach there is an opposite behavior you must teach to keep things in balance.
4.) Teaching behaviors in pairs is a great way to build cues and establish stimulus control. It means you can avoid using an extinction process and the frustration that goes along with it.
5.) You can easily become a clicker “drill sergeant”. You avoid this by turning the whole process into a game.
It’s important that you understand the underlying concept. I don’t want you to treat Zatcho’s story as a strict recipe for training. You want to pick behaviors that your horse has shown you he enjoys. If you try to copy exactly what I did with Zatcho, you could end up with a muddle. If your horse isn’t good at leg lifts and doesn’t particularly enjoy hugs, you won’t get the same good result. If he loves head lowering and targeting, those would be the behaviors you’d use.
6.) Remember to laugh. It doesn’t matter what the behaviors are. It is the delight you take in seeing your horse succeed that is what really keeps these lessons full of play.
Coming Next: Ten Things You Should Know About Cues: Number 8.) Cues Can Change and Be Changed
Remember, if you are new to the JOY Full Horse blog, click on the JOY Full Horses tab at the top of this page to find the full table of contents and links to each of the articles I have published so far.
I hope you will want to share these articles by sending links to this blog to your friends. But please remember this is copyrighted material. All rights are reserved. Please do not copy any of the “JOY Full Horses” articles without first getting written permission from Alexandra Kurland, via theclickercenter.com
Also note: these articles are not intended as an instruction guide for introducing your horse to clicker training. If you are new to clicker training and you are looking for how-to instructions, you will find what you need at my web sites:
I have a lot of new people joining this blog, so it’s probably a good idea to remind people that the articles you’re reading are an experiment in publishing. I am combining a 19th century idea, publishing my book, JOY FULL Horses, in installments, with 21st century technology to publish it here as a blog.
If you’ve been reading the blogs from my first posting on January 2, 2016, you’ve been reading them in order, but if you are new to this series you are encountering them back to front. My recommendation would be to treat this like the book that it is. You wouldn’t want to read a Dickens novel beginning in the middle. This is very much the same. You will get so much more from these articles if you read them in order.
Click on the JOYFULL Horses tab at the top of this page to go to the Contents. That will give you the links to all the articles. It also makes it very easy to go back and find individual posts that you want to reread.
Also, please let your friends know about these blogs. The more we share, the more people can learn about clicker training. This is a great opportunity to introduce people to the fabulous relationships that clicker training helps us create.
Now on to today’s article. The previous section was a long one with lots of how-to instruction. Today’s post is much shorter, though it deals with an important concept: stimulus control. Without this you can easily end up with a clicker mess instead of a clicker super star.
Getting What You Want
Our novice clicker trainer is learning a lot about cues.
1.) Cues and commands are not the same. 2.) Not all cues are verbal. 3.) Cues can come from inanimate objects. You can have environmental cues. 4.) Our animals can cue us. 5.) Cues evolve out of the shaping process.
The list is simple, but we’ve covered some major training concepts. Now it’s time for another.
Number six on my list is how to get what you want, when you want it, and only when you want it. In other words, I want my novice trainer to understand:
6.) Stimulus Control
Cues and Our Eager Clicker Horses
Cues are great, but they are just the beginning. You could have a great back up cue for your horse. Every time you ask him to back he does so right away. There’s no hesitation. It’s a completely reliable cue. The only problem is he also backs up when you ask him to go forward. And he backs up when you try to groom him and saddle him. In fact just about every time he sees you, he’s backing.
Your horse knows backing is a hot behavior. You often pay well for it, so it’s worth a try. And if backing doesn’t work, how about retrieving? That usually gets a laugh and a treat. How about handing you all the brushes out of your grooming bucket. Will that work?
Clicker-trained horses can be great fun, and they can also be great pests!
When my clever clicker horse starts expanding on the games I’ve taught him, I keep reminding myself that I don’t want to make him wrong for offering the behaviors I’ve taught him. I just need to understand that attaching a cue to a behavior is only half of the story.
I need to take the process a little further and establish some level of stimulus control over the behaviors I’ve been reinforcing. That means I get the behavior when I ask for it, but not at other times. And I don’t get some other behavior in response to my cue. If I ask for backing, I get backing – each and every time. I don’t get head lowering or walking forward in response to my cue. And I don’t get backing in response to some other cue. Stimulus control takes me to precision and consistency.
Stimulus Control Version 1.0
When I was first learning about clicker training, stimulus control was taught using an extinction process. Here’s how it was described:
You are teaching your horse to touch a target. You would eventually like to say “touch” and have your horse orient to the target. (Remember Number 2 of Ten Things You Should Know About Cues: Not All Cues Are Verbal. We’re a verbal species so, of course, we would feel that we don’t have the behavior fully developed until we have a verbal cue attached to it! https://theclickercenterblog.com/2016/02/14/)
We are reminded that saying “touch” before you have the behavior in place is not going to help you get the behavior. If I held a target out in front of you and said “Rabish”, you wouldn’t know what to do. Think of all the things you could do. You could back up. You could spin around. You could grab the target from me. You could jump up and down, wave your arms, sing the “Star Spangled Banner”.
Who knows what the behavior is that the cue “Rabish” is supposed to elicit. Based on your past history I could get all sorts of things besides simple targeting. Before I add the verbal cue, I already want to be getting the behavior I’m after.
So the instructions tell you to wait for the horse to be consistently touching the target. The way this was always described was this:
When you are so confident that your horse will touch the target that you would bet money on it, that’s when you add a verbal cue.
Now you say “touch” and you hold the target up. Your clever horse touches the target, but of course he hasn’t suddenly learned English. He would have touched the target whether you had said anything or not. You could have said “Rabish”, and he would have done the same thing.
You repeat this several times creating an association between the word “Touch” and the action of bumping the target. Now when you say “Touch” your horse looks around for something to orient to.
The Four Criteria of Stimulus Control
The cue is becoming associated with the behavior, but that’s not enough. You want stimulus control. That means the cue meets the following criteria:
The horse touches the target promptly every time the cue is given.
The horse doesn’t touch the target in the absence of the cue.
The horse doesn’t offer some other behavior in response to the cue.
And the horse doesn’t offer the behavior in response to some other cue.
Speed Bump: Teaching with Extinction
So the next step in this process was to hold the target up without saying “Touch”.
Here’s where the snag occurred for me. The horse had been consistently reinforced for touching the target up to this point, so, of course, he was going to touch it now. But you didn’t give the cue. From this point on the horse was only to be reinforced for touching the target when the cue was given.
The poor horse didn’t know about this rule change so he thought the system was broken. What do you do when you can’t get your candy bar out of the vending machine? You bang on the machine. That’s what the horses would do. They would bump the target really hard. It’s as if they were saying to their human:
“I’m touching it! Can’t you see. I’m really touching it!”
As their frustration grew, they might grab the target, or bite at their handlers to get their attention.
This is all very typical of the behavior you see in an extinction process. The animal gets frustrated. He tries harder, and when that doesn’t work, he gets angry.
When I was first exploring clicker training and I followed these directions, I would see the best examples of targeting yet. My horse was really bumping the target hard to get my attention. In fact he was well on his way to picking it up and handing it to me. How could I not reinforce that? A retrieve would be really fun to train! But if I reinforced him at this point when I hadn’t given my cue, I would blow my stimulus control.
Now I was frustrated. My horse was frustrated. We didn’t like this way of doing things so we found a different way of building good stimulus control.
We taught behaviors in pairs.
Through “the Wardrobe”
The next unit will explain what this means. As you come to understand this process, you will be stepping “through the wardrobe” – not into Narnia – though it may seem that way given the clarity of communication that evolves – but certainly into a world of play.
Coming Next:Ten Things You Should Know About Cues: Number 7.) Stimulus Control and Play: Teaching Cues in Pairs
Remember, if you are new to the JOY Full Horse blog, click on the JOY Full Horses tab at the top of this page to find the full table of contents and links to each of the articles I have published so far.
I hope you will want to share these articles by sending links to this blog to your friends. But please remember this is copyrighted material. All rights are reserved. Please do not copy any of the “JOY Full Horses” articles without first getting written permission from Alexandra Kurland, via theclickercenter.com
Also note: these articles are not intended as an instruction guide for introducing your horse to clicker training. If you are new to clicker training and you are looking for how-to instructions, you will find what you need at my web sites:
Heating Up a Behavior In the previous section you learned how to teach your horse to back through a square. There are many practical reasons why you would want this kind of maneuverability in your horse. For starters it’s important that horses understand that they can swing their hips so they don’t feel trapped in tight spaces. I’m sure you can see why this would be important. What may not be as obvious is the link between backing in a square and head lowering.
To get to this lesson, you’re going to take a little detour. You’re going to leave the stall for a few minutes while you make head lowering a “hot” behavior.
Training Detours
The reason for this detour is this way of teaching head lowering out of backing can be a hard lesson. I learned it originally from John Lyons where essentially you were closing down all options but the one you wanted. You were taking away choice. It is often taught when horses are over threshold. It’s a powerful lesson that can bring a horse back under control.
There have been times over the years working with horses at clinics where I have been very glad I knew how to make this lesson work. When a horse is panicking because he is away from home, you need management tools that can safely and without undue force, bring him back under control. If you ever find yourself on the other end of the lead from a horse who is having an emotional meltdown, you may be very grateful that you know how to make this lesson work.
But, and this is a big but, I want to be a constructional trainer. I want to teach a skill before I need to use a skill.
That means I want to teach my horse how to solve the puzzle that this head lowering lesson presents BEFORE I need to use it. I want to tease apart what can be a hard lesson into it’s underlying component parts. Instead of taking away choice, I want to give it back. Instead of this feeling like a hard lesson where doors are slammed shut, I am presenting it in a series of easily understood steps. If my horse ever does have a moment of panic, he will know how to solve the puzzle.
Think about how this would feel for yourself. When you’re afraid, if someone asked you what 27 divided by 3 is, you might momentarily struggle to find the answer, but you know basic math. You’d be able to give the answer. But suppose you’re asked for something you’ve never done. Now you’re really in a panic. You can’t solve this additional puzzle. You feel even more trapped. You’re afraid of the environment, and now you are struggling to figure out what your inquisitor is demanding of you. That’s definitely not how I want my horses to experience training. Controlling the environment and breaking training down into small steps transforms an inquisition into a reasonable lesson.
This is essentially showing you how you can take training you may have learned from a traditional, correction-based system and transform it into something that is very clicker compatible. That’s why I have taken so much time to describe the step-by-step teaching process that is going to take us from backing in a square to head lowering.
Priming the Pump
To make the jump from backing into head lowering, I’m going to “prime the pump”. I’m going to make head lowering a super “hot” behavior.
To show you how this works answer the following questions:
What colour is snow?
What colour is the house the US President lives in?
What colour is a sheet of typing paper?
What colour is the opposite of black?
What colour are clouds?
What colour is a bride’s gown?
What do cows drink?
Many people will say milk. They’ve been primed to say milk because they are thinking about things that are white. But, of course, cows drink water, not milk.
We’re going to prime the head lowering pump by asking lots of questions where head lowering is the answer. It’s like having a stack of files on your desk. At the moment the head lowering file may be buried at the bottom. It’s in there somewhere, but you’ve forgotten it’s even there. Bring it to the top of the stack, and now you’ll be thinking about it. Make every file you open a head lowering file, and pretty soon that’s the only answer you’ll be expecting to give.
Priming The Head Lowering Pump
The easiest way to get head lowering is through targeting, so that’s how you’re going to begin. You’ll have your horse track the target down, click and treat.
Another easy way is to milk the line down as you bend down softly inviting your horse to join you. The expression milking the line refers to your fingers stroking down either side of the line. You aren’t pulling down, and you aren’t fixing your hand firmly around the lead. You are simply drawing your fingers along the rope in a soft invitation.
Placing your hand on your horse’s poll is yet another way. By now he may drop his head readily because he knows head lowering has been paying well recently so why not try it again. Click and treat.
It’s no accident that head lowering is the go-to option. When you put your hand on his poll, it’s clear you want something, but no clicks are coming for just standing still. When you withhold your click, you’ll see a resurgence of the behavior that was just earning high rates of reinforcement – in this case, head lowering. For a discussion of resurgence and how to use it in training refer to the May 2015 articles on Resurgence and Regression: https://theclickercenterblog.com/2015/05/21/
Head Lowering from Backing in a Square
The pump is now primed. Head lowering is a super hot behavior. It’s time to return to the backing in a square lesson. You were asking your horse to back through a corner. As he swings his hips to the inside, his head is going to drop ever so slightly. This doesn’t happen because he’s relaxing. It’s more matter of counter-balancing. As his hips swing to the side, his head will counter balance that move by dropping slightly.
You’re going to be looking for this subtle balance shift. At first, it may be very small, so you have to be on the lookout for it. Instead of releasing the lead as soon as he’s backing, you’re going to wait for this tiny head drop. Your hand will stay on the lead to say: “I want something”. As soon as you get the response you’re after, you’ll release it.
This isn’t a change in the way you’re playing this game. You haven’t suddenly switched from a starter button to a constant-on cue for the backing. What has changed is the criterion you’re looking for. Now it isn’t backing. It’s that slight drop in his head. You’ve been getting it in different ways. Now you’re simply triggering it out of backing.
Head lowering is a hot behavior, so your horse will catch on fast. He’ll start to drop his head even before he’s stepping back. This is golden. You now have a super reliable way of asking for head lowering, one that will work even when he is feeling nervous and anxious.
Calm Down Now!
Why are you teaching head lowering in this way? Why not simply stay with the easier, less technically-difficult-to-teach methods? It’s a simple answer – even the most mellow horse can have a moment when his world is falling apart. You never know when you might suddenly find yourself holding onto a horse who is becoming increasingly worried. Maybe your friend has just taken her horse out of the arena, or maybe his best buddy is being turned out without him. Whatever the reason your horse has suddenly gone from working quietly to exploding into a freight train’s worth of energy. You need to keep both you and your horse safe. Putting him away, or turning him loose to work things out at liberty may not be an option, so what else can you do?
Again, it’s a simple answer. Ask him to back in a square. This moves his shoulders out of your space and keeps him from crashing over the top of you. As he backs, you’ll be displacing his head up and to the outside. The more anxious he is, the higher his head will be as he takes a step back. When he swings his hips to the inside, he’ll have a tendency to drop his head. This isn’t because he’s calming down. It’s a matter of counter-balancing. The drop of his head tends to happen as he steps to the side.
Be ready for this. As soon as you feel even the first inkling of head lowering, be certain to release the lead.
Even if you don’t manage to get a click in, the release of the lead will jump start the process. You’ll be ready the next time to reinforce the behavior not just with the release of the lead but with a click and a treat, as well. Repeat this a few times, and you will very quickly have a horse who lowers his head not just a tiny amount, but all the way to the ground.
Priming the pump helps the horse make the connection. When you activate the lead, he’s going to try head lowering because head lowering has been the go-to answer. Click and treat. When you need it the most, activating the lead will head straight to head lowering. (In the next unit we’ll address stimulus control so head lowering isn’t the only behavior you get when you touch the lead.)
Heading Toward Lighter Than Light Cues
Cues for head lowering will definitely grow out of this shaping process. When you slide down the lead asking for that slight displacement of his head to the outside, he’ll know you’re after head lowering.
How light can you be? Will he lower his head from just a soft touch on the lead? From a hand gesture? How can you morph that head lowering trigger into ever more subtle cues?
Playing with Cues
You can play even more with this process. Head lowering is hot. So let’s see what else can trigger the head lowering response. Stroke your hand along your horse’s back. If he’s been a little anxious, the long brush strokes your arm makes over his back may feel soothing. If you see him drop his head even a little, click and treat. Resume stroking his back again. He’s catching on to this new clicker game. He’s beginning to make connections fast. After just a couple of clicks, you’ll see that stroking his back cues him to drop his head. Very neat!
You can install all kinds of fun “buttons” all over your horse. And it’s not just head lowering that you can trigger. If you understand the overall concept of how this priming process works, you can install “buttons” for ears forward, for the pilates pose, for forward motion, for backing, etc.
“How’d you do that?”
As you play with this game, the question you’ll be hearing from your friends will be: “How’d you do that?”
“How did you get your horse to back up by pulling on his tail?”
“How did you get your horse to drop his head by tickling his belly?”
“How did you get your horse to run towards you by sitting in a chair?”
You don’t have to give away all your secrets (unless you want to). You can give them the best answer of all – playfully.
Author’s note: I want to remind people that I am using these lessons to illustrate some important concepts. I’ve included a lot of how-to instruction in this unit, but I have also left a great deal out. I can’t fit everything that needs to be said about head lowering into the length of an article. It was never my intent that these articles would give that kind of complete detailed, how-to instructions. For those resources refer to my web sites, and to my books, DVDs, and on-line course. In particular refer to my book, “The Click That Teaches: A Step-By-Step Guide in Pictures”, and the early DVDs in the DVD lesson series: Lesson 1: Getting Started with the Clicker, Lesson 2: Ground Manners, and Lesson 3: Head Lowering. My on-line course will also provide you with very thorough how-to instructions.
Coming Next: Ten Things You Should Know About Cues: Number 6.) Getting What You Want When You Want It: Stimulus Control
Remember, if you are new to the JOY Full Horse blog, click on the JOY Full Horses tab at the top of this page to find the full table of contents and links to each of the articles I have published so far.
I hope you will want to share these articles by sending links to this blog to your friends. But please remember this is copyrighted material. All rights are reserved. Please do not copy any of the “JOY Full Horses” articles without first getting written permission from Alexandra Kurland, via theclickercenter.com
Also note: these articles are not intended as an instruction guide for introducing your horse to clicker training. If you are new to clicker training and you are looking for how-to instructions, you will find what you need at my web sites:
In the previous post I used the process of teaching a horse to back in a square to illustrate several ways in which cues evolve out of the shaping process. I showed you how you can use food delivery to move your horse through a particular motor pattern. When you first teach a horse to come forward to touch a target, it’s easy to have him step back to get to his treat. Body language cues evolve easily out of the food delivery. Now if you turn into him to ask for backing, he’ll know what you want. The cue for backing evolved out of the shaping process.
Horses are masters at reading subtle changes in body language. They are good at seeing what comes before what comes before what you are asking for. In the wild a horse needs to be good at predicting the future to stay out of trouble, both within the herd and when a predator is on the hunt. So horses are good at spotting the little clues that tell them what you’ll be asking for next. After all, the better they learn to read you, the more successful they’ll be. Those clues help them to get to their reinforcers faster.
Starter Button and Constant-On Cues
In Part one of this section, I focused on teaching your horse to back in a square. That’s the precursor to teaching head lowering. So let’s continue on to that part of the lesson. Remember you’ve been asking your horse to back from the front of his stall a step or two toward the back wall. The stall may be his actual stall, or just a square marked out with cones or ground poles. Once these steps come easily, you can begin to build duration. You’ll need to decide if your cue is a starter button or a constant-on cue.
A starter button cue is exactly what it sounds like. Think about how you use your key to turn on your car’s ignition. You turn the key and as soon as you hear the engine start, you let go. You don’t keep turning the key. You assume that once your car starts it’s going to keep going until you turn it off. If it does stall out, you’ll restart it with the turn of the key.
Your backing cue can work in the same way. When you slide down the lead, you expect your horse to begin to back. But do you hold on to the lead the whole time he’s backing, or do you let go once he’s initiated the movement? The later would be a starter button cue.
If you hold on, you’re using the lead as a constant-on signal. You’re in effect saying: “As long as this signal is present, you’re to keep backing. When it goes away, you’re to stop.”
In her book, Lads Before the Wind, Karen Pryor described how she taught her dolphins to spin and to keep spinning as long they could hear a certain signal. It was an easy way to build duration in a behavior, especially working as she was with multiple animals.
The problem with using the lead as a constant-on signal is it can effect your horse’s balance. You can experience this yourself. You’re going to hold the snap end of the lead so you get the horse’s perspective of this lesson. Have a friend slide down the lead to ask for backing. First, she’s going to hold on until you have given her the number of backing steps she wants. That’s the constant-on cue.
Next have her slide down, but she’s to let go AS SOON AS you’re in motion. If you stall out, not sure what she wants, she’s to slide down again and restart the behavior. Once you are backing freely, she’s to let you back several steps before she clicks. That will bring you to a stop. Remember, as you are backing, she is NOT keeping an active hold of the lead.
So now you’ve sampled both constant-on and starter button cues.
Question: Which way did you prefer? If you are like most people, you’ll prefer the starter button. The other will feel heavier and more demanding. You’ll also notice that there was a difference in how you backed. With the starter button your steps will be longer, more even, better balanced.
The Horse’s Perspective
There’s a lovely expression that I refer to often in clinics: Go to people for opinions and horses for answers. In this case you were the horse. You don’t have to take my word for it. You can test out the two different versions of how you ask for backing and decide for yourself which one you prefer.
One of the things I like about clicker training is we can experience directly so many of the lessons we give to our horses. Holding on to the lead with a constant-on cue comes much more easily to most people. You have to make a conscious effort to let go. If there’s no difference, there’s no reason to change. But once you’ve experienced for yourself from the horse’s perspective the difference in the feel and the impact it has on your balance, it becomes a lot easier to pay attention to the detail of letting go.
Years ago at one of the big horse expos I had a trade booth set up directly across the aisle from a company that sells electronic shock collars for horses. All weekend long I got to watch their sales video. It featured a mare who had a foal at her side. The mare was a cribber. They were using the shock collar to discourage the cribbing.
Each time she reached out to the fence, they would zap her with the collar. Over and over again as the video played, I got to watch her jump back from the shock. That was hard enough to watch. What made this even worse, when they shocked her, her foal had just started to nurse. Think of the associations that was creating!
As part of their sales pitch they were letting people feel the shock the collar produced. Toward the end of the weekend when things were quieting down, I went over to have a feel. They had the collar set at the lowest setting. You didn’t get a jolt. Touching an electric fence is much worse, but even so it was exceedingly unpleasant. That was the lowest setting.
I asked to feel the setting the mare was given.
“Oh on. We don’t let people take that level of shock.”
Soap Box Time
It made me appreciate clicker training all the more. To the best of our ability to simulate experiences, there’s nothing we do to the animals that we do not also let people experience. I can slide down the lead and let you feel what the horse feels at his end of the lead. I can set up training games and let you go through the same puzzle solving process. I can click and feed – maybe not hay stretcher pellets, but something more to your liking.
We are confronted by so many different opinions about how best to train our horses. We can’t always know how something feels to a horse. I can’t wear a bit or carry a rider on my back, so I can’t replicate every experience, but here’s my standard. Your horse should not have to go through any training procedure which you are uncomfortable watching.
Note, I do not say which you are uncomfortable doing to your horse. You may not have the skill to take your horse through a particular lesson. You may be using a trainer to help teach your horse something that requires more experience than you currently have. But you should be able to watch everything that’s done to your horse. If something makes you squirm, it’s okay to speak up for your horse. There is always, ALWAYS another way to train everything you want to teach.
A good trainer will respect you more for standing up for your horse, and a good trainer will find another way to teach the lesson. A punitive trainer with a narrow tool box will tell you this way is for the good of the horse, and you have to let him finish. He’ll tell you if you let the horse get away with being disrespectful, you’ll ruin him.
These are red flags. Thank him very much for his opinion and take your horse home. You don’t have to be a clicker trainer to know how to break a lesson down into small steps. You don’t have to be a clicker trainer to be fair to a horse. You just have to be a good trainer. So take your horse out of harm’s way, and find someone to help you who is a true teacher not a bully.
Backing with Starter Button Cues
That’s enough standing on a soap box. Let me step down off of mine and get back to the backing in a square lesson. Hopefully, you got a friend to help you, and you were able to feel the difference between a starter button and a constant-on cue. You know for this lesson you want the lead to act as a starter button cue. Once your horse initiates backing, you’ll release the lead and walk back with him.
Now note, this means that there is a constant-on cue in this process. As he backs, you’re walking forward toward him. Walking toward him is your constant-on cue. You want him to keep backing out of your way as you walk into his space. That cue is evolving out of the shaping process.
Again, if he stalls out too soon, you’ll restart the “engine” by sliding down the lead.
You’ll ask him to back a couple of steps, being mindful that you are still in a stall and there’s a wall behind him.
After the click, you’ll use your food delivery to reposition him forward.
This begins a new movement cycle.
As you ask him to repeat the cycle, you’ll see him backing with more confidence. Not only does he understand what you want, he’s backing over ground he’s already stepped on. He knows now that it doesn’t contain any hidden traps. It’s safe to step back. Each time you ask him, it becomes easier and more fluid. That’s in part why you do this back and forth dance. It is like bending a metal coat hanger. At first the hanger is very stiff, but the more you bend it, the softer and easier it becomes.
A Change in the Game
Now that you have a horse backing easily, you’re going to change the game once again. Instead of feeding forward after the click, now you’re going to feed right where you clicked.
Again, this can trip people up. They spent so much mental energy figuring out how to feed forward, and now they have to change all that and keep their feet still.
Why the change? You’re ready to tackle the puzzle that the back corner of the stall presents. So many horses feel trapped in this kind of situation. They forget that they can just swing their hindquarters over. When they get in a corner, instead of simply stepping back and to the side, they panic and push forward into the handler.
You’re going to show your horse that he has another option. You have him at a halt with his rear end close to the back wall. You’re going to slide down the lead and ask him to turn his head away from you. Your body orientation is still saying back, but you ARE NOT pushing into him AT ALL with the lead. There is no backwards force on the lead. There doesn’t need to be.
If you add a feel of pushing him back before he has figured out how, he’ll just feel trapped. All the pressure will go down into his hocks. Especially if he has any arthritis in his hocks, this will make him feel even more anxious, and it will be harder yet for him to figure out what he’s to do.
More “Being the Horse”
Instead you are simply going to ask him to turn his head away from you. You can experience what this does simply by standing up for a moment. Put your hands on your hips so you can really feel the effect. Begin by looking straight ahead. Now turn your head to one side and look over your shoulder. What did your hips do? They counter balanced the movement by swinging in the opposite direction.
As you ask your horse to bend his nose more and more to the outside, he’ll become aware of the answer to the puzzle. All he has to do is follow the turn of his hips, and he can back up out of this corner. Putting him in the corner makes it easier for him to figure out the answer. The structure helps you. I just don’t want to put him prematurely in the corner before he’s comfortable enough with backing to be able to find the answer in a relaxed manner. That’s the reason for all the back and forth prep.
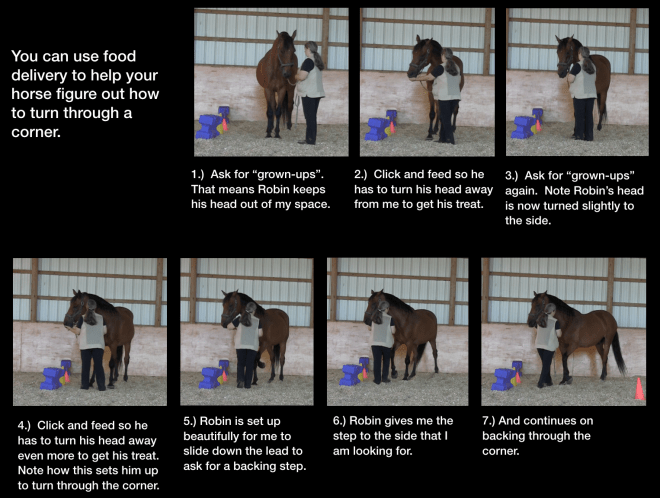
If your horse doesn’t understand your request to move his head away from you, there’s a simple way to prep this part of the lesson. Use food delivery to set up the response. Begin by asking him to stand next to you in the “grown-ups are talking” position.
When you click, instead of presenting the food so he continues to keep his head in this position, you’ll extend your arm past where his nose is so he has to turn his head to get his treat. As he moves, you’ll step forward, filling the space he’s vacating. You’ll repeat this until the food delivery has created the weight shift you need to ask him to turn his hip so he can back through the corner. This is an easy way to ask for what can be a very challenging maneuver for some horses. The goal is to make this as easy and understandable as possible so your horse is very comfortable being asked to back through turns. (For another view of how to use food delivery to set up the behavior you want refer to the May 6, 2016 post on Using Environmental Cueshttps://theclickercenterblog.com/2016/05/06/)
Whichever approach you use, you now have him backing one step through the corner. Click and treat. You can ask for another step, or perhaps it is time to walk him forward again out of the stall to give him a break.
Once your horse is comfortably backing through all four the corners of the stall, it is time to change the game yet again. Now you’re going after head lowering.
Heating Up a Behavior
To get to this lesson, you’re going to take a little detour. You’re going to leave the stall for a few minutes while you make head lowering a “hot” behavior.
Remember, if you are new to the JOY Full Horse blog, click on the JOY Full Horses tab at the top of this page to find the full table of contents and links to each of the articles I have published so far.
I hope you will want to share these articles by sending links to this blog to your friends. But please remember this is copyrighted material. All rights are reserved. Please do not copy any of the “JOY Full Horses” articles without first getting written permission from Alexandra Kurland, via theclickercenter.com
Also note: these articles are not intended as an instruction guide for introducing your horse to clicker training. If you are new to clicker training and you are looking for how-to instructions, you will find what you need at my web sites:
Cues evolve out of the shaping process.
I chose head lowering to illustrate how this works. In Part 1 I ended with a reminder that there is always more than one way to teach every behavior. I teach head lowering in many different ways. The first, easiest way is through targeting. That’s a good start, but just because you can get head lowering one way doesn’t mean your job is done. The more different ways you can trigger the behavior, the better.
Backing in a Square
You may not see the connection at first, but one of my favorite ways to teach head lowering is via backing in a square. The reason for using this teaching process is because it generates a shift of balance from the forehand onto the horse’s hindquarters. That in turn leads straight to improved performance under saddle. You may not see the connection at first, but this way of asking for head lowering creates a very different balance from the one a horse is normally in when he drops his head. The most frequent form of head lowering occurs when he’s grazing.
Head lowering is taught via backing in a square.
Grazing is a forward-moving exercise. Horses graze by walking slowly forward. They don’t normally graze by walking backwards and eating the grass that they have already stepped on. Grazing forward means they encounter fresh grass that hasn’t yet been crushed underfoot.
Grazing is a forward-moving exercise.
Grazing is forward movement.
Not A Forward-Moving Exercise
The expression for teaching head lowering is: head lowering is not a forward-moving exercise.
At first glance this seems like a very clumsy sentence. What you are saying is your horse can stand still and drop his head. He can also walk backwards and drop his head. So you aren’t saying he can’t move his feet. He just can’t move his feet forward.
You most need head lowering when a horse is nervous. A nervous horse needs to move. If you were to try to ask him to drop his head AND stand still, you would bottle him up way too much. Under this kind of enforced restriction, he might end up exploding like an over-coiled spring.
So you don’t say to this still learning-to-be-calm horse – “Stand still”. You say: “You can move your feet all you want, but I get to choose the direction. If you need to move, you can back up. And to be more precise, you can back in a square.”
It’s best to teach this lesson when your horse is calm. If your horse already understands how to back up in a square, he won’t feel trapped. If something does make him nervous, it will be easier to remind him that backing is a great option, and dropping his head is even better.
Moving the Hips
Backing in a square lets you manage where in your work space you are going to be. If your horse becomes even more nervous the further into your arena he goes, backing in a square lets you stay in the part of the arena he can handle. It also keeps him from backing into other horses, ditches, fences, or the clutter that many of us have around our barnyards. Horses learn very quickly what works. Backing is hard work. It’s not something horses normally choose to do on their own. So if backing straight towards a barbed wire fence gets you to stop asking for backing, guess what your horse will learn fast: point your rear end towards anything sharp, or dangerous, and your human will let you go forward.
You can very quickly teach your horse to back towards ditches, blackberry canes, wild roses, barbed wire, tractors, traffic, the one horse in the group that kicks. You name it and if it’s something you don’t want your horse to back into, that’s what he’ll do.
Backing in a square circumvents that. To back through a turn your horse needs to learn two skills. The first one is obvious. Your horse needs to back up comfortably. You want him to back promptly when you ask, every time you ask. He shouldn’t feel as though he is pulling his feet out of cement. He needs to move back fluidly.
You also need to be able to ask him to bring his hips to the inside, towards you. Most of us know how to send a horse’s hips away from us. If you ask a horse to bring his nose towards you, that will send his hindquarters away from you. This is one of the first things a beginner learns.
Think about the instructions you give to someone who is holding a horse for you while you examine a cut on his hind leg. You tell this person to stay on the same side that you’re on. If the horse gets anxious, even a beginner handler will react by bringing the horse’s head towards her. This will send his hips away. If you were standing on the opposite side of the horse, you’d be knocked over. You might try to push his hips away from you, but the effect the handler has with the lead is much stronger that any push you could give at his hind end.
You can get the horse to send his hips away from you, but that’s not the only direction you can influence. A horse can move his hips in six directions.
Up and down. Think about when he lies down and gets up again.
Forward and back.
To the left and to the right.
You want to be able to ask for each of these six directions, especially the last four. Forward and back are easy. You do that every time you ask your horse to follow beside you on a lead, and to stop and back up.
You’ve already seen how you can send your horse’s hips away from you. Bend his nose towards you as he steps forward. That sends his hips away from you.
To bring his hips toward you, you’ll do the opposite. You’ll bend his head away from you as you ask him to back up. I teach this by asking him to back in a square.
Backing in a Square
If the size is suitable, I like to teach this in a stall. The walls will help your horse understand that you aren’t just asking for backing. You want him to turn. Solving this puzzle helps him become more hind end aware.
Some stalls are just too small or too crowded with feed bins, water buckets, and hay racks to be good work spaces. And some horses just aren’t comfortable in stalls. They may feel crowded by their neighbors or anxious because the rest of the herd is outside. Asking them to work in this kind of confinement isn’t fair or productive.
So the next option is a small paddock, but again there can be problems here. If you are slogging through muddy footing, it may not be safe for you or fair to your horse to ask for backing when you’re both pulling your feet out of ankle deep mud. And it’s certainly not fair to ask him to back towards electric fencing – even if that fencing is turned off.
So another option is to lay out ground poles or cones in a large square, and to use those as the boundary markers. If possible use a fence line for one side of your square.
You don’t have to have a stall or small paddock to teach your horse to back in a square. Here the square is built out of cones.
If I’m using ground poles or cones, I’ll pretend that I’m in a stall. I’ll have a designated “entrance”. I’ll begin by walking my horse into the “stall” and stopping so his nose ends up at the “entrance”. This gives me a reference point to return to after each click.
Initially, I’ll ask my horse to back just a step or two, click!.
As I am reaching for the treat, I’ll step forward.
My horse will also step forward to get his treat so we’ll end up back where we started at the entrance to our “stall”.
“Walking and Chewing Gum”
Feeding so he walks forward to the “entrance” is very important. I don’t want to keep asking my horse to back up without taking him forward again to the front of the stall. We would find ourselves all too quickly confronted with the back wall of the square before we’re ready. The closer I get to the wall that’s behind him, the more reluctant my horse is going to be to back up. He’ll be thinking: “What a stupid human! Can’t she see there’s a wall behind me! I can’t back up any more than this.”
In these two photos I’ve brought Robin in too close to the wall. I’ve left him nowhere to go. When I ask for a turn, he ends up crammed against the wall. This could easily make a less experienced horse feel very nervous.
I don’t want to make a nervous horse feel more nervous because I’m crowding him up against a wall. And I definitely don’t want my horse thinking I’m incompetent and stupid! So instead, before we get too close to the back wall, I’ll reset him forward using my food delivery.
This is one of those tricky handling skills people struggle with. They can walk. And they can reach into their pocket to get a treat. But doing both at the same time is hard. It’s so like the expression about walking and chewing gum. This is clearly a skill that must be learned and practiced.
Here are some points to look out for: You don’t want to begin your food delivery before you click. That undermines the meaning of the click. And you don’t want to get the food out of your pocket and then put your feet into motion. That interrupts the flow of the pattern.
You want to click, then begin reaching into your pocket AS you turn to walk back to the front of his stall. You want this to become so automatic that you can do both together without thinking. That frees you up to focus on your horse’s response.
Dynamic Food Delivery
Now you could ask “why bother?” Why not just click, feed where you are and then ask your horse to step forward, click, then treat again? That accomplishes the same reset forward. It’s just broken down into more steps.
This certainly works, but it doesn’t gain you some extra bonuses. Most important, I want my horse to understand that sometimes he needs to move his feet to get to the treat. This active form of food delivery does many good things. It lets me reposition him so I can set him up for the next cycle of the behavior I’m focusing on.
Earlier I described the “Why would you leave me?” game. This lesson provides us with a great example where moving to get the treat really helps both you and your horse learn the “dance steps” of the pattern. (https://theclickercenterblog.com/2016/07/27/) In this lesson you are walking your horse around a circle of cones. At some point you’re going to want to change direction. You can do this via the food delivery.
Food delivery gives you a sneaky way to execute a complex series of steps that some horses find quite challenging.
Mapping Out The Dance
It’s very much like trying to figure out the steps for a new dance. Once you’ve learned them, they seem effortless. How could you ever have struggled over something so easy? But right now you can’t figure out where to put which foot. What a mess. Arthur Murray where are you when we need you!?
That’s how your horse feels in the “Why would you leave me?” game. You’re asking him to stop, back up, swing his front end across, and walk off with you in the opposite direction. What a tangle! But if you make this dance sequence part of the food delivery, he won’t be thinking about which foot to put where. He’ll be following your lead before he’s even aware that he’s changed direction. You’re programing in the dance steps BEFORE you ask for them directly.
So it’s: click, you do your part of the dance as you reach for his treat. Next he does his part as he moves into position to take it from you. He’ll find it’s easy to stay with you. The dance is completed without his having to think about how he’s done it. You’re mapping this movement out in his nervous system. Once the map is in place, it will be that much easier to ask directly for the dance steps.
Using Food Delivery in the “Why would you leave me?” game to map out a change of direction.
You’re also getting a chance to watch how he moves BEFORE you ask directly for the steps. Does he back easily? Is he able to rock back into his hindquarters and step across into the new direction? No. Then he may have some arthritis in his hocks or some other condition that needs protecting. This kind of information makes a huge difference both in what you ask for and how you teach it.
Reading Your Dance Partner
The “why would you leave me?” lesson provides a great example of using dynamic food delivery. It’s such a useful strategy, but in clinics I often encounter horses who have only been fed in place. The first time I click and flow into my half of the dance, they don’t follow me. Just like everything else, this is a strategy that must be taught. I can’t expect my horse to understand that he needs to track my movement and move his feet to get his treat unless I have gone through a teaching process to explain this to him.
That’s a specific example of the basic training principle: you can’t ask for and expect to get on a consistent basis something you have not gone through a teaching process to teach to your horse. That and safety always comes first are twined together as the guiding principles that direct all my training. Following these two principles can help you avoid many training pitfalls and keep your training very positively oriented.
Normally, I teach the food delivery lesson early on. It’s part of his first introduction to targeting. (https://theclickercenterblog.com/2015/11/20/2015-clinic-season-an-introduction-to-clicker-training-day-1/) Once my horse figures out that he may need to track my movements to get to his treat, he’s going to pay even more attention to my body language. What hints or clues am I telegraphing that will let him know where he needs to be?
As he learns to step forward and back in response to the positioning of the treat, he’ll also be learning how to read me. When I rotate my shoulders towards him and extend my arm out towards the point of his shoulder, he’ll back up.
This lesson is introduced in the very first clicker lessons. I generally begin by having a horse touch a target. I’ll hold the target out in front of him. When he touches it, click, he gets a treat.
Robin has come forward to touch a target.
At first, I’ll make things easy for him. I want him to be successful, so I’ll deliver the treat about where the target was. He won’t have to move his feet to get to his treat. In the photo above this would keep his head on my side of the stall guard.
I would eventually like to be able to ask him to back up. If I’m working with a horse I don’t know, I won’t know what his past history with backing is. Has it been used as a punisher so he resents being asked to back? Does he have joint problems so backing is uncomfortable? I’d like to get a “read” on how he feels about backing, so I’ll introduce it first via the food delivery. As this lesson progresses, I’ll begin to step towards him so he has to back up to get his treat.
I’ve turned into Robin and extended my arm out towards the point of his shoulder. He backs up to get to his treat.
I think of the image of a swing door. If I swing the door (my torso) towards the horse, I am effectively closing the door, and he’ll back up. If I rotate in the opposite direction, I’m opening the door. I’m no longer blocking the space in front of him. Instead I’m opening that space to him and inviting him with the gesture of my leading hand to come forward.
Cues Evolve – Adding the Lead
Once my horse is consistently coming forward to touch a target and backing up to get his treat, I can clip a lead to his halter. Now I can combine the opening and closing of the “swing door” with cues from the lead. My horse will respond perfectly. I won’t need to escalate the pressure to “make” him back up. This is a very clear case of the cues evolving out of the shaping process.
Here’s the summary of this lesson:
Beginning with some of his very first clicker training lessons, my horse learned to back up or come forward to get his treats. That was easy. In the process he became aware of the clues my body orientation was giving him so he could get to the treats more efficiently. If the treats are going to be presented forward, there’s no point in getting ready to back up. You need to read your human to know which one it’s going to be.
These hints can then be transferred to a different part of the movement cycle. The hints are no longer part of the food delivery. Now they are the main event. They come before the click. I’ll use them to ask for the behavior I want. This process lets me use the food delivery to help my horse learn how to respond to the lead.
By tracing these reaction patterns back through a series of lessons, you can see how your horse’s ability to read your body language cues has been evolving beginning with the very first clicker lesson. You have been building the components you’ll need one small step at a time for the more complex lessons that are to come.
This points up how important the foundation lessons are. Ideally, no matter how complex a lesson may seem to an outside observer, for my horse the correct answer should be only one small, very attainable step away. If I jump into the middle of a teaching progression, that won’t be the case at all. I won’t have the underlying components in place. I’ll be teaching my horse three or four new things all at once, and I’m likely to end up in a muddle.
In the backing in a square exercise I’ll want him to back up and then come forward to get his treat. If he’s never moved his feet to get to his treat, he won’t understand what has just happened. I clicked, but then I marched off before he could get his treat. It will feel like a broken click, a broken promise, and he may shut down on me. But, if in an earlier lesson I have taught him to walk forward to get his treat, this component will be well understood. He’ll follow me forward to get his treat, so we’ll be set up to repeat the movement cycle. I’m only introducing one new element at a time, not three or four. In this case my horse already knows how to back up when asked, and to come forward after the click to get his treat. The new element is he’s backing within a confined space.
The key to good training is this progressive, step-by-step building of components. Lessons are only complex when they are not well prepared. Build the underlying layers well, and you can turn the difficult into the achievable.
This is one way in which cues evolve out of the shaping process. Here’s another.
Cues Evolve: How Light Can Light Be?
Now that I have my horse backing easily when I rotate toward him as I slide down the lead, I’ll begin to notice that he is already backing before I can get very far down the lead. Great! My cues are getting lighter. I’ve now opened up a whole new game to play. The goal is to see how little I need to do to get a correct response from my horse. How little do I need to do to get him to back? How far do I need to rotate? Look, I just move my shoulder slightly and he’s already backing. Click! Give him a treat with some laughter added on top.
Horses are superb masters at this game. They have to be given the herds they live in. To keep from running into one another they need to be able to read and predict movement.
When Robin and I were sorting out one of the many leading patterns I’ve wrestled with, I’m sure he thought me the rudest, clumsiest dance partner ever! I was forever in his space, “stepping on his toes”. How annoying! When I finally figured out how to ask for the sequence I wanted without crowding into him, you could see from his expression the immense relief he felt. Finally, he was getting somewhere teaching his very awkward pupil!
Who’s Not Showing Respect?
People are forever talking about respect – by which they usually mean the horse needs to mind his manners and stay out of their way. But really this goes both ways. We’re often the clumsy ones not understanding how to give our much larger dance partner the space he needs to maneuver.
Here’s something else to consider: when a horse is startled, he will often crowd in on top of us. We humans often view this as very rude, disrespectful behavior. But look at it from the horse’s point of view. What should he be doing when his herd is threatened? Bunch in closer together to make it harder for a predator to get at any one of them. He isn’t being disrespectful at all. He’s trying to keep you both alive! But that very generous act can get a human seriously hurt. That’s why we are teaching him some alternatives to crowding on top of us.
The food delivery has tuned you both into body language. He now tracks you beautifully, and you’ve been able to transfer your cues to the front end of the process, ahead of the click. You started out with a big obvious rotation of your body, but that’s now evolved into a whisper. Tighten a shoulder muscle, and he rotates back. What fun!
Now that he’s tuning into you, you’ll begin to notice even more ways in which your body language is giving him clues about what you want. Before you can give your big deliberate cue, he’s already read what you want and responded to you. You’ll need to decide if you want him to be this light, or do you want him to wait for a signal you’ve chosen.
This is often what people mean when they talk about attaching a cue to a behavior. But as you can see the cues are already there. It’s more a matter of deciding which of these signals are you going to highlight and make more definite.
You get to decide if you are going to make deliberate use of the small cues your horse is already using. You can only do that if you understand the process so you can be on the lookout for these subtle cues. Otherwise, if you block him when he starts to respond to these signals, you could end up confusing him.
One of the training mantras I repeat often in clinics is: don’t make your horse wrong for something you’ve taught him.
Being aware of the way in which cues evolve out of the shaping process is one of the ways you can help your horse to be right.
Remember, if you are new to the JOY Full Horse blog, click on the JOY Full Horses tab at the top of this page to find the full table of contents and links to each of the articles I have published so far.
I hope you will want to share these articles by sending links to this blog to your friends. But please remember this is copyrighted material. All rights are reserved. Please do not copy any of the “JOY Full Horses” articles without first getting written permission from Alexandra Kurland, via theclickercenter.com
Also note: these articles are not intended as an instruction guide for introducing your horse to clicker training. If you are new to clicker training and you are looking for how-to instructions, you will find what you need at my web sites:
Review
It’s time again to add to our list of things I would want a beginner to know about cues. So far we have:
1.) Cues and commands are not the same. 2.) Not all cues are verbal. 3.) Cues can come from inanimate objects. You can have environmental cues. 4.) Our animals can cue us.
Here’s number 5: Cues evolve out of the shaping process.
The way in which cues evolve as we teach new skills leads us straight to play. That makes this a very important concept to understand.
A common question people ask when they are teaching a new behavior is: when do I get to add a cue? This is really the wrong question. At least when you are working with horses, the cues are already there. In fact you really can’t NOT cue.
If you are reinforcing your horse for putting his ears forward, where are you looking? At his ears, of course. When you want him to take a step back, your eyes shift down to his feet. Your horse is going to notice these difference. For him these are clues that will morph into cues. Even if you aren’t aware of them, they are still functioning to let him know what to do next to earn reinforcement. So it isn’t a question of when you do you get to introduce a cue, but how do you transfer from the cue that is currently working to a new cue? But before we can get to that question, we need to look in more detail at how those cues evolve in the first place That’s what we’ll be exploring in this section.
Bear with me. I’m going to be traveling through several different lessons, connecting up the dots of evolving cues as we go.
Head Lowering
To understand how cues evolve, let’s begin with this example: suppose I want to teach my horse to drop his head. There are a number of reasons why I might want this behavior.
The first begins with safety. A horse cannot simultaneously rear and drop his nose to the dirt. If I can ask for head lowering, I can interrupt a potentially dangerous behavior.
Head lowering is also practical. Even a short horse can become very tall when you’re trying to get a bridle or a halter on. Asking him first to lower his head makes the task easier for you and more comfortable for him.
Head lowering leads to calmness. This is not automatic. The first time you ask a horse to drop his head, he’s not going to magically and instantaneously calm down. In fact, a nervous horse can actually be made more nervous by being asked to lower his head. With his head up he can scan the horizon line for predators more effectively. So when you ask this anxious, on-guard horse to lower his head, he’s going to want to pop it right back up again.
Should you quit and ask for something else? No. The answer is to keep working on head lowering, but, if you can, change the environment so he feels more at ease. Ask for it again and again over many training sessions. As you begin to build some duration into the behavior, you will begin to see a different emotional state linking up with it.
Horses living in the wild spend twelve plus hours every day grazing. Even horses living in stalls spend several hours a day eating. That means they are spending a huge amount of time every day feeling relaxed enough to drop their heads and eat. The classically conditioned link between head lowering while grazing and an emotional state of calm relaxation is huge. If we can tap into that same state by asking for head lowering, we’ve just created a powerful link between clicker training and a calm emotional state. That will serve us well as we progress forward in training.
Linking head lowering to calmness is something most people are familiar with. Something you might not think about as much is this: head lowering is the counter balance to collection. This is perhaps one of the most important reasons to teach head lowering because it takes you into riding excellence.
Keeping Things in Balance
One of the training mantras you want to always keep in mind is:
For every exercise you teach, there is an opposite exercise you must teach to keep things in balance.
If you ask a horse to engage and collect, you also need to ask him to lengthen and stretch out. If you focus too much attention on collection, you may not have a way to tell him he can just relax and lengthen. As a rider is learning about collecting, if she ends up compressing her horse, she will need a way to lengthen him back out so she can try again. Asking a horse to stretch out in head lowering provides a powerful, and very important counter-balance both physically and emotionally to collection.
On the left Robin is offering beautiful collection. On the right head lowering balances his pose.
There’s Always More Than One Way To Teach A Behavior
I teach head lowering in many different ways. The first, easiest way is through targeting. I will simply have the horse follow a target down to the ground. Click and treat.
The easiest way to teach head lowering is through targeting.
That’s a good start, but just because you can get head lowering one way doesn’t mean your job is done. The more different ways I can trigger the behavior, the better.
In the next installment I’ll look at one of the most powerful ways you can teach head lowering: via backing in a square.
Head lowering is taught out of backing in a square.
Coming next: Backing in a square
Remember, if you are new to the JOY Full Horse blog, click on the JOY Full Horses tab at the top of this page to find the full table of contents and links to each of the articles I have published so far.
I hope you will want to share these articles by sending links to this blog to your friends. But please remember this is copyrighted material. All rights are reserved. Please do not copy any of the “JOY Full Horses” articles without first getting written permission from Alexandra Kurland, via theclickercenter.com
Also note: these articles are not intended as an instruction guide for introducing your horse to clicker training. If you are new to clicker training and you are looking for how-to instructions, you will find what you need at my web sites:
Listen to Your Horse
I’ve been describing a lesson I call “Capture the Saddle”. It’s used to teach horses to line themselves up next to a mounting block. In the previous section I talked about how you can turn this ordinary, everyday behavior into extraordinary “Grand Prix” level excellence.
Even before you have built the behavior to this point, you can use the mounting block as a measure of how your horse is feeling. If your horse normally lines up well, but today he is swinging out or he’s walking off before you can get on, don’t assume that he’s “testing” you. Instead ask him what’s wrong? He knows standing at the mounting block leads to riding. Why doesn’t he want to be ridden today?
Our horses work so hard to communicate with us. We need to learn to be better listeners. When we train them with play in our hearts, they will want to work with us. If today they are saying “No” to riding, there’s a good reason. It may not always be obvious, but we need to become good detectives and find the answer.
Detective Work
Ask most horse owners about the ancestral background of the horse, and they can tell you that horses are a prey species that evolved in open grasslands. What they may not be as clear about are some of the consequences of that background.
Horses are herd animals because there is safety in numbers. The flip side of this is there is danger in appearing to be vulnerable. A lame or sick horse draws attention to itself and to the herd as a whole. Show weakness, and you’ll be drawing in predators, so horses are very good at hiding their injuries. They are protecting not just themselves, but their whole family. It takes something acutely painful such as an abscess or a torn tendon to bring a horse hobbling to a stand still. If they can hide an injury, they will.
So we have to be good detectives. It may not be immediately obvious what is wrong, but if you keep looking, if you keep collecting data, you may be able to piece together enough clues to discover that the reason your horse fidgets at the mounting block has nothing to do with training and everything to do with the poorly fitting saddle that is hurting his back.
“Just Tell Me How You Feel”
Normally an angry or frightened horse gives lots of warning signals that he is about to explode. If you punish those early warning signals in an attempt to stop a horse from biting, you can create that most dangerous of animals – a horse that gives no warning signals and goes straight to attacking when he has been pushed over threshold.
Just as horses can learn to withhold these signs of stress, they can learn the opposite. Instead of punishing them for fidgeting and refusing to step up to the mounting block, if you show them instead that you will listen to them, they will become more comfortable about expressing how they feel.
Just as we can actively teach a process that leads to intelligent disobedience, we can teach our horses to express more openly how they are feeling. When we listen to them in a context such as the mounting block, they begin to generalize the concept and offer us a truer picture of how they feel both physically and emotionally.
Peregrine for years bounced from one health crisis to another. The aftermath of a bout of Potomac Horse fever sent him on a downward health spiral that took several years to sort out. During that time I was grateful for his grumpy faces. I needed to know from one day to the next how he was feeling.
He was never punished for making faces. The rule was he could make faces. He just couldn’t act out on them. Because I was listening, he never needed to.
Saying “No”
Sometimes the reason a horse says “No” to us, is not because there is something wrong with him, but because there is something that isn’t right with us.
This was driven home to me by a horse I met in a clinic many years ago. The horse was on loan to one of the course participants. She was a very clicker-experienced horse who was used to being handled by a skilled and very tactful owner.
Some horses are incredibly generous teachers. They seem to enjoy working with beginners. They are truly worth their weight in gold as they make up the heart of a good lesson string. Round-bellied ponies who take care of their young riders are treasures. Solid citizen campaigners who will take you over your first jump no matter how out of balance or how scared you are are the salt of the earth.
This mare was none of those things. She was a finely-trained artist who expected a high level of expertise and delicate feel from all her human partners. Unfortunately the woman who was working with her wasn’t able to live up to this mare’s exacting standards.
They started out well enough. I had them walking around a “why would you leave me” circle of cones. The mare started out by offering what she knew – beautifully balanced steps of shoulder-in on the circle. The handler clicked, gave her a treat and then slid down the lead. The mare wasn’t happy. Something was wrong, but it wasn’t clear yet what it was.
They went through a couple more cycles. The handler slid up the rope, and the mare walked off in shoulder-in, click and treat. Only now she was beginning to grab the lead before the handler could get more than a few inches down the rope.
“That’s as far as you’re going, little miss,” she was effectively saying.
We stopped, put the mare away and worked with the handler. We had her slide down the lead while someone else held the snap end. She felt soft enough to us. There was nothing especially harsh or abrupt in the way she handled the lead. We made a few adjustments to the details we did notice, and then we brought the mare back out. Things were not much better. Hmm. We put her away again and went back to rope handling basics.
Our handler told us she had the same sort of issues with her own horse. Clearly both horses were trying to tell her something. This was a puzzle we needed to solve.
We brought the mare back out, but now we let her be the teacher. The instructions were to wait until she showed her handler that she was ready to begin a new cycle. Not until her horse cued her was she to slide down the lead.
They stood side by side. The handler had her hands folded together about waist height. That’s the cue for a behavior which I call “the grown-ups are talking, please don’t interrupt”. It is one of the very first lessons which I teach a horse. The horse is clicked and reinforced when he keeps his nose pointing forward, away from the handler’s treat pouch. Over time it evolves and branches off into many different behaviors.
Robin shows us a beautiful baseline for “the grown-ups are talking, please don’t interrupt” behavior.
The grown-ups are talking:
is the formation of ground tying which means, among others things, you can groom a horse while he stands at ease.
transforms from a simple at-ease posture into the pilates pose. This is a “grand prix” behavior. The horse engages the same muscles he uses under saddle to collect himself for advanced performance. Only instead of doing this in motion, he is collecting at the halt. It is wonderfully good for a horse’s overall muscle tone and can help maintain a horse’s back strength for riding.
The Conversation
This mare had a beautiful pilates pose which she normally was perfectly happy to offer. Now she just stood next to this handler in a flat, at-ease stance.
The handler was waiting in grown-ups for she wasn’t sure what. She let out her breath, and the mare posed.
“Slide down the lead,” I quietly instructed her. The handler did as she was told. There was no biting at her hand. Instead the mare flowed into a beautifully balanced shoulder-in. Click and treat.
The handler waited again. Again, she let out her breath, and again the horse posed. “She’s telling you she’s ready for you to go on,” I told her handler. “Let the pose be the cue to you that she’s ready for you to slide down the lead.”
The mare had been trying her best to tell us what was wrong. When this handler slid down the rope, she held her breath. That made her feel tighter, heavier. It made her feel as though she was shouting at this very light horse.
Either we humans weren’t as sensitive as this mare, or the handler hadn’t been holding her breath when she practiced the rope handling with us. But at least with this horse she was definitely holding her breath. Without meaning to she was applying too much pressure. This horse didn’t like it and neither, apparently, did her own horse. When we gave the mare a way to signal to us when things were more to her liking, we could not only see what was going on, we could solve the problem.
Fixing the “Fixers”
As I watched this handler more closely throughout the weekend, I saw lots of little ways in which she was keeping the pressure on. It was so subtle, it was easy to miss. The pressure wasn’t coming from her hand on the lead, it was coming from her expectations and to be blunt – her neediness. She was a rescuer. She wanted to “fix” this mare. But this mare didn’t see herself as broken.
When we gave the mare permission to lead the dance, she was able to show us all that she wasn’t broken. Her handler needed to breath, smile and set aside the “poor horse” energy that was clogging up the relationship she brought to all the horses she worked with. She saw horses as sad little infants in need of rescuing and fixing.
If you don’t see yourself as either a baby or broken, you don’t want someone mother henning you and trying to “fix” you. There are definitely times when my horses aren’t feeling well, and they want to be cuddled. And there are horses who have fallen on hard times and really do need to be rescued. But that’s not forever. At some point that event sits in their distant past, and they are no longer “broken”. When we surround them with “fix it” energy, some of these horses can begin to feel restricted and annoyed.
It’s very much like a toddler who squirms out of his mother’s protective arms. “I can do it myself!” He’s beginning to exert his own independence. “I can tie my own shoes!” At some point you have to let him try.
At some point we have to stop treating our horses like infants in need of our constant care and supervision. They are our partners in the best and truest sense of that word, and sometimes our partners get to take the lead.
This handler needed to play more. She wanted to be a nurturer, and for some horses that is exactly what is needed. But every good mother knows there is a place for play, as well.
When my horses wrap themselves around me in beautiful lateral work, they make me smile. I laugh with them. We are dancing together, and for both horses and humans there is no better of expression of Joy than that.
This article ends this section on “Cue Communication”.
Coming Next in our list of “Ten Things You Should Know About Cues” is: Number 5: Cues Evolve.
The way in which cues evolve as we teach new skills leads us straight to play. That makes this a very important concept to explore.
Remember, if you are new to the JOY Full Horse blog, click on the JOY Full Horses tab at the top of this page to find the full table of contents and links to each of the articles I have published so far.
I hope you will want to share these articles by sending links to this blog to your friends. But please remember this is copyrighted material. All rights are reserved. Please do not copy any of the “JOY Full Horses” articles without first getting written permission from Alexandra Kurland, via theclickercenter.com
Also note: these articles are not intended as an instruction guide for introducing your horse to clicker training. If you are new to clicker training and you are looking for how-to instructions, you will find what you need at my web sites:
Pre-Ride Safety Check List
In the previous article I described in detail how to teach your horse to line himself up next to a mounting block using the “Capture the Saddle” lesson.
I know there are many ways to get to this end behavior that do not use the reins, but remember this lesson is part of your “preflight safety check”. Just as an airplane pilot inspects his plane before takeoff, the rider is “inspecting” her horse. She’s making sure that the connection to the reins works.
At clinics I don’t always know the riding skills of the people I’m working with. I want to see the handler teach the “capture the saddle” lesson in this way so I know she understands how to use the rein to connect to her horse’s hindquarters. If something spooks him and he starts to jump forward, building this in as an automatic reaction can redirect him out of what might otherwise turn into a bolt or a buck.
“Grand Prix” Mounting Block Behavior
Getting on safely at the mounting block is only step one in this lesson. In the next phase the handler leaves her horse a few steps away from the mounting block. He is to wait there until she calls him over to line up next to the mounting block. This is normally taught with backchaining. Gradually the step or two turns into greater and greater distances. The “Grand Prix” version of this behavior is the horse comes at a canter, ignoring all distractions, and lines himself up.
Grand Prix behaviors
Most of us have seen Grand Prix horses, perhaps not in person, but certainly on video. We’ve watched them at the Olympics, in dressage and jumping competitions. We can all admire those horses. Perhaps you even dream of being the rider on one of these magnificent horses. Or maybe you think, I could never do that. “I’m just a recreational rider”. You might not dream of having a Grand Prix dressage horse, but you can certainly have “Grand Prix” behaviors. That’s a goal that is well worth pursuing, especially when it is done playfully.
A horse who stands beautifully for grooming, and then picks each foot up for cleaning when you just point to it is showing you beautiful “Grand Prix” behavior. When he canters over from the center of the arena and lines himself up next to the mounting block, that’s most definitely “Grand Prix” behavior.
Robin is showing beautiful, beyond-the-ordinary foot care manners. He is targeting his knee into my waiting hand. This makes it so very easy for me to clean his foot.
Think about your own horses. What “Grand Prix” behaviors could you teach them? Excellence comes in many forms. It doesn’t have to be a competition-oriented behavior to be impressive training. In my barn a favorite summertime activity is our nightly watermelon party. It may not seem like much of a “Grand Prix” behavior, but waiting patiently while a favorite treat is passed out shows impressive self-control. Turning the ordinary into the extraordinary is the fun of clicker training!
Have Fun!
Coming Next: Cue Communication Part 6: Just Tell Me How you Feel
Remember, if you are new to the JOY Full Horse blog, click on the JOY Full Horses tab at the top of this page to find the full table of contents and links to each of the articles I have published so far.
I hope you will want to share these articles by sending links to this blog to your friends. But please remember this is copyrighted material. All rights are reserved. Please do not copy any of the “JOY Full Horses” articles without first getting written permission from Alexandra Kurland, via theclickercenter.com
Also note: these articles are not intended as an instruction guide for introducing your horse to clicker training. If you are new to clicker training and you are looking for how-to instructions, you will find what you need at my web sites:
When I shared the runway lesson with you in the June 2016 posts, I talked about constructional training. That’s where you teach the skills you’ll need for a particular task BEFORE you need to use them. Before you build a house – or even a birdhouse – you must first learn how to use a hammer.
That’s what we’re doing with the mounting block lesson. I’m going to use the “Why Would You Leave Me?” game to teach my horse the skills he’ll need to line himself up to the mounting block BEFORE I take him anywhere near the mounting block. (Refer to the previous installment of JOYFull Horses: https://theclickercenterblog.com/2016/07/27/ and Lesson 5 in the Click That Teaches DVD Lesson Series: “The Why Would You Leave Me?” Game)
In training we talk about breaking each lesson down into smaller steps so it becomes easier for your learner to understand what is wanted. Constructional training is another way of looking at this basic teaching strategy. What are the skills you need for the task at hand? Do you have those skills? Yes, then the task will be within your reach. No, then build the skills first.
When you build skills first, you find that each new thing you ask for is really just an easy step beyond what you already have. So before I play what I refer to as the “capture the saddle” game, I first build the skills I’ll need for this lesson via the “why would you leave me?” lesson.
Capture the Saddle – A Targeting Game
Photo 1.) Why would you leave me? At this point in the lesson, Robin’s answer would be: I can’t think of a single reason. I’m happy to stay right here by your side.
Why would you leave me? Answer: I can’t think of a single reason. I’m happy to stay right here by your side.
When that’s the answer, you have a horse who is ready to walk with you to the mounting block.
I’ve pulled some photos from a video of the “capture the saddle” lesson. The resolution isn’t the greatest since they come from a video, but they illustrate well how the lesson works. The horse I am working with is a young haflinger who didn’t know how to stand well for mounting.
Photo 2.) Getting a Baseline.
His owner didn’t use mounting blocks so this was a new concept for him. When she asked him to stop with her beside the mounting block, he kept going. He ended up facing in the opposite direction. Previous experience had taught him that it was a good idea to keep the saddle well away from her. This is a very common scenario, one many riders have to deal with.
Photo 3.) This is a horse who doesn’t understand mounting blocks.
We can’t expect this horse to understand instantly what is wanted. Instead we went through the steps that would teach him how to line up next to a mounting block so his rider could easily get on.
Photo 4.) We want to go from this . . .
Photo 5.) . . . to this.
We weren’t just teaching him to line up next to a mounting block. That could easily have been done with targeting. He was also learning how to soften and respond to rein cues. That’s an important extra that this lesson gives us. His owner reported that he was an incredibly wiggly horse who was very difficult to ride. BEFORE she gets back on, the mounting block lesson will help him to be better balanced and more connected to her.
6.)
7.)
8.)
Photos 6-8
Photos 6-8.) The three photos above show how I begin with the “Why would you leave me?” lesson. He’s learning to walk with me. Note, as I approach the mounting block, I am not holding onto the reins. I want him to stop with me as I step up onto the mounting block.
Photo 9
Photo 9.) He doesn’t know this part of the lesson. He’s not expecting to stop at the mounting block, so he over shoots the mark. That’s okay.
I could teach this part of the lesson in many different ways. I could use targets and mats to help him out, but remember, I want to prepare this horse for riding. Riding includes not just all those times when things are going great. It also includes the sudden scares that can send even the most solid of riding horses jumping to the side.
The mounting block lesson confirms that your horse understands how to respond to your rein cues. It provides an essential safety net for those times when things are going wrong, and it is also a core building block for creating the great performance we all dream of having when things are very right.
10.)
11.)
12.)
Photos 10-12
So in photos 10-12, I have taken the left rein, and I am asking this horse to soften and bend his nose towards me. That causes his hips to swing out away from me. Essentially his front end is stopping before his hind end. The extra momentum from his hind end causes him to swing around to the front side of the mounting block. In horse training language he is yielding his hips.
He has ended up facing in the opposite direction from the one in which we started. (Photo 13) That’s more than okay. I’ll first ask him to take a step or two back so I can easily reach the right rein.
13.)
14.)
21.)
22.)
Photos 13-16
Next I’ll have him soften and come around me on his right rein. (Photo 14) As he swings back to the opposite side of the mounting block, I’ll again ask him to take a step back. (Photo 15) This does two things. It helps him to rebalance, and it gives me access to the left rein. (Photo 16)
By the time I get on, I will know that he will soften and yield his hips to both reins. Many people get in a hurry with this lesson. They become too goal oriented. They are thinking only about getting on. I am thinking about the ride ahead. I want it to be safe. That’s first and foremost. And then I want it to be fun – for both the horse and the rider. That’s not going to happen if the horse is out of balance and disconnected from his rider. So the “capture the saddle” lesson is really one that should be process not goal driven. Yes, I want my horse to line up next to the mounting block, but it’s not a race to see who can teach this the fastest. Each time this horse swings wide, he’s giving me another opportunity to explain rein cues to him.
As he comes past me again on his left side, I let go of the rein and reach out towards the saddle. (Photo 17) He’s not ready to let me get to the saddle. In the photos below you see that he swings wide again. (Photos 18-19) That just gives me another opportunity to ask him to soften to the right rein. (Photo 20)
At no point in this do I want the horse to feel as though I am punishing any of his responses. This is about teaching him WHAT TO DO. It is not about blocking or stopping unwanted reactions.
17.)
18.)
19.)
20.)
Photos 17-20.)
As he swings past the mounting block, I can again ask him to take a step or two back. (Photo 21) This helps him to rebalance, and it also gives me access to the left rein. I’ll ask him to step forward to line up along side the mounting block. (Photo 22)
21.)
22.)
Photos 21-22
As he comes past me again on his left side, I LET GO OF THE REIN. (Photo 23)
Photo 23.)
This is very important. I don’t want to block him to make him stand still. Remember always – you want energy. You want your horse to move his feet. This lesson redirects his energy. It doesn’t block it. You are releasing him into a halt, not stopping him from moving. There is a huge difference. (I’ll refer you again to my books and DVDs for a more in depth discussion of this very important concept. Visit theclickercenter.com)
As I release the rein, I am reaching up to touch the saddle. (Photo 23) Click and treat. (Photo 24.) The clickable moment for this phase of the lesson occurs as my hand makes contact with the saddle. So this lesson begins with rope handling and ends with targeting.
Photo 24.)
I’d like him to come forward half a step so he is in a better position for me to get on. I use the left rein to ask for this step. (Photo 25.) As he begins to respond, I again release the rein and touch the saddle. (Photo 26.) Click and treat. (Photo 27.) We’re making progress. This time he doesn’t swing away.
25.)
26.)
27.)
Photo 25-27.)
Photos 28-30.) I ask him for another small step forward. (28.) This time when I reach out for the saddle, he’s in perfect position. (29.) Click and treat. (30.)
28.)
29.)
30.)
Photos 28-30.)
Remember though, it isn’t so much about the goal of lining up next to the mounting block as it is about his response to the reins.
So far I have clicked and reinforced him just for letting me make contact with the saddle. Now I am making it harder. I have stepped all the way up onto the mounting block so I can lean down onto the saddle and add some weight. I’m really seeing if I can “capture it”. (Photo 31.)
(Photo 31.)
(Photo 32.) The answer is – not yet.
(Photo 32.)
He swings wide out from under my hands. Again, this is okay. It gives me another opportunity to ask him to soften and yield his hips. All of this bending and connecting to the rein helps him to become more supple and better balanced. That’s going to help him be more connected to his rider.
So as he swings around past me on the left rein, I’ll again ask him to rebalance by taking a step or two back, and then I’ll bring him back in front of me first on the right rein, and then on the left. (Photos 33-36.)
33.)
34.)
35.)
36.)
Photos 33-36)
As he passes the mounting block, I again let go of the rein and reach for the saddle. (Photo 36.) He’s better balanced than he was in the first couple of passes, and he’s in a much better position. It’s easy for me to touch the saddle. This time I can really grab the saddle. (Photo 37.) Click and treat. (Photo 38.)
37.)
38.)
Photos 37-38.)
I use the word grab because I don’t want to be delicate in this. I want this horse to really feel me taking the saddle in my hands. This is the target position. As soon as I have both hands on the saddle – Click!
39.)
40.)
Photos 39-40
I’ve asked him to go forward another step (Photo 39.) and this time he swings a little too wide so I can’t reach the saddle. (Photo 40.) The pattern should be familiar by now. I ask him to swing back around via the right rein, (Photo 41.) then I bring him forward past me on the left rein. (Photo 42.)
41.)
42.)
43.)
44.)
Photos 41-44
He comes in really close to the mounting block. It’s easy to capture the saddle. (Photo 43.) Click and treat. (Photo 44.) This isn’t an ideal orientation for getting on, but we’re making good progress.
I ask him to come forward one small step. This adjustment puts him into a great position for me to get on. Click and treat. (Photos 45-47.)
45.)
49.)
47.)
Photos 45-47
He’s made great progress. We’ve gone from the photo on the left (48) to the one on the right (49) in just a couple of passes.
48.) We want to go from this . . .
49.)
Photo 48-49
It’s time for a break.
Photo 50
I’ve gotten down from the mounting block. (Photo 50.) We’re going to walk a large “why would you leave me?” circle back to the mounting block. Remember that means I’ll be asking him to walk beside me without my needing to take the reins to keep him with me. (Photo 51.)
51.)
52.)
53.)
54.)
Photos 51-54
I approach the mounting block hands free. (Photo 51.) As I step up onto the mounting block, he stops on his own. (Photo 52.) He’s brought the saddle into perfect position. I can really grab hold of the it and truly capture it. (Photo 53.) Click and treat. (Photo 54.) This is a horse who is telling me he’s ready for me to get on.
As the horses figure out that they get clicked for bringing the saddle to our waiting hands, they become increasingly clever about lining themselves up to whatever we are using for a mounting block.
It’s great fun having your horse bring the saddle to your waiting hands. (Photo 55.)
55.) This horse is bringing the saddle to his rider’s waiting hands.
Photo 55
Sometimes a horse will misjudge the approach and ended up slightly angled out to the side. You know he has truly understood the lesson when, without any prompting from you, he steps sideways so he can bring the saddle to your waiting hands. That’s a horse who really understands the game. Click and treat.
As this video shows, sometimes a mounting block is a tree stump, or in this case a metal gate. When a horse understands the capture the saddle lesson, he will line himself up to anything you treat as a mounting block.
If you have a horse who dances around a mounting block, this lesson will definitely help you. But please note: this article began with a discussion of constructional training. The more preparation you bring to it, the easier the lesson will be.
The preparation goes beyond the “Why Would You Leave Me?” Game. It’s a matter of looking at what comes before what comes before the lesson you want to work on.
What comes before the “Why would you leave me?” Game? Lots of preparation. That’s prep for your horse AND prep for you. Anytime you use a lead or reins, you want to practice first without your horse so your handling skills are horse-friendly and clicker compatible. The how-to instructions for using reins and leads is beyond the scope of this single article. For that please visit: theclickercenter.com and theclickercentercourse.com
Coming Next: Cue Communication Part 5: Grand Prix Behaviors
Remember, if you are new to the JOY Full Horse blog, click on the JOY Full Horses tab at the top of this page to find the full table of contents and links to each of the articles I have published so far.
I hope you will want to share these articles by sending links to this blog to your friends. But please remember this is copyrighted material. All rights are reserved. Please do not copy any of the “JOY Full Horses” articles without first getting written permission from Alexandra Kurland, via theclickercenter.com
Also note: these articles are not intended as an instruction guide for introducing your horse to clicker training. If you are new to clicker training and you are looking for how-to instructions, you will find what you need at my web sites:


 Heating Up a Behavior