Review
It’s time again to add to our list of things I would want a beginner to know about cues. So far we have:
1.) Cues and commands are not the same. 2.) Not all cues are verbal. 3.) Cues can come from inanimate objects. You can have environmental cues. 4.) Our animals can cue us.
Here’s number 5: Cues evolve out of the shaping process.
The way in which cues evolve as we teach new skills leads us straight to play. That makes this a very important concept to understand.
A common question people ask when they are teaching a new behavior is: when do I get to add a cue? This is really the wrong question. At least when you are working with horses, the cues are already there. In fact you really can’t NOT cue.
If you are reinforcing your horse for putting his ears forward, where are you looking? At his ears, of course. When you want him to take a step back, your eyes shift down to his feet. Your horse is going to notice these difference. For him these are clues that will morph into cues. Even if you aren’t aware of them, they are still functioning to let him know what to do next to earn reinforcement. So it isn’t a question of when you do you get to introduce a cue, but how do you transfer from the cue that is currently working to a new cue? But before we can get to that question, we need to look in more detail at how those cues evolve in the first place That’s what we’ll be exploring in this section.
Bear with me. I’m going to be traveling through several different lessons, connecting up the dots of evolving cues as we go.
Head Lowering
To understand how cues evolve, let’s begin with this example: suppose I want to teach my horse to drop his head. There are a number of reasons why I might want this behavior.
The first begins with safety. A horse cannot simultaneously rear and drop his nose to the dirt. If I can ask for head lowering, I can interrupt a potentially dangerous behavior.
Head lowering is also practical. Even a short horse can become very tall when you’re trying to get a bridle or a halter on. Asking him first to lower his head makes the task easier for you and more comfortable for him.
Head lowering leads to calmness. This is not automatic. The first time you ask a horse to drop his head, he’s not going to magically and instantaneously calm down. In fact, a nervous horse can actually be made more nervous by being asked to lower his head. With his head up he can scan the horizon line for predators more effectively. So when you ask this anxious, on-guard horse to lower his head, he’s going to want to pop it right back up again.
Should you quit and ask for something else? No. The answer is to keep working on head lowering, but, if you can, change the environment so he feels more at ease. Ask for it again and again over many training sessions. As you begin to build some duration into the behavior, you will begin to see a different emotional state linking up with it.
Horses living in the wild spend twelve plus hours every day grazing. Even horses living in stalls spend several hours a day eating. That means they are spending a huge amount of time every day feeling relaxed enough to drop their heads and eat. The classically conditioned link between head lowering while grazing and an emotional state of calm relaxation is huge. If we can tap into that same state by asking for head lowering, we’ve just created a powerful link between clicker training and a calm emotional state. That will serve us well as we progress forward in training.
Linking head lowering to calmness is something most people are familiar with. Something you might not think about as much is this: head lowering is the counter balance to collection. This is perhaps one of the most important reasons to teach head lowering because it takes you into riding excellence.
Keeping Things in Balance
One of the training mantras you want to always keep in mind is:
For every exercise you teach, there is an opposite exercise you must teach to keep things in balance.
If you ask a horse to engage and collect, you also need to ask him to lengthen and stretch out. If you focus too much attention on collection, you may not have a way to tell him he can just relax and lengthen. As a rider is learning about collecting, if she ends up compressing her horse, she will need a way to lengthen him back out so she can try again. Asking a horse to stretch out in head lowering provides a powerful, and very important counter-balance both physically and emotionally to collection.
On the left Robin is offering beautiful collection. On the right head lowering balances his pose.
There’s Always More Than One Way To Teach A Behavior
I teach head lowering in many different ways. The first, easiest way is through targeting. I will simply have the horse follow a target down to the ground. Click and treat.
The easiest way to teach head lowering is through targeting.
That’s a good start, but just because you can get head lowering one way doesn’t mean your job is done. The more different ways I can trigger the behavior, the better.
In the next installment I’ll look at one of the most powerful ways you can teach head lowering: via backing in a square.
Head lowering is taught out of backing in a square.
Coming next: Backing in a square
Remember, if you are new to the JOY Full Horse blog, click on the JOY Full Horses tab at the top of this page to find the full table of contents and links to each of the articles I have published so far.
I hope you will want to share these articles by sending links to this blog to your friends. But please remember this is copyrighted material. All rights are reserved. Please do not copy any of the “JOY Full Horses” articles without first getting written permission from Alexandra Kurland, via theclickercenter.com
Also note: these articles are not intended as an instruction guide for introducing your horse to clicker training. If you are new to clicker training and you are looking for how-to instructions, you will find what you need at my web sites:
In the previous section I described how I taught Peregrine to line himself up to a mounting block. He was already an experienced riding horse who was familiar with mounting blocks so this was an easy lesson. I used two targets to bring him into position. The first brought him to the mounting block and the second took him forward a couple of steps so he ended up positioned exactly where I needed him to be in order to get on.
Capture the Saddle
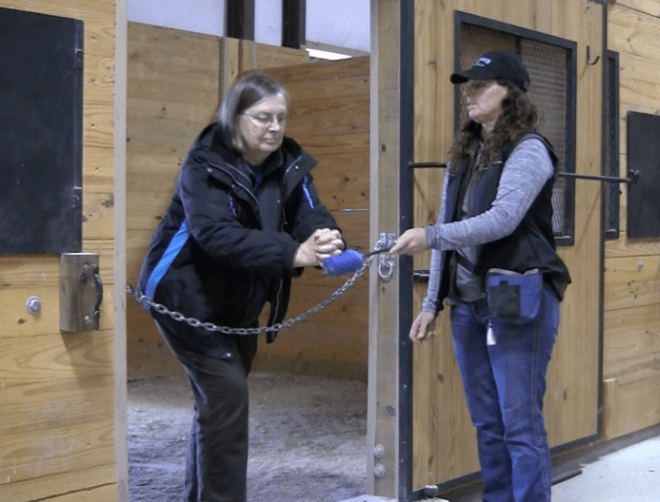
I teach the mounting block lesson very differently these days. The lesson is called: “Capture the Saddle”. (Refer to Lesson 11 in The Click That Teaches DVD Series: “Capture the Saddle”.) It begins with rope handling and directed learning and ends with targeting. I teach it in this way because I regard the mounting block lesson as a final safety check before a rider gets on. The lesson shows how well connected you and your horse are to one another. BEFORE you get on and need to rely on them for your safety, it confirms that you BOTH know how to communication via the reins and are comfortable with their use.
A horse that has been well prepared with good ground work will breeze through this lesson. The prerequisite is a lesson that I have named: The “Why Would You Leave Me?” game. I will refer you to the DVD of that name for the details on how to teach this lesson. (This is Lesson 5 in The Click That Teaches DVD Lesson Series)
The “Why Would You Leave Me?” Game
The overall description is this: the handler sets out a circle of cones and then leads her horse around the circle. The basic question is: can the handler let go of the lead/rein and have her horse stay with her like a dog heeling at her side? Or when she let’s go, does her horse wander off the circle, lag behind, rush ahead, or push into her to cut across her path? Where is his attention – with her or elsewhere outside of the circle?
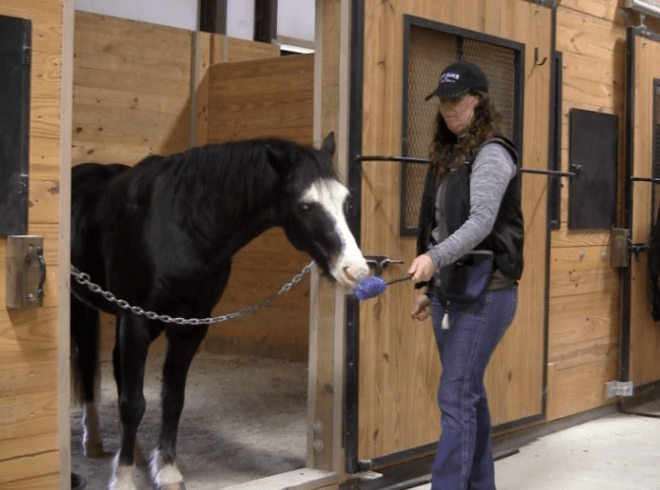
Robin has his attention on me as we walk around the “Why Would You Leave Me?” circle.
It doesn’t matter if the horse can do this perfectly at liberty, wearing nothing on his head. Lots of things change when a horse is “dressed” for riding. The horse that walks beautifully by your side when he’s wearing nothing, may become an anxious freight train when he’s wearing a bridle.
Some people may jump to the conclusion that a horse who becomes anxious when he’s wearing a bridle dislikes having a bit in his mouth, but that may be a red herring. If we went back to that horse’s first encounter with a bit, we might discover that he was one of those youngsters who always seemed to have something in his mouth. His handlers were forever taking lead ropes, brushes, halters out of his reach. If you left anything close enough to grab, he would have it in his mouth. So when he was offered a bit, there was nothing unpleasant about it. It was something he could put in his mouth, and finally his people didn’t snatch it away from him!
But then the reality of riding set in. Riders bounced uncomfortably on his back. His saddle pinched his shoulders, and worst of all, when he guessed wrong or headed off in his own direction, his riders jerked on the rein so the bit hurt his mouth. It wasn’t long before someone approaching him with a bridle became a predictor of unpleasant things to come.
Of course, this isn’t the only outcome for riding. The sight of the bridle can mean a fun clicker game is about to begin. But for a horse who has been ridden with corrections, the bridle often triggers unpleasant associations.
You could decide to work exclusively at liberty, or you could help this horse out by explaining away his anxiety about halters, leads, bridles, and saddles. Every time you explain away a fear, you remove a potential source of stress for your horse. That’s a process that’s worth doing.
Expectations
When I first get on a horse, I like to walk off from the mounting block on a loose rein. (And yes I do use mounting blocks. I feel very strongly that they are a courtesy to the horse. They save strain to his back. You save strain to yours, and you protect your saddle from becoming twisted.)
I want the horse to stand patiently at the mounting block until I signal to him that I am ready for him to walk off. I’ve watched too many horses who barely let the rider settle into the saddle before they take off. The rider is snatching up the reins and blocking the horse before they’ve even gone two steps. The horse protects himself by throwing his head up and tightening his jaw which then hollows his back. The ride has barely begun, and already they are in a training hole. It’s a long way from play for either horse or rider.
When I get on, I expect my horse to wait patiently while I get myself organized and settled into the saddle. I appreciate these good manners, so I always click and treat the horse for standing well. I’m sure there will be some who feel that the horse should not need to be be reinforced for behavior that he knows well, but I like to say “thank you” by marking good responses with a click and a treat. It costs so little to maintain this ritual. I ride with clicker treats at the ready. Offering one as a thank you takes no real effort, and it means that my horses can be trusted to stand quietly at the mounting block.
When we are ready, I cue the horse to walk off. I want him to walk off on a loose rein. On a green horse, this may not be possible. Two steps on from the mounting block I may be picking up the rein and sliding down asking for the hip, but the goal is to have a horse who leaves the mounting block in an energetic, but relaxed walk. The reins are long. I don’t want to be shortening them up and restricting the walk in any way.
This is important. It gives me time to evaluate how my horse is feeling on that day. Where is his back? Does everything feel as it should, or is there a stiffness or an uneven feeling that I need to be aware of? What is his energy level? How does everything compare to previous rides? Can I feel the effect of the previous lesson in the start-up? What is available to me? What do I need to work on? As Mia Segal (June 9, 2016 post) would say, if you know the questions, you have the lesson.
Walking Off Casually and the “Why Would You Leave Me?” Game
Walking off casually gives us time to come together as a riding pair. It gives me time to evaluate where my horse is on that particular day, both physically and emotionally. But walking off casually is not a given. It is something I have actively taught to my horses. It begins on the ground with the very first leading lesson and is further expanded upon in the “Why Would You Leave Me?” game.
This lesson is best taught on a circle. Every time the horse takes his focus away from the handler and begins to leave the circle, the handler slides down the lead and brings the horse back onto the circle. The handler is essentially asking the question: why would you leave me?
This is such an important question to ask. Are you leaving because the environment is too distracting? In that case perhaps the best option is to move to a less distracting location. And note the distractions could be from things the horse is afraid of and wants to get away from, such as a tarp that’s come loose over the shavings pile. Or it could be things the horse wants to go towards, such as grass or his pasture buddies.
Are you leaving because you are so full of energy that you can’t walk at my pace? Are you leaving because you aren’t balanced enough to stay on a circle? Are you leaving because you’re afraid of me?
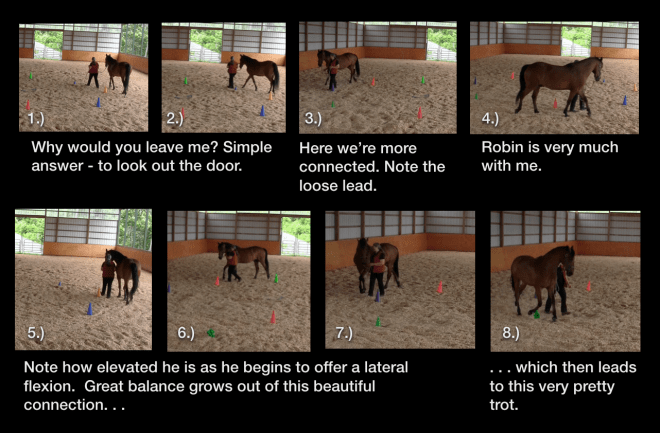
Robin begins by being momentarily distracted by something out the back door, and ends with some lateral work and a beautifully balanced, connected trot.
These are all questions I want to ask and have answered before I put my bones up on the horse. That’s the purpose of the “Why Would You Leave Me” game. The end result will be a horse who walks with you without needing to be held there with a lead.
We begin on a circle so the loop keeps repeating itself. If your horse tends to crowd into you as you pass by the gate, and you missed noticing until he was already pushing you off the circle, don’t worry. You’ll come around to that point again, and you will be better prepared to ask for what you WANT him to do. Eventually, you’ll be able to leave the set pattern of the circle and walk complex patterns.
In this video Panda shows off her “heeling” skills. She’s working with Sue Bennett, one of the coaches for my on-line course. Sue and Panda have just met, but that doesn’t matter to Panda. She’s happy to stay connected. Why would you leave me? For no reason at all.
My thanks to my coaches: Michaela Hempen and Asfaloth for the bridling pictures; Monty Gwynne and Icaro for the mounting block; Sue Bennett and Panda for the heeling video (and Ann Edie for letting Sue play with her guide horse); and Robin for the “Why Would You Leave Me?” photos.
Also please note: I am not attempting to provide complete instructions for any of the lessons I have described in this post. Nor have I detailed how to ride in a way that is clicker compatible. That’s not the function of these posts. You will find very thorough instructions in my books, DVDS, and on-line course. Visit: theclickercenter.comtheclickercentercourse.com
Coming Next: Cue Communication Part 4: Capture the Saddle – A Targeting Game
Remember, if you are new to the JOY Full Horse blog, click on the JOY Full Horses tab at the top of this page to find the full table of contents and links to each of the articles I have published so far.
I hope you will want to share these articles by sending links to this blog to your friends. But please remember this is copyrighted material. All rights are reserved. Please do not copy any of the “JOY Full Horses” articles without first getting written permission from Alexandra Kurland, via theclickercenter.com
Also note: these articles are not intended as an instruction guide for introducing your horse to clicker training. If you are new to clicker training and you are looking for how-to instructions, you will find what you need at my web sites:
This is a continuation of Part 2 of my new book, “JOY Full Horses”. If you are new to this series, go to the contents for links to the previous articles.
In the previous post I introduced you to TagTeaching which stands for teaching with acoustical guidance. Tagteaching takes the excess words out of coaching and shifts the focus from what a student is doing wrong and needs to correct to what is wanted. Instruction can be pared down to the four WOOF criteria:
What we want One thing at a time Observable Five words or less.
I described what each of those meant in the previous installment. Now in this section, I’ll introduce you to another tagteaching tool: the focus funnel.
The Focus Funnel
The founder of Tagteaching, Theresa Mckeon, developed the concept of the focus funnel for TAG instruction.
A funnel is wide at the top and narrows down at the bottom.
So at the top of the focus funnel is a broad description of the lesson. This is the part most of us find easy. We like our words!
Next the coach reduces this general description of the task down to clear instructions about what is wanted. Lastly she reduces this even further down to a point of focus which can be described in five words or less.
The Focus Funnel Applied to Horse Training
Suppose you are introducing a friend to clicker training. You’re going to show her how to ask her horse to touch a target. You’ve probably already given her a general overview of targeting and explained why it’s important, why it makes a great introduction to clicker training.
You’ve gone through the basic prep. You’ve practiced the lesson letting her rehearse with you how she’s going to hold the clicker and the target, how she’s going to feed her horse.
You’ve found a good area to work with her horse. He’s loose in a small paddock so he’s free to move about and interact with her, but there is a fence separating her from him just in case he gets pushy or overly excited about the food. The barrier means she can step back out of his reach instead of correcting him. That keeps the lesson focused on the behavior she wants – touching the target.
So now she’s ready for the lesson description.
“You’re going to ask your horse to touch the target. When he does, click and treat. Repeat this several times, then drop some treats in his food bucket and step away from his paddock.
Your tag point is: Click as nose touches target.”
Constructive Feedback
Tagteaching, like its cousin clicker training, keeps us focused on the positive. How do we say things so they are clear, to the point and non critical?
One of the tripping up points in coaching is what happens after the handler completes this first round of training. As you watch her work, suppose you noticed that she was reaching into her treat pouch a second or two before she clicked.
Horses miss nothing. Her horse is going to see that movement, and he’s very quickly going to connect the dots. Whatever he was doing just as her hand started to move is what he’s going to repeat. If that was touching the target, that’s the behavior she’ll get more of. The click will be extraneous information that gets filtered out. She’ll be clicking the clicker, but it will have less and less meaning as her horse begins to rely on the movement of her hand. For him that’s the true marker signal.
Now you could say – what’s wrong with that? Isn’t that easier than all this clicking nonsense?
You could absolutely decide that the movement of your hand is going to be your marker. There is nothing in clicker training that says you have to use a clicker, or even an auditory marker. If you were working with a deaf horse, you’d have to come up with some other way to mark behavior.
The problem isn’t that a different marker is being used. It’s that the handler isn’t aware that’s what is going on. She isn’t being deliberate in her use of that signal so it will become inconsistent. If she watched a video of herself, she might notice her hand movement and decide to make that her marker signal, but it’s one I would advise against. There are so many times in horse training where your hands are going to be busy doing other things. If your hand is your marker signal, you’re going to run into major timing problems.
You’re seeing these potential pitfalls ahead for your friend so you decide to say something about it. Here’s how this normally plays out:
“That was good. You timed the click well, but I noticed that your hand was creeping into your treat pouch.”
Oops. You’ve just fallen through the trap door that catches so many of us out. You’ve mixed reinforcement with instruction, and the result is that “but” just negated all the good things you said about her performance. She isn’t going to hear that she did a good job. What will stick is she got something wrong.
So what do you do instead? You put a pause between the assessment and the next set of instruction.
“That was great. You timed the click perfectly each time he touched the target.”
Pause
Lesson description: “Now in the next round of targeting we’re going to focus on a different element. It’s important that you wait until after the click to reach into your treat pocket. This keeps the meaning of the click really clear.”
Directions: “You’re going to repeat the targeting. Your feeding hand will stay at your side until you click.”
Tag Point: “What would be a good tag point for you? “Food delivery after the click.” Or perhaps “Hand on hip” might work better. You tell me which one works best for you.”
Having the learner identify her own tag point makes it even stronger. This is something that means something to her, that she can relate to. So involve your learner in creating her own tag points. It’s a great way to check that she really does understand what you want her to do, and because she helped create the tag point, she is more likely to remember it.
Try It Out
One of the reasons for publishing this book in small installments is it gives you time to think about each section and to try things out for yourself. How many times during the coming day will you find yourself commenting on someone’s performance?
Your answer may be: “but I’m not a teacher.”
Hah! We’re all teaching – all the time. It may be with your children, or a co-worker – or yourself, but we all offer instruction and give feedback. Do you fall into the trap of mixing feedback with instruction? Are you letting: “that was great, but . . .” slip in and disrupt what you intended as praise?
For today take the time to notice what you are currently doing. What is your existing habit pattern? Once you’ve observed what you do, you can take action to change any patterns you aren’t liking. Use what you’ve been learning about habits from the previous chapters to help you create a plan for developing the good habit of separating feedback from instruction. What new habit loop are you going to create for yourself?
Keeping track of the changes you see is a good way to build new habits that last. That’s what we’ll be exploring in the next installment.
Remember, if you are new to the JOY Full Horse blog, click on the JOY Full Horses tab at the top of this page to find the full table of contents and links to each of the articles I have published so far.
I hope you will want to share these articles by sending links to this blog to your friends. But please remember this is copyrighted material. All rights are reserved. Please do not copy any of the “Joyful Horses” articles without first getting written permission from Alexandra Kurland, via theclickercenter.com
Also note: these articles are not intended as an instruction guide for introducing your horse to clicker training. If you are new to clicker training and you are looking for how-to instructions, you will find what you need at my web sites:
This is Part 3 in this series. The horse I am featuring was one of the horses at the November 2015 Arkansas clinic. He had no clicker training experience prior to the clinic. We tracked his progress via video over a three day period.
Part 1 covered the morning training sessions of Day 1
Part 2 covered the afternoon training sessions of Day 1
If you have not already read Parts 1 and 2, I suggest you begin there. This article covers the training sessions in Day 2.
Day 2
Day two began with another round of targeting and “the grown-up are talking”. Again, I was choosing to work over the stall guard and to keep the session short.
Video: Introduction to Clicker Training: Day 2 Session 1
We followed the same pattern of the previous day. After working with Nick, I asked people what they saw. They all agreed that he was doing much better. He was coming forward to touch the target, but the targeting loop was not yet clean. He was first looking down the barn aisle. Since this was not his home barn, it wasn’t surprising that he wanted to look around. However, being easily distracted was one of the issues his owner reported having with him.
One of the participants commented that she was seeing a trend. Yes, he was looking at these competing distractions, but he was re-engaging with the targeting faster. We also liked how far he was backing to get his treat, and how promptly he came forward again once the target was up. He was still cautious about touching the target so we discussed whether we wanted the actual bump of the target, or was it enough for him to orient towards it.
Part of the answer to this depends upon how you are going to use the behavior in the future. This is something to consider as you build your horse’s targeting skills. For example, when horses trail ride in company, horses target on the tail of the horse in front of them. We don’t normally think of this as targeting, but it is. So here’s the question: do you want your horse to catch up to that target? Or would you rather have him learn to maintain a set distance from the horse in front of him? Following at a set distance the kind of target stick we were using with Nick is a good first step towards teaching this skill.
Once I start moving a target, generally I want the horse to keep a set distance from it. There are other targets that I want the horse to catch up to. If I am teaching a horse to retrieve, I not only want the horse to catch up to the target. I want him to put his mouth around it, pick it up and bring it to me.
The beauty of this system is you don’t have to choose. You can teach your horse that one type of target is something you orient to and follow. Another is something you retrieve. And still another type of target is something you station next to.
So what are some examples of different ways you might use targets? You can teach your horse to “self bridle” by first having your horse touch his mouth to a bit that you’re holding out. Through small shifts in the criteria, you can then teach him to put his mouth around it in preparation for bridling.
Here’s an example of what this looks like when it’s a finished behavior:
Here are some other uses for the targeting skills Nick is learning. You can hold a hula hoop out and have your horse put his nose through the center. Change to a smaller hula hoop, and then change again to the nose band of a halter that you’re holding out for him. He’ll be targeting by putting his nose into a halter.
You can hang a stationary target such as an empty orange juice jug in your barn aisle or stall. While you are grooming your horse or doing a medical procedure, he’s staying next to his target.
I can even use the same object for two different target uses. Small cones are a great example. Cones make perfect retrieve toys. They also make great markers. I will often put cones out in a circle for my horses to go around. These are targets that I want the horse to orient to, but not interact with in other ways – until I direct him to. At the end of the lesson I’m going to ask him to pick up all the cones and hand them to me so we leave a tidy arena behind us. How does an experienced clicker horse know the difference? Cues.
Cues and the context in which they are given help a horse understand what to do when. You might have a horse that understands the verbal cue “trot”. When he’s on a lunge line, he picks up a trot promptly when asked. But if you said “trot” to him while he was in a stall, he probably wouldn’t respond. He’s not responding to the word “trot” in isolation. It is “trot” plus all the context cues. “Trot” plus the environment tells him what to do when. So the target alone doesn’t tell the horse what to do with it. As his understanding of clicker training expands, it’s the target plus the associated context cues that he’ll be learning
Generally when I move a target, I want the horse to follow it, but not catch up to it. The timing of my click teaches my horse what I want. If I want my horse to follow a moving target, I’ll click as he orients to the target. I won’t wait until he has caught up to it. So, suppose I’ve been teaching my eager clicker horse to bump a target, and now he’s really hitting it hard with his muzzle. I may be wondering: did I really teach that!? If I want a softer touch, or I want to have him just approach but not make contact with the target, I’ll click as he approaches the target.
Here’s a discussion of this process:
Video: An Introduction to Clicker Training: Day 2: The Flexibility of Targeting
Based on this discussion in the next round of targeting, I used a flat cone instead of the target stick.
Video: An Introduction to Clicker Training: Day 2 – Session 2: Targeting with a Cone
Video: An Introduction to Clicker Training: Day 2 – Session 2 continued: Work in the Stall
Going into the stall with Nick revealed the core issues his owner has been puzzling over. The way Nick struggles to turn in the stall makes the space look small and cramped, but he’s in a stall that was built for draft horses. It’s roughly 14 by 16 feet, more than big enough for a small horse like Nick, and yet he struggled to turn. Again, I am still in the data collecting phase of the training. I make note of the difficulty even while I continue to ask Nick questions.
One question I wanted to ask related to the halter. Was it contributing to Nick’s inability to maneuver in the stall? Was there something in his previous experience with being worked on a lead that caused him to stiffen? The way to answer that question was to slip the halter off and shift to targeting.
In this next clip you’ll see how I begin to ask for backing not via the food delivery, but as a direct request. I’ll ask for backing by placing my hand on his neck. I think of my hand there as a starter button cue. It is very much like the key that turns on your car. Once your car has started, you don’t keep turning the key. In the same way, once Nick is backing, I release my hand. But you’ll see that I walk into him as he backs. So my hand on his neck is a starter button cue. Walking into him is a “keep going” cue. “As long as I am walking towards you, keep backing up.” I want the horse to continue to back until either I click, or I ask for something else.
My hand on his neck is a pressure-and-release-of-pressure cue. I am teaching it in a context that hopefully makes it easy for him to understand what is wanted. In the clip you’ll see I ask at one point where he is close to the back corner of the stall. He doesn’t think he has room to back up, so he stalls out.
When I fail to get a response, I don’t escalate. I don’t push into him harder or become louder in my body language. There’s no “do it or else!” embedded in my request. Instead I make some small adjustments to ensure that my request is clear, and then I wait for him to solve the puzzle. When he steps back, my hand goes away, and, click, he gets a treat.
Choice is what this lesson is all about. When he stops at the door to look at the people, again, I wait him out. I am letting him decide to bring his head inside the stall to touch the target. You see revealed in the small confines of the stall the two issues his owner reports that she has with him. When she goes out to get him, he will approach part way, but he is reluctant to come all the way up to her. And out on the trail he is easily distracted. She has trouble getting him to focus back on her.
I don’t have to turn Nick out or take him out on a trail to see these issues revealed. He’s showing them to us here in the stall. That’s good news. Out on the trail energy levels can shoot up. Small problems can suddenly turn into major safety issues. Here in the stall, if he gets distracted, it’s easy to handle. I can teach Nick some skills that will help him stay with me as the environment becomes more complex.
Video: An Introduction to Clicker Training: Day 2 – Session 2 continued: More Stall Work
And here is the discussion that followed that session, including what it means to have a Grand Prix clicker horse.
Video: An Introduction to Clicker Training: Day 2 – Final Discussion
Once again, the clinic participants had to wait overnight to see how Nick processed this day’s lessons. I will make you do the same. I’ll share Day 3 in the next installment of this report.
Alexandra Kurland theclickercenter.com theclickercentercourse.com
This is Part 3 of a 4 Part series on introducing a horse to the clicker.
My thanks to Cindy Martin for organizing and hosting the November clinic, and to all the clinic participants, especially Wendy Stephens and her beautiful Nick.
Please note: This article gives you wonderful details to get you started with the clicker, but it is not intended as complete instruction. If you are new to clicker training and you are looking for how-to instructions, you will find what you need at my web sites:
This is Part 2 in this series. The horse I am featuring was one of the horses at the November 2015 Arkansas clinic. He had no clicker training experience prior to the clinic. We tracked his progress via video over a three day period.
If you have not already read Part 1, I suggest you begin there. Part 1 covers the morning sessions of Day 1. This article covers the afternoon sessions of Day 1.
Afternoon Targeting Sessions
Just when you think you have that rare thing, a complete video record of a horse’s introduction to clicker training, you discover that several sessions are missing. For the first two rounds of Nick’s afternoon session the record button wasn’t on.
In both sets he was at the door waiting for me and began with three very definite target touches. He came forward promptly, touched the target and backed up easily for the treat delivery. He came out further over the stall guard than he had been in the morning. His interest in the game was growing. That was encouraging progress, but it was also that’s something needed to be monitored. I wanted to make sure that this new found confidence remained in balance with his general good manners.
In both rounds he showed the same cycle. He began by touching the target promptly with none of the hesitation that he had shown in the morning. He gave three solid touches, and then his response rate dipped down. That was also something to monitor.
As usual we discussed what to do with the next round of treats. Everything about his behavior suggested that he would be fine if I went into the stall with him. He was backing easily out of my space. He was taking the treats politely without any excessive mugging behavior.
Because he was now showing me that he would back away from me, I felt comfortable going into the stall with him. But that didn’t mean I had to go in. I could stay outside the stall and continue with the targeting. Or I could introduce one of the other foundation lessons. The consensus from the group was to continue with the targeting to get the come-forward-to-the-target-back-up-to-get-the-treat loop cleaner.
Again there is no right or wrong to this. We could have made some other choice. Nick’s behavior would tell us if the choices we made were heading us in a good direction.
Video: An Introduction To Clicker Training: Day 1 – Afternoon Training: 3rd Session
Data Collected. Now It’s Assessment Time
People felt this was his best round yet. I kept this session very short. I got three good touches and then ended the session. This avoided the dip in behavior that we had seen earlier. Nick was clearly still very cautious in his responses. This is a process that has to unfold in it’s own time.
Several of the clinic participants wondered if we should change targets or change treats. It’s always a possibility. One of the huge advantages of clicker training is there is always more than one way to train every behavior. There isn’t one and only one right way that you have to follow. That’s what makes these discussions so valuable. We could certainly try a different target, or introduce a different foundation lesson, but it was also okay to stay with what we were doing.
With Nick, I was still working with simple targeting, but in each round there had been significant changes. I began by offering him the food approximately where the target had been. Now I could move him back to get his treat which meant he then had to step forward to touch the target. The shaping of more complex behavior was occurring almost without his noticing. In the morning he started out much more on the forehand. I made a point of feeding him in a way that shifted his balance back slightly which brought him off his front end. That then allowed me to feed him so he moved back even more. You are now seeing in the video clip how he is moving back well out of my way to get the treat.
Because I can feed him so he steps back, the dynamic of touching the target changes. I will often see people moving the target around through big changes. They’ll hold it high, then low, then out to the side. Most horses can follow these changes and continue to touch the target. Essentially the handler is being reinforced for changing criterion in big stair steps. We call that lumping. It works for a simple behavior like targeting, but I would rather see the handler learn to build behaviors more smoothly, so a response is already happening consistently before it becomes the criterion that earns the click.
Questions
Training must always take into consideration any health concerns. One of the questions I had concerned Nick’s teeth. I wondered how long ago they had been checked. Nick not only took a long time to eat the hay stretcher pellets, I never heard him take them up onto his back molars to chew. So I wondered if he might have some sharp points or some other issues that were contributing to his overall caution. His owner said he had very recently been done by a good dentist. That’s good to hear, but it doesn’t completely eliminate my question.
It’s so hard to judge how well an equine dentist is doing. We can look at our horse’s feet to see if a farrier is leaving flare and other obvious signs that perhaps we need to question the job he’s doing. But with teeth it’s much harder to evaluate the job a dentist has done. Reaching in to check for points isn’t something we’re trained to do.
Even if you’ve had the teeth checked recently, it’s always possible that something has happened since to cause a problem. Nick’s owner reported that he is very tight in his jaw and his poll. That’s consistent with the way he was eating his treats. This is all part of this early data collecting phase of the training. Many of the concerns and questions that these early sessions raise may well simply disappear as Nick figures out the game. What remains needs to be looked at with the possibility that there is a physical issue interfering with his ability to respond well. For now we were very much still in an exploratory stage, so I continued on with another targeting session, the fourth of the afternoon:
Video An Introduction To Clicker Training: Day 1 – Afternoon Training: 4th Session
The Grown-up Are Talking, Please Don’t Interrupt
In the discussion that followed this set, we decided that it would be interesting to shift gears and introduce Nick to an exercise which I refer to as: the grown-ups are talking, please don’t interrupt. At it’s most basic this exercise is asking if the horse can keep his nose away from my treat pocket when I’m standing in close to him. Initially I free shape this lesson, meaning I am not prompting or triggering the correct response through my behavior. I am simply observing Nick and reinforcing him for approximations that move him closer to my overall goal.
If he comes into my space or nudges at my arm, I’ll let him explore. It’s important that he feels safe experimenting. If I correct him for nuzzling my pockets, I can’t expect him to feel safe offering behavior in other ways. If I don’t feel comfortable letting him nuzzle my pockets, I can always step back out of range.
When he moves his nose away from my body, click, I’ll give him a treat. I’ll feed him out away from my body where the perfect horse would be. That means he’ll have his head between his shoulders and at a height that puts him into good balance.
In this first round of grown-ups you will see that he spends over a minute investigating my pockets. I let him explore. This is such an important part of the process. He isn’t being punished for coming into my space or nuzzling at my vest. It isn’t dangerous for him to check out this option, but it also doesn’t get him any treats.
If you’ve been taught that you should never let a horse into your space like this, it can be really hard to watch him nuzzling at my pockets. During this process his owner told us that he often mugs for treats. It’s a behavior his previous owners allowed, which may account for his persistence. But watch how quickly he catches on to this new game. Moving his nose away from me is the way to get treats!
Video: An Introduction to Clicker Training: Day 1 – Afternoon Training: 5th Session – the First Asking for Grown-Ups
In the discussion that followed this session I again emphasized how systematic the unfolding of clicker training is. The behaviors I work on are very connected one to another. Even though I haven’t perfected targeting, I can still move on and introduce other behaviors. In the targeting he was learning that moving his head away from me to touch the blue end of the target stick produced goodies. In grown-ups he was discovering that moving his head into that same position, even when a target wasn’t present, also produced treats.
I think it’s important early on for horses to discover that there is more than one way for them to earn a click and a treat. If you work too long on targeting or some other behavior, a horse can get too narrow in his understanding of how the process works. He will think that there is one and only one behavior that produces treats. He can become very locked in. When you try and do something else, he’ll get very frustrated because he feels as though he is being blocked from the one thing that he knows works. So it’s good to experiment and introduce other behaviors early on in the process.
Remember there is no one and only one right answer. If we had stayed with another round of targeting, would that have been wrong? No. If we had moved from targeting sooner, would we have been wrong? No. If we had switched to a different target or to different treats, would we have been wrong? No.
Nick is definitely cautious in his approach to the target, but at this stage that isn’t a bad thing. We’re at the beginning of a huge paradigm shift. I’m letting him come into my space and sniff at my hands and explore my pockets. He has to do that in order to discover that that’s not what works. What works is taking his nose away from me. I’m not going to correct him for nuzzling at me. I don’t want to punish him for it. I want him to make that choice on his own with minimal prompting from me.
If I thought he was dangerous, if I thought he was going to bite me, I would step away. I might even have a different kind of barrier. Or I might wait to work on this particular lesson. In other words, I would set it up so I felt safe. He’s exploring. He’s experimenting. While he’s doing so, it’s important that we both feel safe.
If I said to you: I want you to experiment, but recognize that there are sharks in the water. And now go dip your toe in the water, you’d say to me: “I’d rather not.”
If I’m correcting him for nuzzling, then experimenting in general is a bad idea. Trying things has become unsafe. He’d be right to say the same thing to me. “I’m not going to reach out and touch that target, because I might get smacked. You may be giving me treats this time, but next time you just might hit me instead.”
This is why I set up the training in this very structured way, and why I begin with protective contact. I want him to learn that he can experiment safely.
In this next round you’ll see how well this strategy is paying off. Nick spent most of the previous round mugging my pockets. Now in this set you’ll see him very deliberately moving his head away from me.
Progress.
Video: Introduction to Clicker Training: Day 1 – Afternoon Training: 6th Session – 2nd Grown-ups.
Nick is showing us why clicker training is so much fun. With every round we’ve seen a shift, a change in his understanding. Grown-ups produced for him a real “lightbulb” moment. Shifting from targeting to grown-ups has helped him “connect the dots”.
It also shows again the value of using these short rounds of training. You may be thinking: that’s easy to do in a clinic. You have to stop to talk to the participants and explain what you’re doing. How am I supposed to do this the the real world of my barn?
It’s really easy to do these short rounds of training in your home environment. You might do a quick round of targeting and then fill a couple water buckets. You’d do another short round of targeting and then throw down some hay, or turn out a horse. You’d do another round, and then sweep the barn aisle. In other words, in between doing your normal barn chores, you can get in a lot of short sets of training.
After you’ve got your chores done, you might want to have a more “normal” visit with your horse. You want to do more with him than just targeting in a stall. All your previous training says you need to “work” with your horse.
You can begin to expand your clicker training into all the everyday tasks he already knows. If he’s a horse like Nick who is safe to handle, by all means bring him out and groom him. In that grooming session, you’ll be looking for opportunities to click and reinforce him. If he normally fusses and moves about while you groom him, but right now he’s standing still, click and reinforce him. When you ask him to move his hips over so you can get by, as he responds, click and reinforce him.
You will now be paying attention to all those little requests that we often take for granted when we groom. You’ll be finding excuses to click and reinforce him, and in the process you’ll be discovering how much better he can be. You will still have your “formal” clicker sessions where you focus specifically on targeting and the other foundation lessons. But you can also begin to incorporate the clicker into the “real world” of everyday tasks and expectations.
Business can continue as usual, but now you have this added communication tool that says: “thank you for a job well done.”
You’ll be doing this, and you’ll also be continuing with the formal process of introducing him to the six foundation lessons of clicker training. As your horse masters those lessons, you can use them to make daily husbandry and the rest of your training even better.
Now, if your horse were showing you dangerous behaviors, I wouldn’t be encouraging you to bring him out to groom him. While he learns how to learn, I would be recommending that you stay with protective contact. He can be dirty for a while. If you’re dodging his teeth, there’s nothing that says you have to groom him every day. If you are seeing behaviors that raise safety concerns, I would teach him the learning-how-to-learn emotional-control aspect of his training with a barrier between you.
After this discussion I decided to finish up with one more round that would include both targeting and the grown-ups are talking lesson.
Video: An Introduction to Clicker Training: Day 1 – Afternoon Training: 7th Session- Targeting & Grown-ups
This was the final round of the day. In the afternoon we spent approximately fifty minutes focused on Nick. About 17 minutes of that time was spent working directly with him. The rest was spent in discussion. That’s a good ratio, especially at this stage of the training.
One of the things we were discussing were all the changes we were seeing. You have a huge advantage because you can go back and review the earlier video clips. Think about all the changes you’ve seen in these clips. We began in the morning with his first tentative exploration of the target, and now in the afternoon he will step forward to touch a target, and I can move him back with the food delivery. I can stand next to him with my pockets filled with treats, and he will deliberately take his head away from me. I can combine targeting and grown-ups in one work session. That means I am beginning to introduce him to two important concepts: cues and chaining. Chaining refers to linking behaviors together via cues to create long sequences of behaviors.
At the beginning of the afternoon session, Nick was starting out with three strong responses and then his rate of response would drop off. In this final set of the afternoon he was maintaining a high response rate through a long training set.
Throughout each of these training sets I was making choices. In that very first round, I was deciding what does “orient to the target” look like? Can he just sniff the target to get clicked, or does he actually have to touch it. These are all choices that have to be made. Remember there are no rights or wrongs. With every click I am assessing the horse’s progress. Have I made a good choice, or do I need to adjust my criterion slightly?
When you are training, it is good to remember this wonderful quote: “It is always go to people for opinions and horses for answers.” Through his behavior your horse will tell you if you are making good choices. He will also be telling you if your basic handling skills are clean. If you are fumbling around in your pocket trying to get out a treat, you’re giving him extra time to mug you. You don’t want to be collecting unwanted behavior even as you’re reinforcing other things that you want. The steady progress Nick made through the day told us that on balance the choices were good ones, and the game was making sense to him. It was time to let him process what he was learning.
One of the expressions I use often in clinics is you never know what you have taught. You only know what you have presented. We would be finding out what he was learning by returning the next morning with another round of training.
More Training
That last video marked the end of day 1 of Nick’s introduction to clicker training. But this wasn’t the end of the day’s training for Nick’s owner. We spent another fifty minutes working with her on her clicker training skills. Just as we did with Nick, we began in a stall with “protective contact”. She was on one side practicing her handling skills while another clinic participant played the part of her horse.
I like beginning with these rehearsals. If you are new to clicker training this is a must-do step. What you just watched can look so easy. You are probably thinking: “What can be so hard about holding up a target?” Until you try it, you won’t know, but better that you find out all the little places where you’re fumbling around trying to get coordinated BEFORE you go to your horse. If you can’t find a friend to help you, you can always pretend you have a partner. Video tape yourself or practicing in front of a mirror to give yourself visual feedback.
I know many people fuss at having to go through these steps. They want to go directly to their horses. They have told themselves that they are hands-on learners. They need to be doing in order to learn. These rehearsals give them the “hands-on” learning experience they are looking for.
I am very protective of horses. If you are learning something new by going straight to your horse, your horse is going to have to withstand your learning curve of making mistakes, fumbling with the clicker, not getting the target up, etc. etc.. That can be hard on a new learner. When someone runs into trouble in the first stages of the clicker training, its often because they didn’t do enough dress rehearsals. This show up in inconsistent handling, timing that’s off, unclear criteria, and other issues that result in a horse being equally inconsistent. The result is a lot of unwanted behavior as the horse expresses his frustration.
Watching someone else training with clean, consistent handling doesn’t guarantee that you’ll be able to do it yourself. The dress rehearsal is the step you put in between. The handler will be going through all the training steps first with a “human horse”. Her partner will hold her hands together to represent a horse’s muzzle. When she reaches out and bumps the target with her hands, her “trainer” will click and give her a treat. The “human horse” will adjust her behavior to meet the needs of her learner. If someone simply needs to practice clicking and getting the food out of her pocket, the “horse” will cooperate by touching the target directly. She won’t present any behavioral challenges until her “handler” is ready to work on that step.
One of the huge advantages of this process is the “horse”can give her “handler” verbal feedback. By the time you’re ready to go to your horse, you can focus on what he’s doing instead of focusing on your own skills.
Once your “human horse” gives you the “all clear”, you’re ready to ask your horse how you’re doing. In this case we had a barnful of clicker-wise horses, so Nick’s owner was able to practice her new clicker skills with an experienced horse. This was a real luxury that prepared her even more for her first clicker lessons with Nick.
This is Puffin checking on Wendy’s “homework”. Puffin was a rescue pony who is becoming a clicker star under the guidance of his person, Karen Quirk.
The clinic participants had to wait overnight to see how Nick processed his first day’s lessons. I will make you do the same. I’ll share Day 2 in the next installment of this report.
Alexandra Kurland theclickercenter.com theclickercentercourse.com
This is Part 2 of a 4 Part series on introducing a horse to the clicker.
My thanks to Cindy Martin for organizing and hosting the November clinic, and to all the clinic participants, especially Wendy Stephens and her beautiful Nick.
Please note: This article gives you wonderful details to get you started with the clicker, but it is not intended as complete instruction. If you are new to clicker training and you are looking for how-to instructions, you will find what you need at my web sites:
The last time I posted I had just returned from the Five Go To Sea conference cruise. It’s now November and I have just finished the 2015 clinic season. Thank you to everyone who was able to join me this year. Sharing clicker training is such a joy. I am looking forward to seeing you again in 2016.
I’ll have my full 2016 clinic schedule posted on my web site soon. In 2016 I’ll be back at the Cavalia retirement farm for another series of clinics. And I’ll be returning to several of my long time clinic locations for more Clicker Intensives.
My conference schedule is already posted. 2016 is going to be a great year for learning!
The last clinic of the 2015 season was at Cindy Martin’s farm in Arkansas. One of the participants brought a horse who was completely new to clicker training. Usually when I have a start-up horse we are in narrow barn aisles with poor lighting and limited site lines. Cindy’s barn is a perfect film studio. It had an extra wide aisle, tall ceilings and great lighting. So we were we able to video this horse’s progress over three days.
What follows is a detailed account of the start-up process. Whether you are brand new to clicker training or an experienced trainer, I think you will find this of interest. This report takes you very systematically through the process that I recommend for introducing a horse to clicker training. I have included video as well as the discussions that followed each training session.
Enjoy!
Step One: Introductions
My clinics always begin with a Friday night gathering. When you talk to experienced clicker trainers, they always emphasize the importance of building a relationship with the animal you are training. Relationship can be one of those fuzzy, feel-good words. You can have all different kinds of relationships, some good, some quite toxic. When science-based trainers define relationship, they are referring to a history of reinforcement.
In clicker training we put the emphasis on creating a history of positive reinforcement. One of the metaphors that’s often used is that of building up a bank account by making many deposits via positive reinforcement. As the bank account grows, if something happens and you do have to use a correction, your “bank account” can withstand a small withdrawal.
So training begins by building up that history of reinforcement with the animals you’re working with. I’ve always felt that it was important to treat the people I work with with the same consideration that I give to their horses. While I’m clicking and treating the horse, I don’t want to be barking commands at the person and criticizing every little mishap. I also don’t want to spend three days working with a group of people who are essentially strangers.
I know I’ll be seeing many of the participants again at future events, so I like to get to know them as individuals, not a sea of anonymous faces. So we spend the Friday night gathering in introductions. I want to know what brought people to a clicker clinic. What is their horse background? What is it they are hoping to get from the weekend? I tell them that this is their first shaping exercise of the weekend. Their introductions, what they are specifically looking for, help shape the clinic experience they are going to have.
Wendy, the owner of our first-time clicker horse, told us his story. She was given Nick after friends of hers had given up on him. They had hoped he would be a reining horse champion. They had bred their mare to a top stallion. At eighteen months he was sent off to a top trainer who thought the world of him. He considered him his best futurity prospect of that year. By the time Nick was two, the trainer was less excited by him, and by three he was saying Nick would not make it as a reiner. It’s a familiar story. His disappointed owners took him out of training, and then found that they no longer wanted him, so they gave him to Wendy.
Wendy’s training concerns centered around a desire to feel more connected to Nick. He was very aloof. He wasn’t hard to catch out in the pasture, but he never came directly up to her. He would always stop ten to twenty feet away from her. Out on trails she described him as safe to ride, but easily distracted. It was hard to get him to focus on the rider.
People often come to clicker training as a last ditch effort to “fix” a problem horse. Nick didn’t need “repairing”. He was not a “broken” horse. As I explained to the group Saturday morning, we weren’t trying to fix anything. We were simply introducing a nice horse to clicker training.
What to Feed
We began with a discussion of the treats, both what to use and how to handle them in these early training sessions. I rejected some flavored commercial horse treats that Wendy had brought in favor of some plain timothy alfalfa pellets Cindy had for an insulin-resistant older horse.
In these early start-up lessons you are asking for simple behaviors. All the horse has to do is touch a target or move his nose away from your treat pocket. You want to keep the rate of reinforcement high so the horse stays engaged in the game. That means you are going through a lot of treats fast. When I don’t recognize the commercial horse treat, I don’t know what I am feeding. Is this something that is designed to be truly that – a treat, something you feed in quantities of one or two at a time, or is it something we can safely use in larger quantities during a training session?
If I’m not sure of ingredients, and especially of the sugar content, I prefer to use something like the timothy alfalfa pellets. They are bland enough that a horse isn’t going to have a “sugar high” during the training, but still enough of a treat that he’ll want to figure out how to get me to give him more.
Protective Contact and the Importance of Choice
In addition to a discussion of what to feed, I also talked about protective contact. What this means is the handler is separated from the horse by a barrier. There are a number of reasons for using protective contact to introduce a horse to clicker training, even with a horse you know well.
When a horse is loose in a small paddock or a stall, he is free to interact with you – or not. He has choice. That’s key to clicker training. If you go in with a horse, even if he is at liberty, his previous learning may interfere with his ability to figure out this new clicker game. He’ll be so busy responding to previously learned cues, he won’t even be aware that there’s a puzzle to solve. In fact, the more well-trained a horse is, the more important this reason for using protective contact becomes.
And if a horse isn’t so well trained, all the safety reasons for using protective contact come into play. Without the barrier, if a horse crowds you trying to get to the treats in your pocket, you’ll need to do something to push him away. If you’re having to correct him for this unwanted behavior, you’re creating a bind for yourself. On the one hand you want your horse to feel safe experimenting and offering behavior. And on the other hand you’re still saying no, don’t do that. You’re essentially poisoning your first clicker encounter.
The barrier removes the safety concerns and gives your horse choice. Choice is very important. Current research is confirming that choice is reinforcing. When we put a horse into protective contact, we are giving him the choice to interact with us or not. We are also keeping things safe. I don’t know the horses I am introducing to the clicker. I don’t know which one is going to get super excited about the food and push into my space. I don’t know which horse is going to show a huge regression into unwanted behaviors when the constraints of punishment are removed. (See my blog post: Resurgence and Regression: Five Go To Sea Conference Presentation. This is a twelve part article. Part 1 was posted on May 21, 2015.) Until the horse shows me that it is safe to go in with him with my pockets filled with treats, I stay with protective contact.
This is one of those soap box issues for me. I know that there are many people in the horse community who will NEVER try clicker training. Feed horses! Give horses choice! Horrors!
That’s fine. Clicker training doesn’t have to be everyone’s cup of tea. But, clicker training doesn’t just introduce the use of marker signals coupled with reinforcers. It also brings into the horse world this idea of training with protective contact. If we can introduce the concept of protective contact into mainstream horse training, we will be doing a very good thing indeed. People go in with horses much too soon, and as a result, they end up reaching for punishment solutions first.
I remember watching a clinic years ago where a very well known clinician made everyone climb in and out of the round pen – even though there was a perfectly good gate. The reason was this: if a horse every charged you, you’d know how to climb the fence so you’d be able to get out of that pen fast!
There’s something wrong with this reasoning. I don’t want to be in the pen with a horse until he tells me he’s comfortable having me there. If he feels threatened, I don’t want him thinking he needs to attack me to remove the danger.
I want the horse to show me that he understands enough of “my language” to be able to figure out the puzzles I’m presenting. Horses are punished for so many reasons, including not responding fast enough to commands.
When you’re afraid, it’s hard to think straight and follow instructions. We know that from our own experience. So imagine what it must be like for a horse. He’s struggling to figure out what is wanted. If he hesitates, he’ll be punished. If he reacts fast, but guesses wrong, he’ll be punished.
When a horse isn’t not sure what is wanted, is it any wonder he feels threatened and frustrates easily? Aggression comes from a place of fear. If I am working with a horse that is quick to lash out to protect himself, I want a barrier between us. That way I won’t be adding fuel to the emotional fire by correcting him to keep myself safe. I can just step back out of the way while he goes through the “learning how to learn” process.
Throughout the horse industry, if we treated horses more like zoo animals and used more protective contact, we would see an overall shift towards kinder training. “Aggression comes from a place of fear” doesn’t just apply to horses. Think about that the next time you are watching someone cracking a whip or swinging a lead rope at a horse.
Enough of the soap box. Nick was stabled overnight in a large 14 by 16 box stall with a door that opened out onto a small outside covered run. A stall guard was already set up in the stall door so creating protective contact was easy.
Keep your First Sessions Short: The Twenty Treat Strategy
The first lesson I teach is generally targeting. For this first lesson I count out twenty treats. I want to limit how long the session can last by limiting the number of treats I start out with. When I run out of treats, I am obliged to take a break from active training. These breaks do a number of good things.
First, they show the horse that this interesting game begins, ends, and then comes back again. For many horses during this first introduction into clicker training is a true “Helen Keller” moment. (If you don’t understand this reference, watch the old movie “The Miracle Worker”.)
When the horse figures out that he can control your behavior, you often see what are referred to as “light bulb moments”. For some horses this a huge sea change. The horse needs to understand that this amazing experience is something that will continue on past the first introduction. That’s part of what helps him to settle into the experience.
By giving breaks your horse is learning that the game stops, but it comes back again. For many horses clicker training is a world changer. Their human makes sense! They can actually train their human! Their world opens up. You’re offering the target, and clicking and treating.
And then you close the door and walk away – and for the horse it’s back to business as usual. All that clear communication vanishes. For some horses this can be really hard on them. Get back here and train me! It’s bang, bang on the stall door. If you’re in a boarding barn, that’s going to make you very unpopular with the owner! By giving breaks, the horse learns that the game has pauses and then starts up again.
So I like to do a short session and then go away for a few minutes. Then I come back to do another round. The game ends, and then it begins again. That’s hugely reassuring to the horse.
The other thing that the breaks create is an opportunity for the handler to think about the training. Clicker training is fun. You see your horse touching a target with more confidence. He’s making progress. It’s like the old potato chip commercial – “bet you can’t eat just one.” You’ll be thinking: “I’ll just have him target one more time. How about one more time after that?”
If you fill your pockets at the start, you could end up training and training. Caught up in the momentum of the moment, you might not notice some unwanted behavior that’s crept into the game. Yes, your horse is eagerly touching the target, but he’s also pinning his ears flat to tell his neighbor in the adjoining stall to stay away! That’s not the kind of behavior you want him to be weaving into his first clicker training experience.
If you take a short break to think about each session, you’re more likely to pick up on these unwanted behaviors, and you can make adjustments to your training environment as needed. You want to catch any “speed bumps” in your training early on so you can make the necessary changes that ensure that the behavior you want is the behavior you get.
The breaks also give you time to think about what to do with the next round of twenty treats. And they let you appreciate the steady, good progress you see your horse making.
Choosing Your Target
I generally introduce horses to the clicker via basic targeting. Most horses are curious. If you are holding something in your hand that doesn’t look too much like a goblin, they will come up to see what you’ve got. Click! They have just earned a treat.
Lots of things make good targets. They need to be easy to handle, horse safe, and nothing that looks too scary. Small plastic cones work great, as do empty water bottles and the lids off of supplement containers. In other words, you don’t have to spend a lot of money on targets. Look around your barn. You are bound to find something that will work. From the collection Cindy had in her barn, I chose a great target stick. It was made from an old riding crop. She had stuck a bit of foam from a pool noodle over one end and wrapped it in duct tape. Perfect.
Planning Your Exit Strategy
Before I could introduce Nick to targets, I first had to think about my exit strategy. If I’m going to take breaks, I need a way to end a session that’s okay for the horse. I’ll be taking the treats, the attention, the game away with me. I don’t want the horse left thinking that whatever he just did it made me leave. He promises never to do that again! If I’m clicking and treating for desired behavior, that’s the opposite of what I want, so I need to think out in advance how I’m going to end a training session.
The horses I work with regularly are all familiar with treats being tossed on the ground. When I need to break away from a conversation we’re having, I toss a few treats on the ground or into a feed bucket for them. While they are searching around for the goodies, I can slip away. However, I can’t assume that other horses will know where to look when I toss a treat into a feed bucket. So Step One for Nick begins with this very easy lesson. I simply opened his stall door, dropped a feed tub onto the floor and began dropping treats one or two at a time into the bucket. Is it any wonder horses love clicker training!
This first video clip shows Nick learning that the sound of treats being tossed into his bucket means goodies are to be found there. You will see that Wendy’s description of Nick was very accurate. While he is willing to come to the front of the stall to take treats, he is very cautious. This was a good first step both to help build his confidence, and to begin to let me learn more about him.
Video: An Introduction to Clicker Training: Session 1: Creating an Exit Strategy
Data Collecting: The First Targeting Session
Next came Nick’s first targeting session. I view this first round of targeting very much as data collecting. I am not thinking of it as the “teaching” part of the training. This is exploratory training. Nick’s response to the target will tell me where I can begin. If he’s reluctant to even come up close to the target, I know that I’m going to have to break this lesson down into much smaller steps, beginning with more time spent just clicking him for acknowledging my presence.
On the other hand if he eagerly touches the target and then grabs for the treat and remains fixated on my pockets, I know I have a very different starting point for the training. It’s all data collecting. Until I ask Nick a few questions, I won’t know where to begin. As you watch this next video, you can join us in the data collecting. It shows Nick’s first targeting session.
Video: An Introduction to Clicker Training: Day 1 – The First Targeting Session
As you can see these sessions are short. Putting only twenty treats in my pocket forces me to stop after just a couple of rounds of targeting. While I am getting more treats, I can think about what I learned about Nick. What did I like about this round? What unwanted behaviors, if any, do I need to be aware of? What do I want to do next?
Data Assessing: What Did We Learn?
The two main questions are: is there anything about this horse’s behavior that would suggest that it would be unsafe to go in the stall with him with my pockets filled with treats? If the answer comes back yes, or even, I’m not sure, I stay with the protective contact.
The other question I ask is what should I do with the next round of twenty treats? Should I continue with the targeting, or does his behavior suggest that I should shift to one of the other foundation lessons? I have six to choose from: targeting, backing, head lowering, the grown-ups are talking – please don’t interrupt (meaning take your nose away from my treat pockets), ears forward (which I refer to as Happy Faces) and standing on a mat. Taken together these six behaviors work beautifully to introduce horse and handler to clicker training. They are great behaviors to choose because the end result of these lessons is a horse who has beautiful ground manners and lots of emotional self-control.
Often when I ask a group: “what did we just learn about this horse?”, they are stumped for words. They don’t know what they are supposed to say. We are so used to criticizing what we see. That’s how we’ve been trained in school, at work, even in our own families. “What’s wrong with this picture” is what we know, and yet, that doesn’t quite seem to be what I’m asking for.
There may indeed be things the horse presents that are a concern, but I really am looking at this through a different lens, one that is often very unfamiliar to first-time clicker trainers. They haven’t spent a lot of time practicing finding things they like, so this is a great opportunity to develop that skill. Let’s listen in to this first assessment process:
Video: Introduction to Clicker Training- Group Discussion After the 1st Target Session
Especially if you are new to clicker training, I recommend that you videotape your first clicker sessions. They really can be fascinating. The change in your horse’s understanding can happen so fast. You can use the pauses between training sessions to review your video. Often you’ll see little things in your handling that you’ll want to change. If you are reaching into your treat pocket ahead of the click, or you’re feeding too far forward so your horse gets pulled onto his forehand, you’ll catch these handling glitches and be able to change them for the better in the next round.
Details That Make A Difference
To help with this type of data collecting I’ll point out a few handling details that you can watch for in this next video clip:
Note how I handle the target. I position it so it is easier for Nick to touch it than it is for him to get to me. If he starts exploring past the end of the target stick, I very quietly ease myself out of his reach while still keeping the target stick easily available.
After I click, the target stick drops down into a neutral position. I give him his treat, and then immediately bring the target back up so it is available to him to touch. The movement of the target stick as I bring it back up helps to attract his attention. Taking it down after I click means that each round is a discreet trial.
Note also how deliberate I am in how I present the treat. After I click, and NOT before, I begin to reach into my pocket to get the treat. I am prompt in beginning the reinforcement delivery but that doesn’t mean I move fast. Note the rhythm of the overall lesson. I maintain a steady pace which allows me to set the tone of the lesson.
Some common things to watch for in your own handling would be:
* Are you reaching into your treat pouch ahead of the click? The movement of your hand will overshadow the click. It will become your marker signal which isn’t what we want.
A good marker signal has the following characteristics: It is quick. It is unique, meaning it stands out from other stimuli in the background. It is non-emotional. The click of the clicker meets all these criteria. It gives you so much precision when you begin to work on details in performance. And it means your horse does not need to be watching you to respond to a marker signal. That’s a huge advantage for riding. So take care now to make the click of the clicker a clean marker signal. (Note, very quickly you will shift from the actual clicker to a tongue click. You’ll see me do this with Nick in the clips that follow.)
* Are you feeding out away from your body where the perfect horse would be? If you feed in close, you’ll be reinforcing your horse for coming into your space. I want to feed Nick so his head is away from me. More than that, I want to take full advantage of the fact that I’m using food in my training, so I’m going to feed him to encourage good balance. In this first lesson that means his head will be even between his shoulders and at a good height so he isn’t pulled onto his forehand to get the treat.
* Are you remembering to take the target down in-between trials.
* Are you bringing the target up promptly so it is approximately in the same orientation that it was in the previous trials? Often people move the target around from one spot to another in this first round. First the target is high, then it is low That means that every time the horse touches the target it’s a very different behavior. Even if the horse is managing to touch the target, he may be struggling to understand the underlying concept behind the click and treat.
* Are you maintaining a steady pace throughout the cycle? Sometimes people rush to get the food out. They are forgetting that the click buys them time. It marks the moment you like. You can think of it like a place holder. You want your horse to understand that the behavior that was occurring at the exact moment that you clicked is worth trying again. As long as you begin to reach into your pocket promptly, you don’t have to be fast in the delivery. This isn’t “click and shove” training. Your horse can see that you are getting a treat. He knows it’s coming. The whole process is part of the reinforcement. It’s like Christmas. It isn’t just ripping open a present that’s reinforcing. It’s all of the anticipation leading up to the event that makes the presents so exciting. With a beginner horse you can’t mess around and take too much time getting your treat to him. That can be frustrating, but nor do you need to feel as though you have to rush.
Look for these details as you watch Nick’s second targeting session.
Training Sessions #2: More Targeting
Video An Introduction to Clicker Training: Day 1 – 2nd Target session
In this next round of targeting Nick is interested. He’s waiting for me at the front of his stall, but he’s still unsure what this is all about. Nick is slow to touch the target. Waiting for him to touch the target can feel a bit like watching paint dry. I have to decide: do I wait for an actual touch, or do I click any orientation towards the target? With Nick I decided to wait for him to touch the target. It wouldn’t have been wrong to click for approximations. That’s one of the great advantages of clicker training. There is no one only one right moment to click.
Someone else might make different decisions. Nick’s behavior will tell us if we are on the right track. That’s one of the reasons to begin with these short sessions. They give you time to consider the choices you’ve made so you can make adjustments.
In the discussion that followed this section, I again reminded people to count out their twenty treats so these early sessions remain short. As long as I am still working with protective contact, I continue to count out twenty treats. Once I decide that it’s time to go into the stall with the horse, I then add more treats to my pockets.
As a group we agreed that Nick was remaining very calm and polite, but he didn’t yet get what this game was all about. As one of the participants said: “That’s what is so exciting about watching this. That moment when a horse understands that he just made you click and hand him a treat, it changes the whole world for that horse.”
Often times in more traditional forms of training horses are corrected for offering behavior that hasn’t been asked for. When you hold a target up, these horses wait to be told what to do. Taking the initiative is not something that feels safe to them. You’ll see them remain hesitant about touching the target. Both Nick’s background and his behavior matches this scenario.
You don’t want to rush through these simple targeting lessons. Again it is about choice. I want Nick to discover that he has control of this lesson. That’s what will build his confidence. He needs me to give him whatever time it takes to make this discovery. That’s what will turn him into a bright-eyed clicker star.
This is another good reason to use protective contact. The stall guard limits my ability to step in a get “things done”. This lesson isn’t about getting a horse to touch a target. If I were goal oriented, that’s all I would see. How fast did I get this horse to touch the target?
That’s just a behavior. It’s a tool I’m using to teach Nick much more fundamental lessons. I want him to understand the core values of clicker training. I want him to understand that he does have choice, that his feelings matter. I want him to understand that what is evolving is a conversation, and that his voice counts.
In the third round of targeting, you’ll see more changes. Again we decided to continue with the targeting.
Video: Introduction to Clicker Training: Day 1 – 3rd Targeting Session
As I finished this round, I decided that I would do just one more round of training that morning – in part because I was looking at how much of the original bowl of treats I had gone through.
Measuring out the treats into a bowl was a good reminder to everyone that you need to keep track of how much you are feeding. In these initial training sessions you are working with very simple behaviors. You can go through a lot of treats fast. It’s one touch of a target, click, treat. One quick moment of grown-ups, click treat.
Later you’ll be asking the horse for so much more. You’ll be building complex sequences of behavior and asking for much longer duration. You’ll be getting much more behavior for every single click. When you reach the stage of filling your pockets at the start of a training session, this early discipline of counting out your twenty treats will help you keep track of how much you are feeding.
Video: Introduction to Clicker Training: Day 1 – 4th session
This fourth round of targeting shows the evolution of the food delivery. Remember in the first round I fed Nick approximately where the target had been. Now I can move into his space to feed him. Initially it’s easy to think in terms of single behaviors. You are having a horse touch a target. But really what you have is a cycle of behaviors. I refer to this as loopy training.
As a shorthand way of describing clicker training, we will often say that behavior leads to a click which leads to a treat.
You can write this as:
Behavior leads to Click leads to Treat
or the short hand of: Behavior => Click => Treat
It’s an easy way to think of clicker training. If you like it, click and reinforce it. Reinforce is the key. When you write out that single phrase, it’s easy to think of this event as an isolated unit, but reinforce means to strengthen. If a behavior has been reinforced, you should see it occurring more and more frequently. So really what we have is a loop of behavior which we can write out as:
Behavior => Click => Treat => More of the Behavior => Click => Treat => More of the Behavior => Click => Treat => etc.
The food delivery is a dynamic part of this process. I could simply click and continue to feed pretty much as I did in the first round of training, but that would be giving up so so much of the value that I get from my treats. People who don’t use food in their training are at such a huge disadvantage. I know that’s not how they think about food, They see it as a nuisance, a distraction, a bribe. All these negative labels can keep someone from seeing the enormous advantages using food as a reinforcer gives me. It isn’t simply that getting something he wants want makes the horse more eager to do it again. I get so many more good things from this part of the cycle:
* I can help a horse find good balance through my food placement. You can see that in this fourth round of the training. I place the food so Nick not only straightens out his head, but I am also placing it at a height that encourages him to lift up in his shoulders and come off his forehand.
* I can also set up the next phase of the training. At some point I will want to ask Nick to back up. By getting the backing first from the food delivery, I can map out the behavior before asking for it directly. I can see how easily – or not – Nick backs. If his feet get stuck and he struggles to back up to get to his treat, I know I will need to be careful how I introduce backing when I ask for it directly. I may be dealing with a horse with arthritic hocks so backing is painful. Or backing may have been taught so punitively that the horse resists and resents any attempt to make him back – even if it is to get to a treat. Or the horse may simply never have been asked to back, and he can’t figure out how to move his feet. Whatever previous experience Nick has with being asked to back, introducing it via food delivery gives him a huge jump-start on solving the clicker backing puzzle.
What this boils down to is I use food delivery dynamically. These simple targeting lessons introduce this concept early on in the process. The horse becomes accustomed to moving his feet to get treat, plus he becomes familiar with the feel of good balance. The horse is learning to follow the handler’s body language creating the foundation for both leading and liberty work.
Nick’s owner was thrilled. These four short training sessions showed her the structure she had been looking for. She appreciated how systematic and organized the process was. She saw how valuable the breaks were. As she said, when you are new to clicker training, you need to step back to take stock of where you are. Is this behavior going the direction you want, or is it going off the rails somehow? Video really helps you keep track. Most of us have cell phones or cameras that can take short video clips. If you don’t have a tripod, you can always prop your phone up on a hay bale or a fence rail.
During the breaks you can review your video. You’ll see your hand creeping towards your treat pouch ahead of the click. No wonder your horse was more interested in mugging you than touching the target! Details like this really do matter. It’s so much better to catch them early on so your handling isn’t creating confusion and unwanted behavior.
The total training time for Nick that morning was twelve and a half minutes spread out over a forty-nine minute session. If you were working on your own, you might spend a few minutes introducing your horse to a target, take a break to review your video, do a couple of barn chores, then return for another round of targeting. Breaking up the individual targeting sessions by putting barn chores in between spreads the sessions out nicely. After you’ve reviewed your video, it also gives you time to think about what you want to do next.
When you are brand new to clicker training, it’s perfectly understandable that you may not be completely sold on this style of training. All you’re doing with these first few sessions is testing the waters. Is this something you’re going to enjoy and find useful?
The structure I’ve shown in these video clips gives you a safe way to become familiar with the overall process. If you need to take a pause from clicker training, you’ll be able to do so. Context cues matter. If you don’t have a target, your horse won’t be expecting the game, so you can handle him business as usual when you put away your treat pouch.
Having said that, when I introduce a horse to clicker training, I feel as though I am making a commitment to that horse. I don’t want to show the horse that we can communicate clearly and then snatch that experience away. Once I open up the communication channels, I want to keep them open, active, and ever-enlarging.
For Nick I may have decided that this fourth session would be the last for the morning, but it was definitely not the last of the weekend. We continued on in the afternoon with another round of targeting.
Just as the clinic participants had to wait to see how Nick processed his morning lessons, you will have to wait to see the afternoon sessions. I’ll post those in Part 2 of this series.
This is Part 1 of a 4 Part series on introducing a horse to the clicker.
Alexandra Kurland theclickercenter.com theclickercentercourse.com
My thanks to Cindy Martin for organizing and hosting the November clinic, and to all the clinic participants, especially Wendy Stephens and her beautiful Nick.
Please note: This article gives you wonderful details to get you started with the clicker, but it is not intended as complete instruction. If you are new to clicker training and you are looking for how-to instructions, you will find what you need at my web sites: